VPN On WSL – Is It Easy?
There may be times when you want to run a VPN on WSL – is it even possible? Should you do it? Answers are here

Last Updated: February 15th, 2022
By: Steve
Contents
Running a VPN On WSL
It may seem a strange requirement to want to run a VPN within the WSL but there are a few good reasons why you may want to do this which I’ll go into more detail below. But is it even possible to run a VPN client in WSL?
Well, I can tell you it is, and it works pretty well. But, I’ve only tried this on WSL2 and I highly doubt it’s at all possible on WSL1 because the network devices probably don’t exist. But if you know it’s available on WSL1 then please let me know by commenting down below.
If you’ve been to the site before you’ll know that I love pushing the boundaries of what WSL can do, for example by running a full Gnome Desktop on Ubuntu, or full KDE Plasma on Ubuntu within WSL. This idea of running a VPN on WSL is no exception. And there’s one really good reason for wanting it, though you might have other reasons you want it to.
Why Run A VPN From Within WSL?
There’s plenty of great VPN clients available for Windows and probably less available for Linux. Plus Linux VPNs often only come with a command line option, not a graphical interface. And if you’re not running a desktop environment in your WSL then you’ll only actually be able to run a command line option anyway.
So why would you want to run a VPN inside WSL and not just run it from Windows and know that the traffic from the WSL instance is routed over the VPN anyway? This is a good question and depends a little on what you’re trying to achieve. But here’s why I run a VPN inside WSL as opposed to running it on the Windows side. (Actually, I do both sometimes – see below).
1. Provide easy access to services running inside WSL from the Internet.
I do a fair bit of development work and host a number of services on the internet. Generally for this I use a VULTR VPS Server (they’re the cheapest, fastest and most reliable) for the live servers since their internet connection is more stable than my own. However, I also have some servers at my home address which run some things that I want to be able to access from the internet when I’m out and about.
I have one desktop computer at home that I use for various purposes such as Nextcloud storage, ZoneMinder etc. It’s convenient to have these things running under Docker on WSL and keep the desktop itself as Windows (so I can play games on it primarily)! It’s cheaper to do all this one machine and there’s no way that running Windows in a VM and having Linux as the main OS would work for playing games properly. So, the Linux services I want to run are inside WSL.
Running a VPN that allows Port Forwarding such as the one I use (see below) lets me run the Linux servers I want to run, in Docker containers, under WSL and easily have those services appear on the internet. Storage fees and bandwidth charges would cripple me if I wanted these things hosted on a real VPS though.
It is possible with some fairly complicated routing options and messing around with Windows Firewall scripts to be able to do it without using a Port Forwarding capable VPN but I like the simple life and setting up PureVPN to do what I want was just perfectly simple and reliable.
2. Make WSL traffic appear to come from different place/country to Windows traffic.
One of the other things I do (in case you didn’t notice) is run some affiliate marketing sites. This one, most-useful.com is where I put all the techie type stuff that I like to tinker with and hope that it helps people. But I also run various other sites which are paid for by affiliate marketing of some description or another.
Those affiliated sites often have different affiliate offers for different parts of the world. It can be tricky to check that the affiliate links are working properly when you only have the one IP address. By running the VPN In WSL instead of Windows I can check my UK affiliate links (since that’s where I am) from Windows, and check the US ones from the WSL instance using a GUI Desktop WSL along with a VPN on WSL connected to a US server. I can see everything side by side and compare and contrast.
I also use this method a fair bit to determine my search engine optimization. It’s all well and good navigating to Google.com to put in a search term, but Google knows I am in the UK and still gives me UK-centric answers. A lot of my website traffic comes from the US though and I want to check where I rank for US visitors. I can compare and contrast Google results easily, side by side, without having to disconnect and reconnect.
Put simply, running a VPN on WSL just improves my workflow and saves me time.
Setting Up A VPN On WSL
Choose Your VPN Provider
If you have a variety of VULTR servers or equivalent with some spare capacity in the countries you want to appear to be originating from, then you can add an OpenVPN server service fairly easily to one or all of them, which will of course save you the cost of a third party VPN provider and you’ll know what data is being kept about you. But you’ll need to be pretty accomplished with Linux servers and setting up OpenVPN for this one to work. Setting up the OpenVPN server isn’t too difficult and I’ll be writing an article shortly about that. But the Port Forwarding option isn’t going to be anywhere near as easy. And you won’t have the variety of different countries to choose to connect to – just the ones where your VULTR server is hosted.
So I did some research and chose PureVPN for my purposes. You could choose any number of them, but it’s worth having a look at https://thatoneprivacysite.net/#detailed-vpn-comparison because not all VPNs are the same and that site is a definitely unbiased non-affiliated source for VPN provider information. PureVPN comes out pretty well in his list of recommendations. PrivateInternetAccess (PIA) also rates highly and has an excellent Linux client, as well as supporting dedicated IP Addresses (for an additional fee) and port forwarding.
If you’re wanting to expose your WSL services onto the Internet, PureVPN and PrivateInternetAccess were some of the only VPN Providers I found that actually allows port forwarding to make this easy. Perhaps the others do it and don’t advertise it though? But using PureVPN’s port forwarding made exposing my chosen WSL services to the internet really easy.
Set Up SystemD Genie
PureVPN on Ubuntu requires SystemD to run as a service in the background – and WSL doesn’t come with SystemD normally.
If you’ve already set up a full desktop GUI from our other guides you can skip this step as you’ll likely already have SystemD Genie installed and working. If you haven’t got Genie installed or don’t know what I’m talking about, keep reading!
To install SystemD Genie, follow this link to Arkane Systems to get detailed instructions for installing Genie. You’ll need to install the Microsoft modules before installing Genie. Microsoft’s documentation isn’t especially beginner friendly or clear – so you can follow the instructions below (but bear in mind they may change the way it all works and this advice will then stop working) before visiting Arkane Systems to install Genie.
Install DotNet Dependencies
wget https://packages.microsoft.com/config/ubuntu/20.04/packages-microsoft-prod.deb -O packages-microsoft-prod.deb

sudo dpkg -i packages-microsoft-prod.deb

sudo apt update

sudo apt install dotnet-runtime-3.1
Once you’ve done that, visit Arkane Systems Github Page to find out how to install Genie.
Start SystemD-Genie
Once Genie is installed, you can start it with the command
genie -sThe only thing you’ll see to show you that it’s successfully completed will be that your command prompt has changed to include a -wsl suffic on your hostname. But in the background, your PureVPN service should now be running.
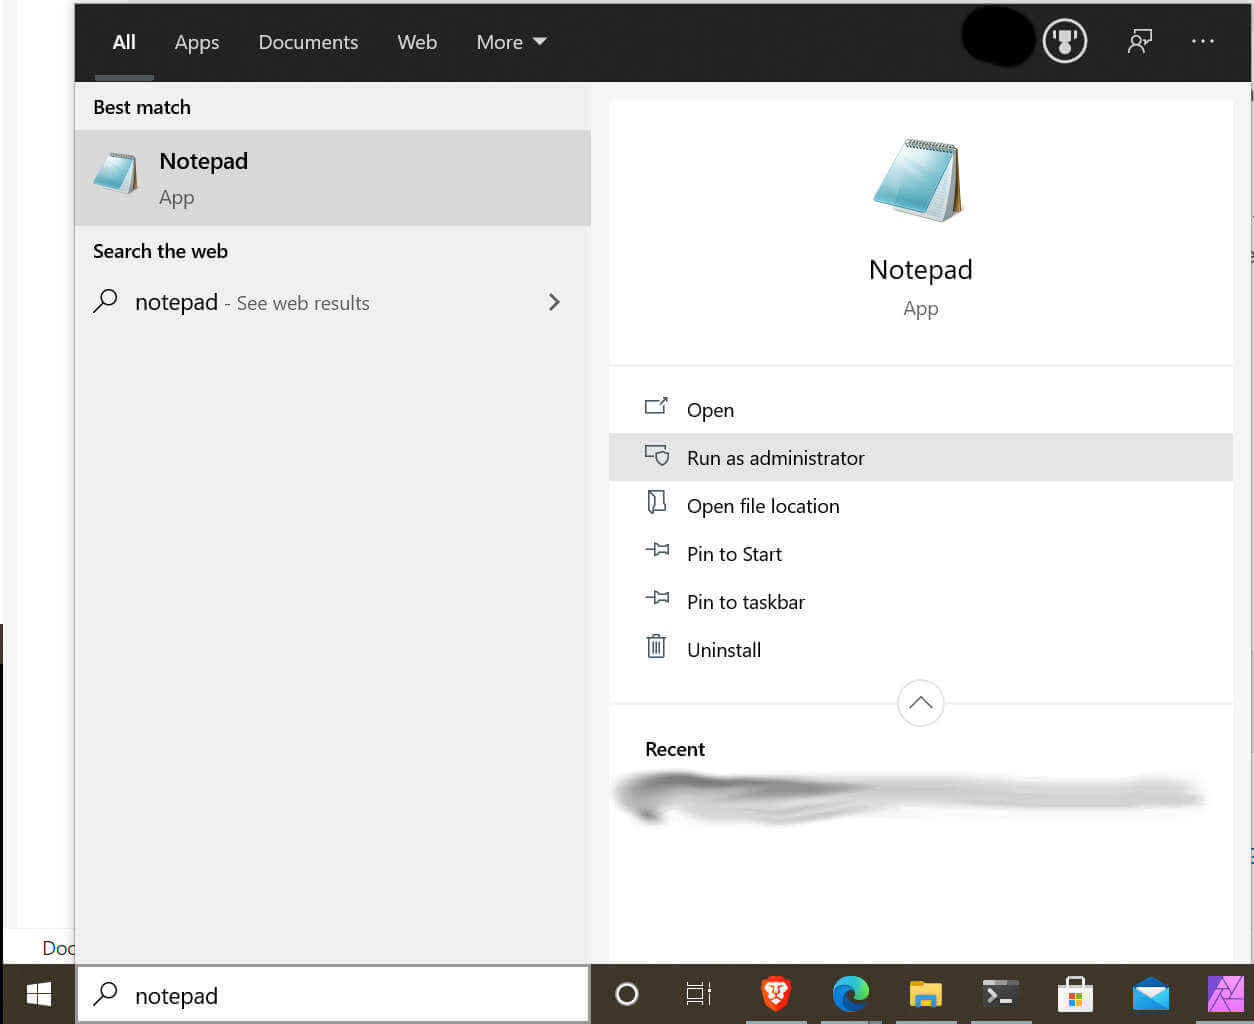
This command is only for initial testing – once you’re sure everything is setup correctly, I recommend using genie -i from a startup script which you can run from the Windows Startup folder. To do this, from the Windows side, press the Windows key and type notepad in the Search box. When Windows gives you the various options (see the screenshot below) make sure you click the option to run as administrator. If you can’t see it you may have to click the little down arrow just underneath the Run option.

Add the following code to the Notepad window;
rem Create startup link for WSL Genie
start /min wsl genie -i
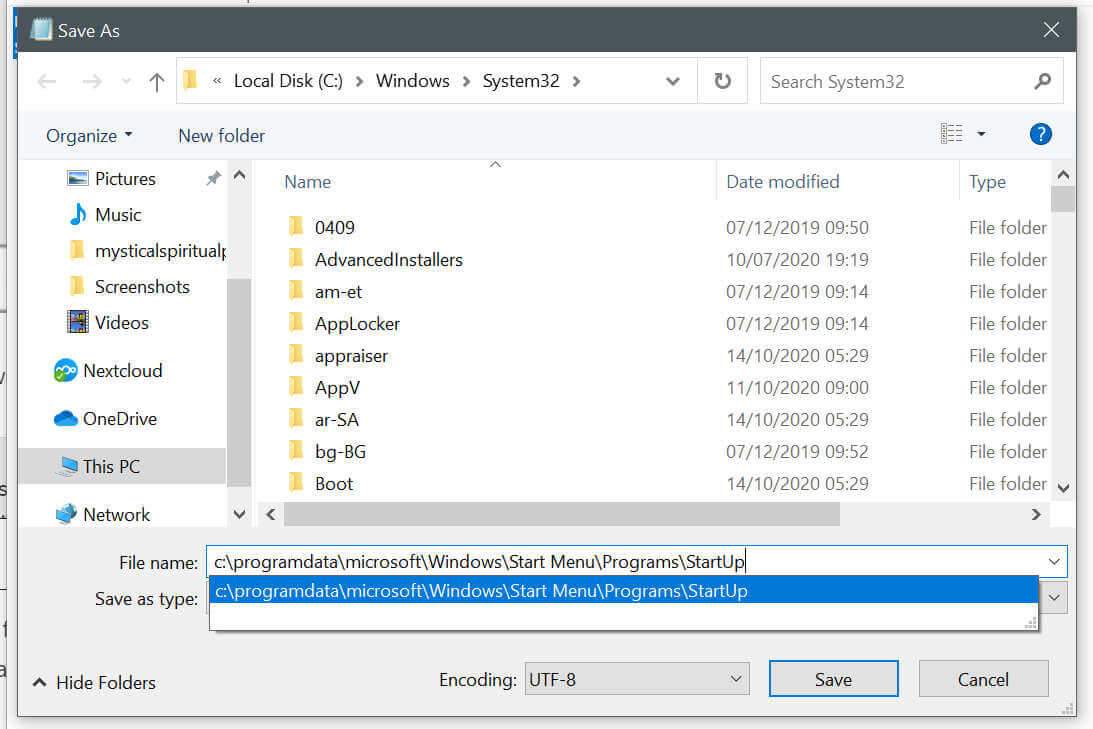
Then save the file in the C:\ProgramData\Microsoft\Windows\Start Menu\Programs\StartUp\ directory. You probably won’t be able to see the ProgramData directory in the main window – but you can type the path in manually into the File Name box and then press return. If you haven’t typed a filename on the end don’t worry, Windows will just navigate to the desired directory for you. Switch the Save As Type to be All Files (*.*) instead of *.txt and choose a name. The picture below should help if you’re confused.

You can call it whatever you like, but I called mine start-kde.bat because that’s what I was working on when I first created it. You might want start-genie.bat since that’s really what it’s doing!
Now when you login to your Windows account your WSL Genie will be started automatically. You may not want that. If not, don’t do the above, but when you want to run PureVPN in WSL just open a WSL terminal and type;
genie -iSetting Up PureVPN in WSL
So, having got that out of the way, how do we setup PureVPN on WSL?
Firstly you’ll need to download the Linux client. If you’re using the Ubuntu WSL instance you can grab the Ubuntu version and download it to your WSL instance.
wget https://s3.amazonaws.com/purevpn-dialer-assets/linux/app/purevpn_1.2.3_amd64.debThe command above works at the time of writing but may move at any time. A better option might be to visit https://www.purevpn.com/download/linux-vpn#linux_distribution_ID from Windows (or setup your WSL to run a Gnome GUI or a KDE Gui) and then copy the .deb file across to your WSL installation.
You’ll also need to sign up for the PureVPN Trial – it’s US $0.99 for a 7 day trial which should give you enough time to work out if it’s going to be useful for you.
Having grabbed the PureVPN client, it’s a simple install;
sudo dpkg -i purevpn_1.2.3_amd64.debThe command above assumes that’s the name of the .deb you downloaded of course. Substitute the name for whichever file you actually downloaded if this article has gone out of date.
Once you’ve installed PureVPN on WSL it’s a simple case of running the command line PureVPN client.
# Login to PureVPN
purevpn -li
Then;
purevpn --connectThe above command will connect you to the fastest available server
purevpn --connect "United States"will connect you to the fastest server in the US for example. PureVPN has servers in more than 140 countries allegedly. You probably won’t need half of them!
Disable Resolv.Conf Automatic Updates
If you want to use a VPN on WSL you probably are going to need to disable the automatic updates of /etc/resolv.conf that WSL does. This may break some of your other scripts if you’re using the entry in resolv.conf to determine what your host IP address is though.
The reason you’ll need to do this is that the VPN will want to rewrite /etc/resolv.conf to use its own nameservers. Otherwise, your main traffic will traverse the VPN but your DNS traffic won’t – and if you’re security conscious (ie, wanting to not let your ISP see where you’re visiting) you won’t want them seeing your DNS traffic either) then this is a problem. If you’re only using the VPN on WSL to see what your sites look like from a different country then you probably won’t need to worry.
To disable WSL from automatically generating /etc/resolv.conf you need to follow the following commands;
sudo nano /etc/wsl.confit may not exist. Add the following contents;
[network]
generateResolvConf = false
Save the file and restart your WSL instance with PowerShell command wsl –shutdown or wsl -t [distro-name]. Note that the first option will shutdown ALL WSL instances with the latest WSL.
Reopen your WSL terminal and issue the following commands;
sudo rm /etc/resolv.conf
sudo nano /etc/resolv.conf
The /etc/resolv.conf that will be present after you disable the automatic generation will be a symlink to /run/resolv.conf and it’s not writable by anyone even root. So the rm command removes that symlink first, then we recreate it with the nano command. Add the following contents;
nameserver 1.1.1.1
nameserver 1.0.0.1
This will add two new nameservers which are publicly available from Cloudflare and generally quicker then even your ISPs own nameservers. You can use Google’s at 8.8.8.8 and 8.8.4.4 if you prefer – and if you trust Google…
PureVPN will change this file when you connect the VPN and reset it back when you disconnect. In this way, your DNS lookups won’t be leaked outside of the VPN on WSL either.
Does VPN on WSL Work?
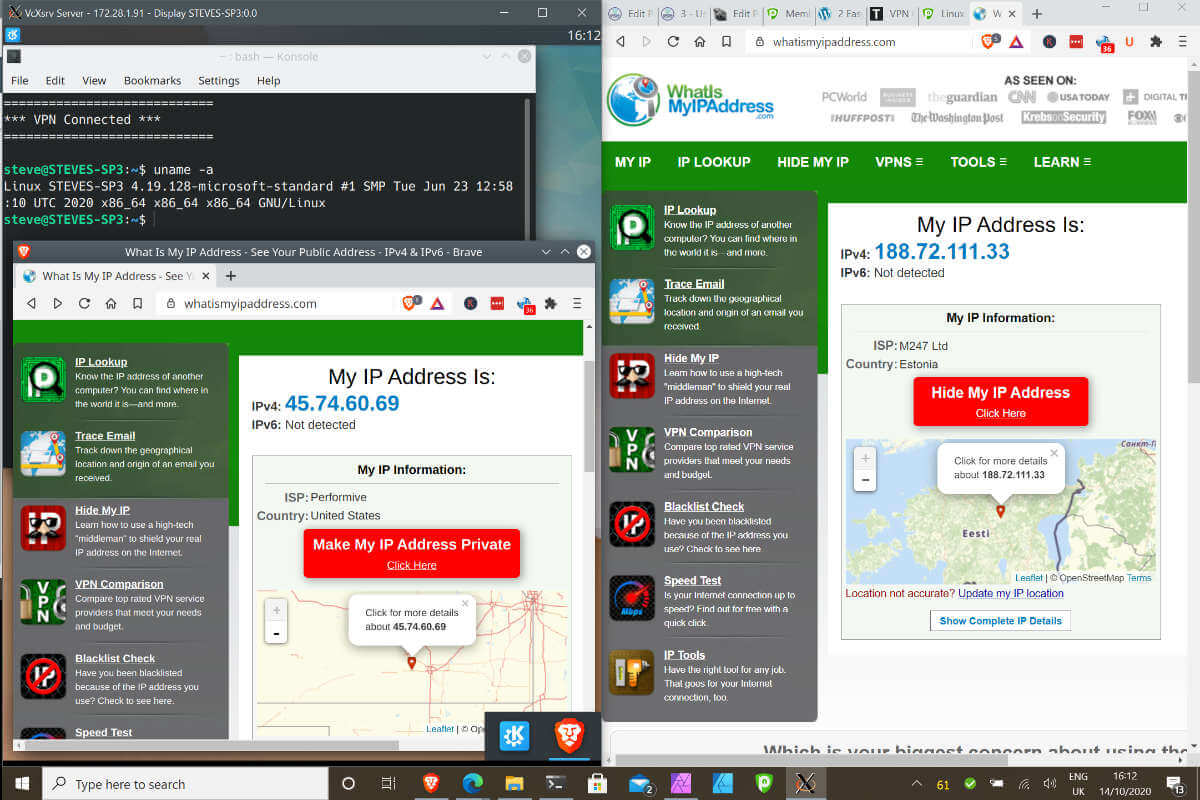
The screenshot below shows my WSL Running KDE Full GUI Desktop next to my Windows browser session (both running Brave Browser) and showing completely different IP addresses and completely different countries. And the integration that goes with WSL works properly so things like Visual Studio Code and Docker function properly.

Restarting PureVPN Service If It Breaks
Every so often I experience a weird failure whereby the port forwarding won’t work properly or the connection cannot be made. I’ve found it’s generally after I’ve run the VPN client on Windows and then want to switch to run it in WSL. It’s been trivial to fix and doesn’t (thanks to the wonder of Genie) require a reboot. Just issue the commands from your WSL session;
genie -u

### Wait a few seconds

genie -i
Doing that resets all the SystemD services. Do be aware that if you have a GUI desktop running it will also be restarted.
Benefits of PureVPN for VPN on WSL
I’ve gone over the use cases that I use this for so I won’t look at them again. You might have other reasons why you want to use a VPN from within WSL rather than from the Windows side. But the following are the reasons I settled on PureVPN rather than any other.
Anyway, as I said originally, I’m not here to sell you PureVPN (or PrivateInternetAccess for that matter) – but if you do want to use it on WSL and make it easy to set up following my instructions then the button below is a link to get your 7 day trial for $0.99. If you sign up through my link below I will be paid a small referral (affiliate) fee but that doesn’t change the price you’ll pay. And I only recommend PureVPN because that’s who I’m using. You can substitute any other VPN provider if you already have one or don’t want to use PureVPN.
Click here to get your 7 day trial of PureVPN
If you have any questions, comments or feedback please do leave a comment below and I’ll try to help as best I can. Thanks for reading and I hope you found this post useful.


