Using Fail2Ban and Cloudflare to Protect WordPress Site
In this post we learn how to protect WordPress sites from brute force password hacking attempts using Cloudflare and Fail2ban

Last Updated: February 25th, 2023
By: Steve
Contents
If you’ve used WordPress for more than a few minutes, you’ve probably already been exposed to at least 2 ‘brute force’ attacks from unsavory players on the internet. These attacks come from automated systems, who are set up just to find vulnerable WordPress installations that they can then use to spread malware around.
It’s a significant problem and if you’re self hosting your WordPress site it’s one you’d do well to try to avoid. Managed WordPress hosting will solve this problem for you, and if you’re not tech savvie then it’s probably better to pay someone else to look after this headache for you. But if you’re looking to create your own secure WordPress site then read on.
Why is it a Problem?
There’s a whole raft of reasons why these brute force attacks are a problem. The most obvious is that they generate large amounts of traffic directed to your website and cost you in terms of bandwidth and processing power. You might not think this matters, but there’s been times where I’ve logged in to my host to discover it’s using loads of processing power and my websites are running really quite slowly. And it’s all because of the number of automated bots trying to discover usernames and passwords on the site so they can automatically upload malware to it. Blocking these bots returns the server to a speed demon.
Plus, if these bots do find a username and password they can use, they will use your site to spread malware. Don’t be part of the problem, get it locked down before it becomes a problem. If you do begin spreading malware (even without your knowledge) Google will penalize your site heavily and you may never fully recover. I know, I’ve been there.
Fail2Ban Doesn’t Stop IP Addresses Through Cloudflare
One of the biggest problems with using Cloudflare Free Tier as a Caching CDN for your website is that you can’t easily block unsavory traffic automatically. You can configure Apache or (in my case) Nginx to see the addresses that requests are coming from – but when you try to block them using fail2ban the traffic still comes through.
If you’re wanting to configure Nginx to see the actual user’s IP address instead of a Cloudflare address then have a look here…
That’s because although the Nginx or Apache log files show the client’s IP address, the actual source of the request is in fact a Cloudflare address. You’ve blocked the bad actor’s source, but that’s not who’s actually speaking to your server. This, without the little trick I discovered when trying to solve this problem, renders fail2ban absolutely useless at blocking XMLRPC or wp-login attacks against your site. And these are the most prolific hack attempt you’ll experience and worth being able to block.
Fail2Ban Can Be Configured To Talk to Cloudflare
However, there is a way to use Fail2ban to talk to Cloudflare and block the suspicious traffic before it even reaches your server. I use Virtualmin to do this, but you can do it manually if you don’t run Virtualmin.
If you do a quick search around this you’ll find some instructions about updating fail2ban to properly talk to Cloudflare. I think these instructions are probably out of date for 2023 as I didn’t need to update it at all. But maybe that’s Virtualmin?
Step 1: Create a Fail2Ban Log Filter
Fail2ban log filters are how you tell Fail2ban what to look for. We’re going to use this to create a fail2ban wordpress filter or two. So in the case of XMLRPC, a popular WordPress exploit pathway, we need to create a regular expression (a search expression if you will) which will match a log request to this resource. In this case, a log line from Nginx will look like the following;
184.75.221.211 - - [25/Feb/2023:12:09:05 +0000] "POST /xmlrpc.php HTTP/2.0" 200 403 "-" "Mozilla/5.0 (Windows NT 10.0; Win64; x64) AppleWebKit/537.36 (KHTML, like Gecko) Chrome/100.0.4896.127 Safari/537.36"There’s some important bits here. The first part is the IP address of the client. But, you’ll need to have installed some extra Nginx configuration to make sure you’re seeing the real client IP address and not one of Cloudflare’s IP addresses. You can see how to do that below.
The second part is the date of the request – and Fail2ban will need that to decide when the ban expires if it gets implemented. The third part – the “POST /xmlrpc.php” is the page that the client has requested. Since we’re trying to ensure someone can’t access that page more than a reasonable amount in a given time frame, this is the part of the log-line that we need.
So, we’ll create a Fail2ban Log Filter that looks something like this;
^<HOST> - - \[.*\] "POST \/+xmlrpc.php.*$The ^ tells Fail2ban that this expression starts at the beginning of the line. The <HOST> part tells fail2ban that we’re looking for a host-name or an IP address and that if it finds it, it’s to store that so we can use it for actually doing the banning. The rest of the line is regular expression syntax to find what we’re actually looking for.
It’s important when designing these (if you decide to protect other pages for example) to be as specific as possible whilst still matching the log lines you intend. So you’ll notice that I’ve included the POST, as well as the / (and in fact, I search for multiple / using the + modifier there because some scripts ask for //xmlrpc.php or ///xmlrpc.php so if I search for only 1 / these would be missed).
Using the very same logic we can create a second fail2ban log filter to create a fail2ban wordpress wp-login filter;
^<HOST> - - \[.*\] "POST \/+wp-login.php.*$If you want to do this using Virtualmin, have a look at the screenshot below for some guidance;
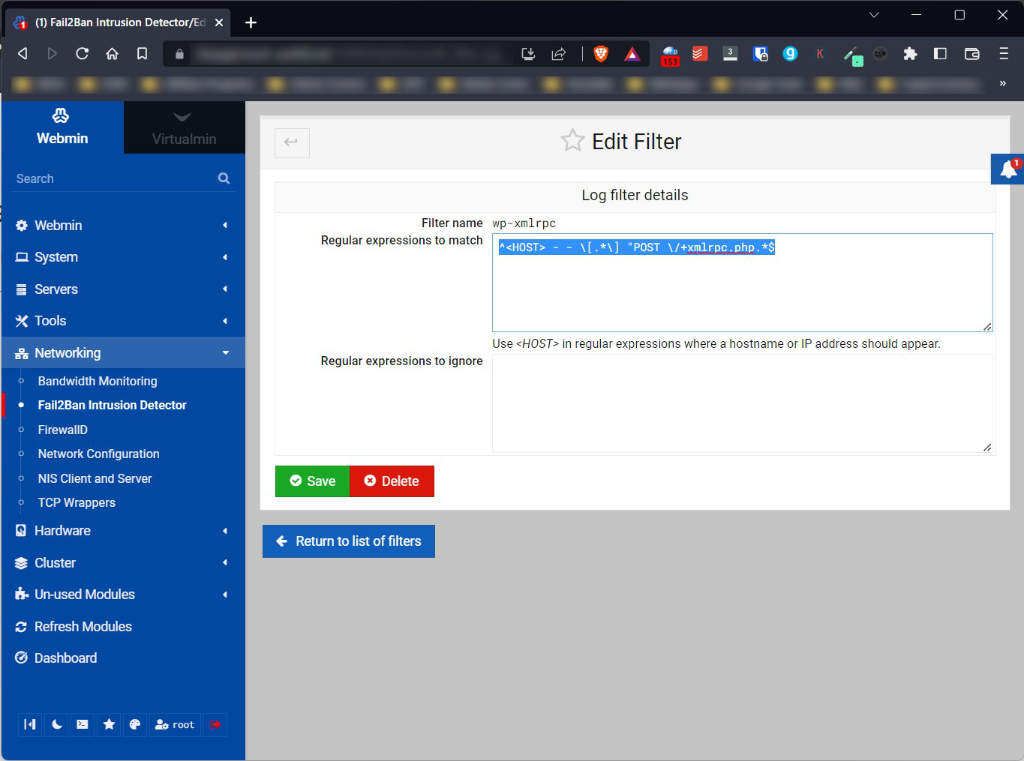
If you want to do it manually, you’ll need to edit wp-xmlrpc.local in /etc/fail2ban/filter.d folder to look something like this. You may need to look up how to add filters to your specific fail2ban setup as this file structure may be specific to Virtualmin though (I don’t know, cos I use Virtualmin).
[Definition]
failregex = ^<HOST> - - \[.*\] "POST \/+xmlrpc.php.*$
ignoreregex =
Step 2: Create a fail2ban Filter Action Jail
A filter action jail is where we setup which log files to monitor, how many times we’re allowed to see lines that match the specific log filter, and what to do if we see more of those log lines in a certain time. The actions that are performed are known in fail2ban as ‘jails’.
Once again Virtualmin provides a nice screen for this which you can see below.
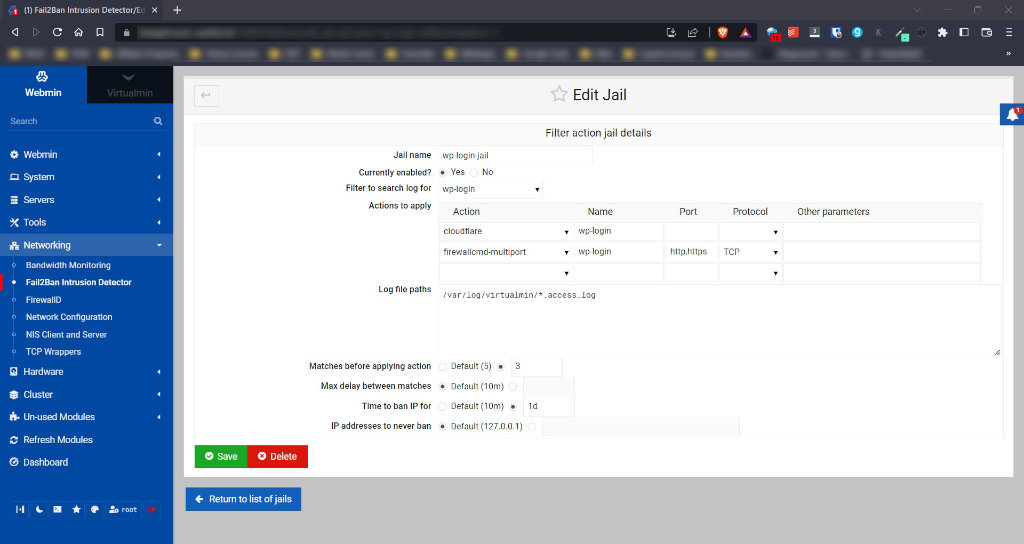
You can call the Jail whatever you want – but I’d make it meaningful so that debugging it is easier if it doesn’t work. Mark it as enabled. The filter to search the log for is the one we created above – in this case wp-login is the filter we created (or wp-xmlrpc depending which one you’re working on).
The actions to apply are where the magic happens – particularly in regard to Cloudflare. Current versions of fail2ban on Virtualmin come with a working Cloudflare action which will ban the IP address (or IPv6) at Cloudflare. I also add the offending address to my own firewall in case they somehow manage to figure out what my direct IP address is and have a go that way. (It’s trivial to do if they want to, so belt and braces here is best).
The log file path is the location of the log file that Nginx (or Apache) logs access requests to. Now, I want fail2ban to watch every website on my server, so I use a ‘wildcard’ here. My web server logs are stored in /var/log/virtualmin and are of the form something like most-useful.com_access_log and most-useful.com_error_log. Nginx logs XMLRPC and wp-login.php access requests into the access log (not the error log, unless something goes wrong) and so I want all websites access logs to be checked. The log file path is therefore;
/var/log/virtualmin/*_access_logBe as specific as possible here – if you only want 3 websites to be protected for example then list them individually. Make sure you’re not including extra log files because processing them will take time and server resources and slow things down for you.
The bottom sections determine how many times in a certain timeframe that the lines specified by the filter can be seen before the jail is triggered. The time to ban the IP address for is self-explanatory, as is the addresses to never ban.
Note: Make sure you specify the Name in the Cloudflare action options, this will be added as a comment to your Cloudflare dashboard so you can see why the address has triggered a block.
Step 3: Modify the Cloudflare Action to Include Your API Details
Before the Cloudflare banning and unbanning action will work you need to provide it with your Cloudflare API details. You can find these under the My Profile menu on the top right of your Cloudflare Dashboard. Perhaps unfortunately it does use the Global API Key rather than an individualized one – but this does have a nice side-effect that any IP bans apply to ALL your websites that are protected by Cloudflare will be safer.
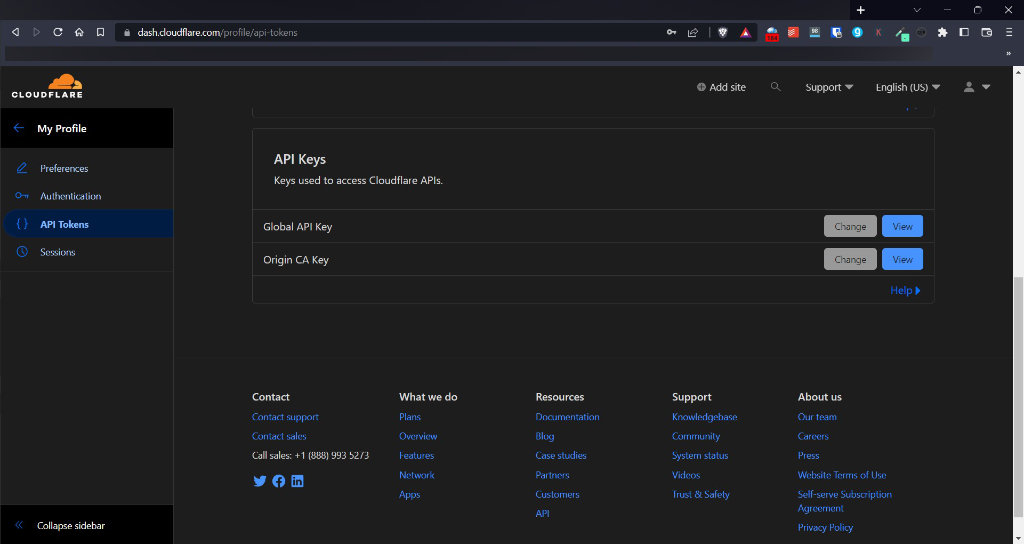
Click the blue view button on the right, next to the Global API Key and copy your API key when it’s shown. You’ll likely have to supply your Cloudflare login details before it’ll show you the API key.
Once you’ve copied that API Key, you’ll need to edit the file /etc/fail2ban/action.d/cloudflare.conf to add the cftoken and cfuser values. You can either SSH into your server or use whichever file manager your server comes with.
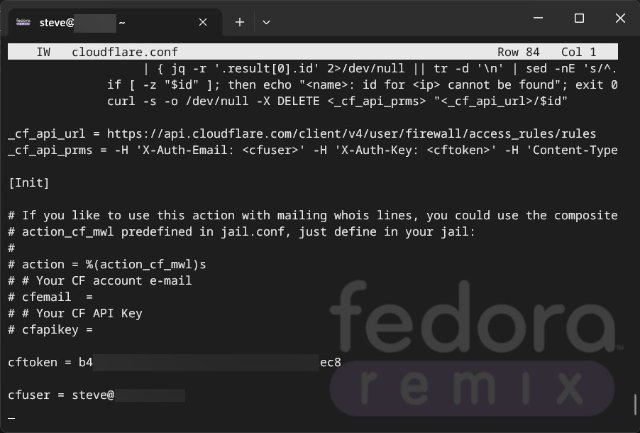
cftoken is your API Key you found from the Cloudflare My Profile section – and cfuser is the email address you use to login to Cloudflare.
Step 4: Modify jail.local
Fail2ban uses various different methods to watch the log file for changes. By default it seems to use a backend called ‘systemd’ – which I think uses fairly limited resources to watch the file for changes. However, Nginx doesn’t log access requests using systemd, but writes directly to the log files. This means that without a small tweak to the definition of the Jail, fail2ban doesn’t pick up any of these access attempts.
For this, the best way is to use a utility called pyinotify. This is a python utility which fail2ban will use if it’s available, but you have to tell it to use it. Of course, it needs to be installed first. You may need to find out how to install it for your particular system, though you could try pip install pyinotify if you have pip installed.
You’ll need to add a ‘backend’ to your jail configuration for each WordPress item you want to ban if it’s improperly used. So for this example we have two resources we’re protecting;
[wp-login-jail]
enabled = true
backend = pyinotify
filter = wp-login
action = cloudflare[name=wp-login]
        firewallcmd-multiport[name=wp-login, port="http,https", protocol=tcp]
logpath = /var/log/virtualmin/*_access_log
maxretry = 3
bantime = 1d

[wp-xmlrpc]
enabled = true
backend = pyinotify
filter = wp-xmlrpc
action = cloudflare[name=wp-xmlrpc]
        firewallcmd-multiport[name=wp-xmlrpc, port="http,https", protocol=tcp]
logpath = /var/log/virtualmin/*_access_log
maxretry = 10
findtime = 5m
bantime = 1d
By default the ‘backend’ line will not exist – you will need to add it for each jail. The rest of the details you can leave as they are. It might be nice if Virtualmin allowed you to modify this through the GUI, but presently it doesn’t.
Step 5: Configure Nginx to See the User’s IP Address Instead of Cloudflare Address
As we mentioned right at the beginning, it’s important to be able to see the actual user’s IP address instead of Cloudflare’s address. When using Cloudflare as a caching proxy and security system, all of the requests that come to your system will come via Cloudflare and all the logs will contain a Cloudflare IP address instead of the real user’s address.
It makes no sense to try to ban Cloudflare’s addresses because of a bad actor somewhere, as doing so will of course render your entire site unusable for everybody.
Fortunately it’s easy to fix with a small additional nginx configuration file.
Create the file /etc/nginx/conf.d/cloudflare.conf and add the following contents;
set_real_ip_from 173.245.48.0/20 ;
set_real_ip_from 103.21.244.0/22 ;
set_real_ip_from 103.22.200.0/22 ;
set_real_ip_from 103.31.4.0/22 ;
set_real_ip_from 141.101.64.0/18 ;
set_real_ip_from 108.162.192.0/18 ;
set_real_ip_from 190.93.240.0/20 ;
set_real_ip_from 188.114.96.0/20 ;
set_real_ip_from 197.234.240.0/22 ;
set_real_ip_from 198.41.128.0/17 ;
set_real_ip_from 162.158.0.0/15 ;
set_real_ip_from 104.16.0.0/13 ;
set_real_ip_from 104.24.0.0/14 ;
set_real_ip_from 172.64.0.0/13 ;
set_real_ip_from 131.0.72.0/22 ;

real_ip_header CF-Connecting-IP;
This will tell Nginx to allow the CF-Connecting-IP header, which Cloudflare sets containing the clients real IP address. It also tells Nginx that the only connections that are allowed to use this header are those that come via Cloudflare IP addresses. It’s important to use only the official CF list for this, as using other IP addresses can leave you vulnerable to trusting a system that is not trustworthy.
Cloudflare’s original documentation of this is here and the definitive source for Cloudflare’s current originating IP addresses are available here.
Save the file and then run the following command;
nginx -tIf there are no errors, you can restart nginx with;
systemctl restart nginxNow your log files should contain the IP addresses of the clients themselves rather than Cloudflare.
Finally…
Once all that is done you’ll need to restart Fail2Ban. You can do this through the Virtualmin GUI if you’re using Virtualmin or you can do it from the command line using something like;
systemctl restart fail2banThis may take a few seconds / minutes if your jailed IP address list is quite long – and it takes longer now that you have Cloudflare to talk to.
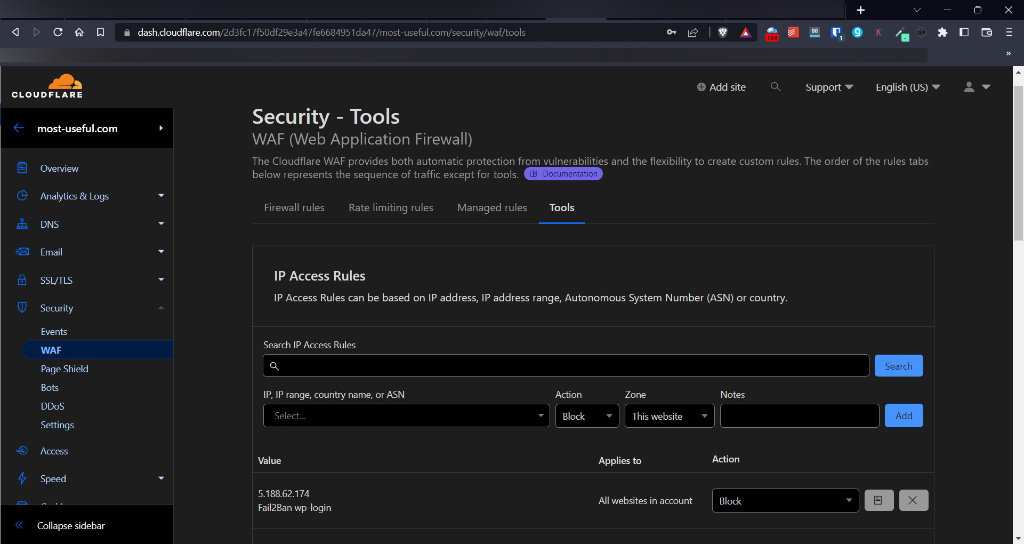
To check that it’s locking addresses out on Cloudflare you can check the IP Access Rules of the WAF (Web Application Firewall) section. See the below screenshot for an example.
What’s In It For Cloudflare?
You may be wondering what’s in this for Cloudflare and why they offer this for free. I was reading up about this recently because I feel this is a phenomenal service for free, but it actually makes a bit of business sense for them.
Firstly, letting me ban these IP addresses at their firewall means their traffic is reduced, both inbound and outbound since their proxy doesn’t need to contact my origin server to be told to go away using and HTTP error code.
Secondly, and perhaps importantly, by me alerting Cloudflare of these potential threatening actors, Cloudflare can better protect it’s paying customers. The ‘bot’ protection feature which Cloudflare uses, can use the information we give it from rules like this to make more accurate protection available and quicker too.
So it’s actually a win-win for them too.
Too Hard? You Might Benefit from a Managed WordPress Solution Instead
If you’re reading this and thinking that it all looks too hard (it’s not really, but it’s a lot of steps and does require low level access to your server) then you would probably benefit from a managed WordPress solution instead. We’ve found Rocket.net to be the best we could find and have used them extensively. They’ll do all this sort of stuff behind the scenes for you without you needing to worry about any of it. Their service is incredibly fast and reliable and doesn’t cost all that much for one WordPress site (or multiple to be fair). Have a look at our Rocket.Net review for more details about them.
Summary
Using Cloudflare with Fail2ban provides a really robust way of keeping your WordPress site protected against bruteforce password discovery attacks. If a hacker can’t easily gain access to your website, and get’s blocked after a few attempts, they’re likely to simply move on to an easier target.
Blocking IP addresses that abuse your system helps reduce resource usage, lowering your bills and improving your service for legitimate users. Blocking brute force password attempts is vital to reduce the likelihood of someone discovering your password – after all, if you have a strong password and the attacker can only have 3 guesses per day before they get locked out, then it’s likely to take them longer than the universe has existed or will exist to crack your password.
Fail2ban and Cloudflare can make this a reality with relative ease and at no cost. For a bit of time, it’s really worthwhile setting this up.
Resources
Fail2Ban Documentation
Cloudflare
If you’ve found this post helpful please feel free to share it using the buttons below. If you have any questions, comments or feedback we’d love to hear from you by leaving a comment using the form below.
Thanks for reading!
Featured Image by fszalai from Pixabay.


