Ubuntu 20.04 Desktop GUI on WSL 2 on Surface Pro
Learn how to install and run Ubuntu 20.04 Desktop GUI on WSL 2 on Windows 10 – and whether it’s any good or not.
Last Updated: February 15th, 2022
By: Steve
Contents
So, if you’ve looked at this website recently you’ll see that I like playing with Linux on my Surface Pro 4. I’ve tried Ubuntu and Fedora 32 with varying levels of success. To be fair, the linux-surface project has done a magnificent job getting Linux to run nicely on the Surface Pro 4 – but there’s a few things missing that are a bit annoying – and some of them are not likely to be resolved.
EDIT: 04 Oct 2020 – Updated to include reference to Win-Kex from Kali. Updated to reflect changes to SystemD-Genie
EDIT: 05 Oct 2020 – If you prefer KDE Plasma (and I highly recommend it, it works MUCH better on the Surface Pro 3) then have a look here – KDE Plasma on WSL 2 on Ubuntu 20.04
Problems with Linux on Surface Pro 4
- The cameras don’t work. They’re not likely to work either to be fair.
- Suspend and resume is problematic, though getting better
- Multitouch is a problem under Fedora because there’s no LTS kernel and the newer kernels are annoying because you can either have single-touch or pen, but not both and not multitouch. The Linux-Surface crew are working hard on this though.
- Windows only programs that I need such as Affinity Photo and Affinity Designer. Yes, I know Inkscape and Gimp are available on Linux (and Windows) and they’re good. But my Mrs uses Affinity – and to be honest the Affinity GUI is just nicer.
Problems with Windows on Surface Pro 4
Privacy, primarily. Linux runs using Open Source software, and is inherently (generally) much better from a privacy standpoint. Unless you’re going to use Google Chrome for Linux it’s unlikely any data is going to get back to Microsoft or Google while you’re using Linux. A prime example of this would be e-mail. GMail obviously collects information for Google. Whether Windows Mail does for self-hosted e-mail is debateable, but it’s likely that outlook.com users will have their data slurped, plus Windows itself sends a bunch of telemetry back to MS.
Can I Get The Best Of Both Windows And Linux then?
Well it’s funny you should ask that. That’s what this article is about – like you couldn’t guess.
Linux purists would argue that this is in fact the worst of both worlds. Windows purists would also argue that this is in fact the worst of both worlds. But, I’m neither. I want what works for me.
I love Linux. I love the latest incarnations of the Gnome GUI. I love the integration that Gnome Evolution offers me with my Nextcloud server for syncing contacts, calendar and tasks across my devices. (It can be done with Windows to be fair, but it’s a bit of a faff). I love the privacy aspects of Firefox under Linux.
But I love the form-factor of the Surface Pro 4 device. It’s so thin, light and once you’ve fixed the screen flicker it’s just an all round powerful yet light, transportable 2-in-1 device that I’ve yet to find a sensible competitor for. And Windows 10 just works better on the Surface Pro 4 hardware. It should, it’s Microsoft’s hardware.
The solution, WSL2 running a full Ubuntu Gnome desktop is what I’m going to show you in this article. WSL2 – Windows Subsystem for Linux V2 is leaps and bounds ahead of WSL1 – and both were unthinkable a few years back. Microsoft allowing me to use Linux and Windows side by side…
Benefits of WSL2 versus a normal Virtual Machine Environment?
For sure, it’s been possible to run Linux in Windows using a virtual machine environment such as VirtualBox or VMWare but these have some significant trade off compared to a ‘bare-metal’ Linux installation or even it turns out, WSL2.
Disadvantages of a VM for running Linux with a GUI on a Surface Pro 4
There’s a few disadvantages that I can see for running Linux on a VM under Windows 10 on a Surface Pro;
- Setup: Installing Linux isn’t for the faint of heart and takes a reasonable amount of time. Usually around half an hour or so. Finding the files to download, including the VM software itself initially. WSL2 is a case of making sure you’re running the latest Windows build ( Windows 10.2004 at time of writing ) and installing Ubuntu20.04 from the Microsoft Store.
- Boot time: Linux boots pretty quickly these days to be fair, but it still takes around 20 seconds or so. Starting the VM and then booting Linux could be around 20-25seconds. WSL, somehow, is almost instant. Most of it must be loaded with Windows booting.
- Memory allocation: Traditional VM software such as VirtualBox will allocate the RAM that you’ve specified you want for your VM upfront. If you allocate 2Gigabytes to your Linux VM, that 2 Gigabytes are no longer available to your Windows host. With WSL RAM is allocated and freed as needed by the WSL system. Having said that, at the time of writing, the WSL2 hypervisor is a bit poor at letting RAM go again… But you can specify a maximum it’s allowed to use.
- No integration with Windows at all: Pretty much the only way you can get files from Windows into the VM with traditional VM software is to share the drive across a Samba share. It’s doable, if you know how. With WSL2 it’s just done for you. And it’s remarkably quick AND easy. I’ll show you later.
Microsoft Visual Studio Code allows you to develop programs to run on the Linux side (for example on an NGINX webserver or Docker container) but show the GUI on Windows. With pretty much native performance.
Using an XWindows setup, you can have individual Linux GUI apps showing up on your Windows taskbar if you wish. I don’t. But you can. And that’s not something you can generally do with a VM setup.
Disadvantages of WSL2 for running Linux with a GUI on Surface Pro 4
Running graphical applications, particularly a full Linux desktop such as Gnome, is not easily setup. Actually, it’s fairly easy to setup – if you know how – but until now there’s no easy guide. That’s what this article is about…
This article is the culmination of various different people’s hard work online. I’ve not really made any of the discoveries that are listed here for how to get a WSL2 Linux Desktop Environment, except that I have brought them all together to make the magic happen easily and automatically when you login to Windows. I’ll list the references and credit for each step as I go through them. This article would not be possible without these other people’s information they’ve provided freely.
So anyway, if you’ve decided you want a Linux desktop environment but don’t want to install a VM or dual boot your system, this is for you. The solution with XWindows provides almost native bare-metal performance in my experience. I don’t have any benchmarks at the moment, though I might do some to test the difference between WSL2, VirtualBox and bare-metal if people want to know.
Installing Linux GUI Desktop on WSL2
Update to Windows 10.2004
The system I am describing requires WSL2. It might work under WSL1 but I suspect not. There’s a few things that likely require a more native looking Linux kernel and environment, which WSL1 isn’t. To install WSL2 you’ll need Windows 10.2004 – which is the May 2020 update. This is available for the Surface Pro 4 now, and might be available using Windows Update itself. If it’s not, you can get the Windows Update Assistant and get it that way. You can find the Windows Update Assistant by clicking here. Install the 2004 update and follow the instructions to make that happen.
Setup Your Surface Pro 4 Windows 10.2004 to enable installation of WSL2
There’s tutorials available for this on Microsoft’s website. You can find this at https://docs.microsoft.com/en-us/windows/wsl/install-win10 – it’s fairly straightforward but does require some command line interaction, either using PowerShell or CMD.
Incidentally, if you’re not familiar with the new Windows Terminal program for accessing Powershell, CMD or WSL then I definitely recommend you checkout Windows Terminal by clicking the link – https://www.microsoft.com/en-gb/p/windows-terminal/9n0dx20hk701?rtc=1&activetab=pivot:overviewtab
Install the Linux Distro Of Your Choice Into WSL2
There’s a few Linux distributions available on WSL2 – the most popular being Ubuntu 20.04 Focal Fossa. This is the distribution we’re using. But Kali Linux is available, or Debian or SUSE Enterprise Server Linux and are also free. There’s other Linux distributions available too – particularly Fedora Core but it’s not free on the Microsoft Store and the alternative way to install it for free is a bit of a pain. We’ll use Ubuntu 20.04.
It’s worth noting at this point that Kali Linux now comes with Win-Kex which is a really promising way forward for getting a full GUI setup under WSL2. I suspect at some point that other distros (notably Ubuntu) may follow suit and this guide will be obsolete when that happens. I’m persevering with it for now because Kali doesn’t meet my needs, but it’s worth a look if you think it might.
To make sure you’re using WSL2 (and it’s important to ensure you are as this tutorial requires WSL2 not WSL) you should open a command prompt or Powershell and issue the following command;
wsl --list -vLook in the version column to make sure that it says Version 2.
Run through the installation process for Ubuntu 20.04 under WSL, including setting up your username and password as per the Microsoft instructions. When you’re finished, open up the Ubuntu 20.04 terminal and follow the procedures below;
Update To The Latest Software Packages And Install Tasksel
To proceed further we need to make sure the Ubuntu installation is up to date. To do this run the following commands;
sudo apt-get update
sudo apt-get upgrade
The information in the following sections is originally provided by u/TDCosta100 on Reddit in the thread titled Tutorial – WSL2 GUI using Xvnc and systemd-genie
You might notice that this tutorial suggests using XWindows versus using VNC. In my testing I found VcXsrv XWindows system to be considerably quicker than VNC – your mileage may vary. In any case, there’s about 95% of what we need to do for either solution provided in the link above. I will outline the steps in this article just in case the original every disappears, but please understand I did not come up with these steps, I merely used them – and modified them later to use XWindows instead.
Install Ubuntu Desktop Components
The WSL2 version of Ubuntu doesn’t come with any desktop / GUI components installed. It saves space, since most people aren’t actually likely to want Desktop components I suspect. I do because I’m weird.
The easiest way to install the Ubuntu Desktop components into WSL2 is to use Tasksel. To do that, from your WSL command prompt (or Microsoft Terminal if you used that) type the following commands;
sudo apt install taskselOnce it’s installed, we need to run it. Tasksel provides an application that allows us to choose various tasks we might be using our Ubuntu installation for. It contains all the necessary packages to make that happen. In my experience though, it’s best to run this once and once only. If you change your mind and decide you want to remove specific tasks again, bad things seem to happen. I ended up reinstalling my WSL Ubuntu installation after changing my mind and altering the tasks using Tasksel.
To run tasksel, it’s simply a case of typing;
sudo taskselChoose the tasks you want your Ubuntu WSL installation to perform. Make sure to include at least the desktop software of your choice – I chose Ubuntu Desktop. I also added the fonts, because why not. And language packs because for some reason English (UK) isn’t installed by default it seems.
Install VNCServer – if you want to
There’s no harm in installing the VNCServer software and indeed, if you want to access your Ubuntu WSL2 desktop from across the internet, then you’ll almost certainly need to stick with VNC as your method of access. XDMCP isn’t good across the internet for various reasons, not least of which because it’s insecure.
You cannot use VNC and XDMCP in this setup – at least I didn’t discover how to.
Installing VNCServer is pretty straightforward and requires minimal setup.
sudo apt install tigervnc-standalone-serverInstall Systemd-Genie
The default WSL2 Ubuntu is quite a cut-down version of Ubuntu. For one thing it doesn’t come with a GUI (but we fixed that). It also doesn’t come with the SystemD system, which is responsible for making sure tasks run at startup and is a core part of the standard Linux distribution. Various parts of the desktop software expect SystemD to be present and operational and will fail if SystemD isn’t present. Unfortunately, we can’t run SystemD directly under WSL2 because part of the integration with Windows relies on some specific Microsoft tweaks. But we can fake SystemD using SystemD-Genie – which is what we’re going to do now.
But SystemD-Genie relies on DotNet framework – presumably to hook SystemD into WSL using Windows APIs. So we need to install DotNet first;
wget https://packages.microsoft.com/config/ubuntu/20.04/packages-microsoft-prod.deb -O packages-microsoft-prod.deb

sudo dpkg -i packages-microsoft-prod.deb

sudo apt update

sudo apt install dotnet-runtime-3.1
Once DotNet is installed we can install SystemD-Genie by following the instructions found at https://github.com/arkane-systems/genie
I previously had instructions in this document, but they recently changed and it struck me that the best place to get those instructions is from the author 🙂
Configure the XVnc Server – specifically the passwords
All the software (for running via VNC) is now installed. We need to setup VNC passwords for a few users to make sure everything runs smoothly. You’ll need passwords for your user, the root user, and potentially the GDM user (depending on if you want to use GDM or LightDM). To set the passwords use the following commands;
vncpasswd

sudo vncpasswd

sudo -u gdm vncpasswd
If you want to allow other WSL2 users to login, you can create more VNC Passwords for those users by running that last command again with a different username. If you’re going to use LightDM instead, then you don’t need the last line. There’s a very good reason to use LightDM too.
Replace The Standard X server
You do not need to do this if you plan on using XDMCP or anything using VcXsrv
Normally, on a Linux machine, the X Server is the software platform that provides the graphical environment onto the display (ie, the screen). On WSL2 we cannot run an X Server that provides the graphical display onto the screen because that’s Windows’ job.
This is why we will need either an X-Windows server implementation for Windows (in which case what we’re about to do is irrelevant, since the X-Server in WSL2 will never be started anyway) or we need to replace the standard X-Server with XVnc – which is what we’re going to do here. We’ll look at the Windows X-Server implementation a bit later because it’s actually in my experience quicker.
To replace Linux’s built in X-Server though, we need to make the following changes;
We should probably back up the original Xorg file – although realistically it’s never going to work in the WSL environment anyway so it doesn’t really matter if it gets lost. But for good practice we should…
sudo mv /usr/bin/Xorg /usr/bin/Xorg_oldThen we need to create a new Xorg file. We do that using a standard text editor that comes with WSL2 and indeed Ubuntu.
sudo nano /usr/bin/XorgYou’ll enter the nano editor. Then copy and paste the code below into the nano editor using right mouse click -> Copy and then pasting into the WSL2 terminal screen using the CTRL-V or CTRL-SHIFT-V keystroke.
#!/bin/bash
for arg do
  shift
  case $arg in
    # Xvnc doesn't support vtxx argument. So we convert to ttyxx instead
    vt*)
      set -- "$@" "${arg//vt/tty}"
      ;;
    # -keeptty is not supported at all by Xvnc
    -keeptty)
      ;;
    # -novtswitch is not supported at all by Xvnc
    -novtswitch)
      ;;
    # other arguments are kept intact
    *)
      set -- "$@" "$arg"
      ;;
  esac
done

# Here you can change or add options to fit your needs
command=("/usr/bin/Xvnc" "-geometry" "2736x1824" "-PasswordFile" "${HOME:-/root}/.vnc/passwd" "$@")

systemd-cat -t /usr/bin/Xorg echo "Starting Xvnc:" "${command[@]}"

exec "${command[@]}"
I’ve set the geometry parameter to match the full screen resolution of the Surface Pro 4 to provide the sharpest display experience but you can adjust this to suit your tastes. Smaller values provide less screen resolution but put less stress on your computer to display them, so it’s up to you. You may find that 1368×912 gives you better performance for example. If you use the larger resolution you may want to switch the scaling to 200% later on.
Don’t forget to set the permissions for the Xorg script, since it needs run permission;
sudo chmod 0755 /usr/bin/XorgTweak SystemD-Genie for Ubuntu
We’re almost done, promise. At least for the VNC server way of running 🙂
There is no need to tweak SystemD-Genie any more – the latest packages work straight out of the box.
Finally we’re ready to run SystemD-Genie which will start Xvnc server and start Gnome Display Manager (GDM) or Light Display Manager (LightDM).
I recommend LightDM because GDM causes us to need to have 2 VNC sessions. The first to login, which then becomes a blank screen, and a second VNC session to an actual desktop. This is just weird, cumbersome and annoying. It’s epecially annoying because it tripped me up. I advice LightDM because that doesn’t happen with LightDM and it’s just so much more intuitive. Plus the XDMCP session details I’ll go into later will use LightDM because that what I’ve used.
To switch to using LightDM instead of GDM use the following command;
sudo dpkg-reconfigure lightdmChoose LightDM from the options and then choose OK. Ubuntu will set everything up to use LightDM instead. Neat eh?
Start SystemD-Genie – finally
Starting Systemd-Genie is as simple as running a command again. We’ll automate this later to make it happen automatically when you login to Windows, because that’s pretty neat. But for now, just run the following command;
genie -sLogin Using VNC
After a few seconds the Ubuntu WSL session will have initialised the graphical user interface and you can login with VNC. To do this, use your favourite VNC client (I use VNCConnect by RealVNC – which allows connections across the internet or LAN (though that’s a topic for a separate article). And it’s free for non-commercial use) and setup a connection to localhost port 5900. Port 5900 is the default VNC port so you may not need to specify it.
You can tweak your VNC client for a bit of extra performance if you’re using it on the same machine. To do that, switch the encoding to RAW since we don’t need to reduce network bandwidth at the expense of extra CPU work. Personally I didn’t find this offered much on the Surface Pro 4 (which presumably has a decent enough processor not to matter).
Use XDMCP Instead Of VNC
The Windowing platform most commonly used by Linux is based on the X-Windows protocol and has been around for years. One of the advantages of X-Windows is that it was specifically designed to be used across networks (which although WSL2 and Windows reside on the same Surface Pro 4, they’re still effectively communicating across an internal network). Historically, logging in to a UNIX system with a Windowing environment involved a thin, unintelligent client, with all the horsepower being provided by a central server. The protocol used to discover these ‘central servers’ and log in to them is XDMCP.
It’s pretty insecure. But we’re only talking about connections to ourselves, so it’s not really a big issue here.
Grab the X-Windows Server Software for MS-Windows
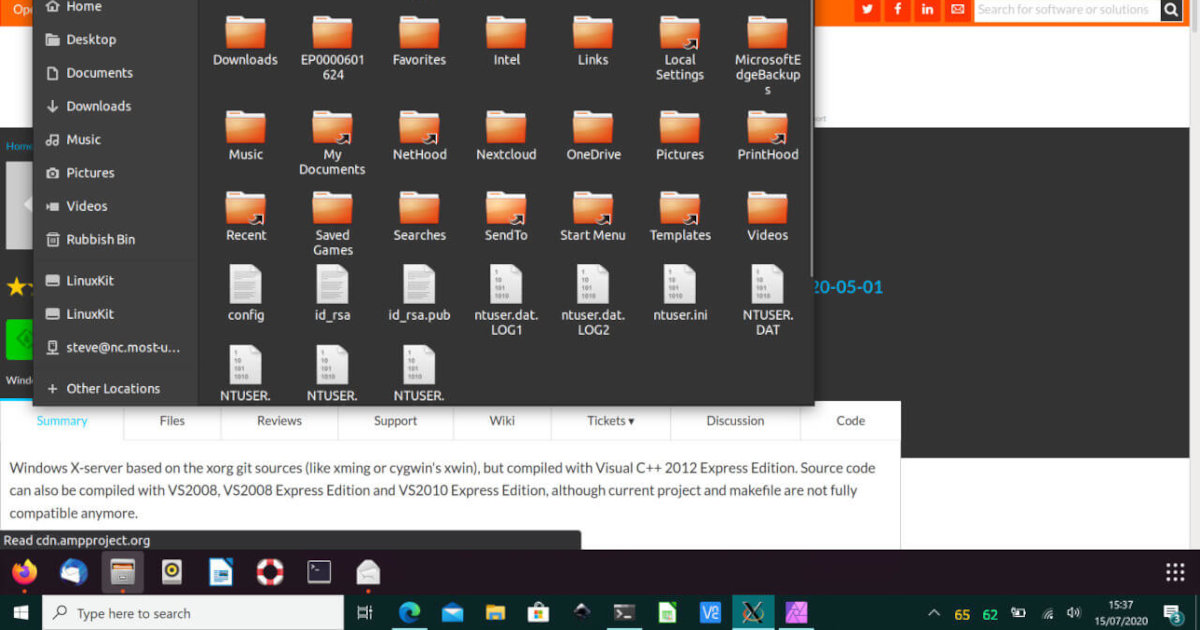
You’ll need some software that understands the X-Windows protocol. For this I use the excellent VcXSrv software which is free and Open Source. It provides an X-Window server on Microsoft Windows. You can download VcXsrv for free at https://sourceforge.net/projects/vcxsrv/
Install that software as per the instructions.
Switch to LightDM
If you’ve not switched to LightDM using the instructions from above, I recommend you definitely do it for running your own X server on Windows. Configuring LightDM to use XDMCP is simple.
Configure LightDM
To configure LightDM to allow us to login using a Windows X-11 Server, follow the instructions below;
sudo nano /etc/lightdm/lightdm.confAnd add the following contents (the file will likely either not exist or will be empty)
[LightDM]
start-default-seat=false

[XDMCPServer]
enabled=true
port=177
Then restart LightDM using the command;
sudo service lightdm restartLogin With VcXsrv in XDMCP mode
Most tutorials for running graphical environments on WSL aren’t running full desktops, so they don’t need to concern themselves with XDMCP since the application that’s being run is usually started from the terminal. In this case though we want the whole Linux desktop to start – and doing that from the terminal is possible, but it’s not exactly native feeling. So we’ll use XDMCP. It’s a little bit to setup but once done it’s quite efficient.
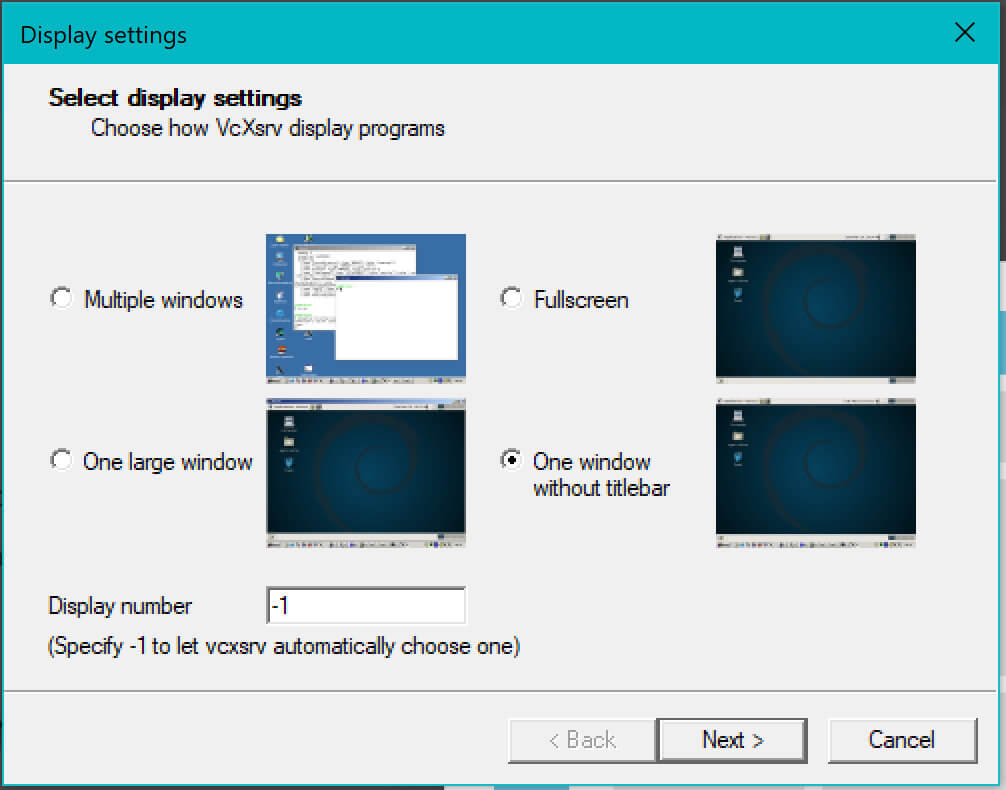
So, you’ve installed VcXsrv from SourceForge using the links above. You’ll now need to find it on your start menu. It’s probably somewhere up the top since you just installed it. It’ll be called XLaunch. Double click that to run and you’ll see the screen to the right show up initially. Click the image to make it bigger if you want a closer look.
You’ll notice we’ve chosen the ‘one window without titlebar’ option here. You can choose whichever option suites you best except Multiple Windows. Multiple Windows won’t work. You can leave the Display number as -1, or change it if you know what you’re doing.
Click Next to proceed
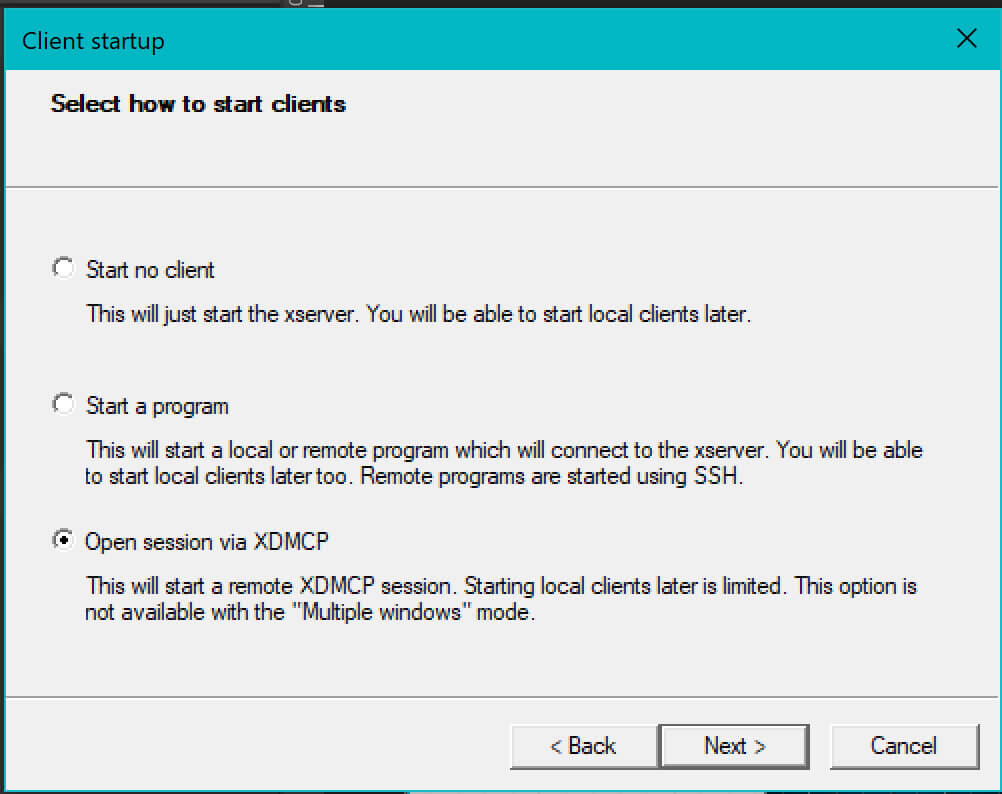
This next screen allows you to choose XDMCP to open the session. This is needed so that you can login to your own Linux desktop session, just as if your Linux installation was running on its own machine.
If you choose the other options you’ll not get a Linux Desktop login session, though you can use the Terminal to start GUI applications if you set the DISPLAY environment variable in the terminal first.
XDMCP is just the most native feel though, which is why we use that.
Click Next to continue
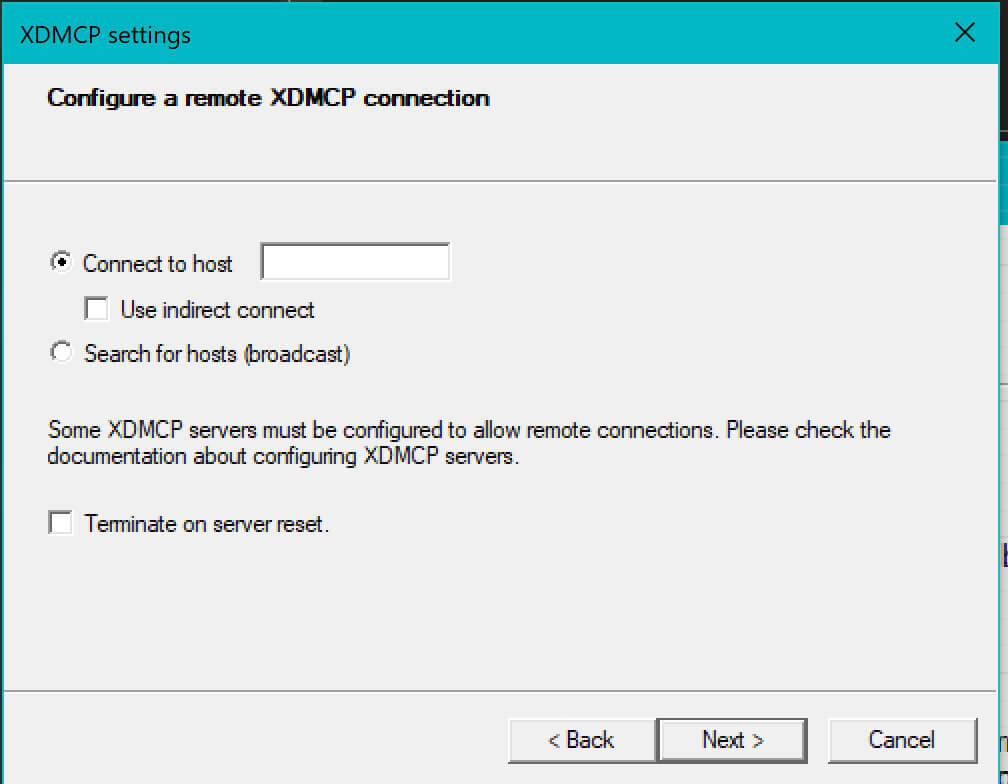
The screen above will be shown next and this screen is used to determine how your computer connects to the XDMCP service running in WSL2. There’s a few options here. Previous tutorials I’ve read said to use broadcast and then select whichever XDMCP service pops up.
I think those tutorials may have been written for WSL1 because this doesn’t work for me. WSL2 uses a virtual network to communicate and doesn’t send broadcasts across from itself to the outside world. This might seem odd, but your Windows 10 platform is considered the outside world to WSL2 – even though they’re on the same Surface Pro 4.
So, we need to Connect To Host. But what host? Again, previous tutorials I found said you can put localhost here. Localhost does not work. I think this is because XDMCP uses UDP transport layer, not TCP. WSL2 intercepts localhost address for TCP connections but does not appear to do so for UDP. So we need to use the specific IP address to make the connection.
This is, without doubt, an annoyance, particularly because the IP address changes every time you reboot, or restart the WSL system. I’ll give you a solution to this shortly so you don’t need to worry about it in the future. But for now, to make sure everything is working, here’s how to find your WSL2 IP Address.
In a terminal (either Ubuntu2004 terminal, or Microsoft Terminal, whichever you installed) type the command;
ifconfig eth0 | grep inetYou may be told that the net-tools package isn’t installed. Install it if that’s the case and re-run the command. The first line should give you the IP address. It’s probably 172.xx.xx.xx. This is the IP address of your WSL2 installation. This is the address to put into your ‘Connect to host’ box in the picture above.
Click Next when you have that address entered.
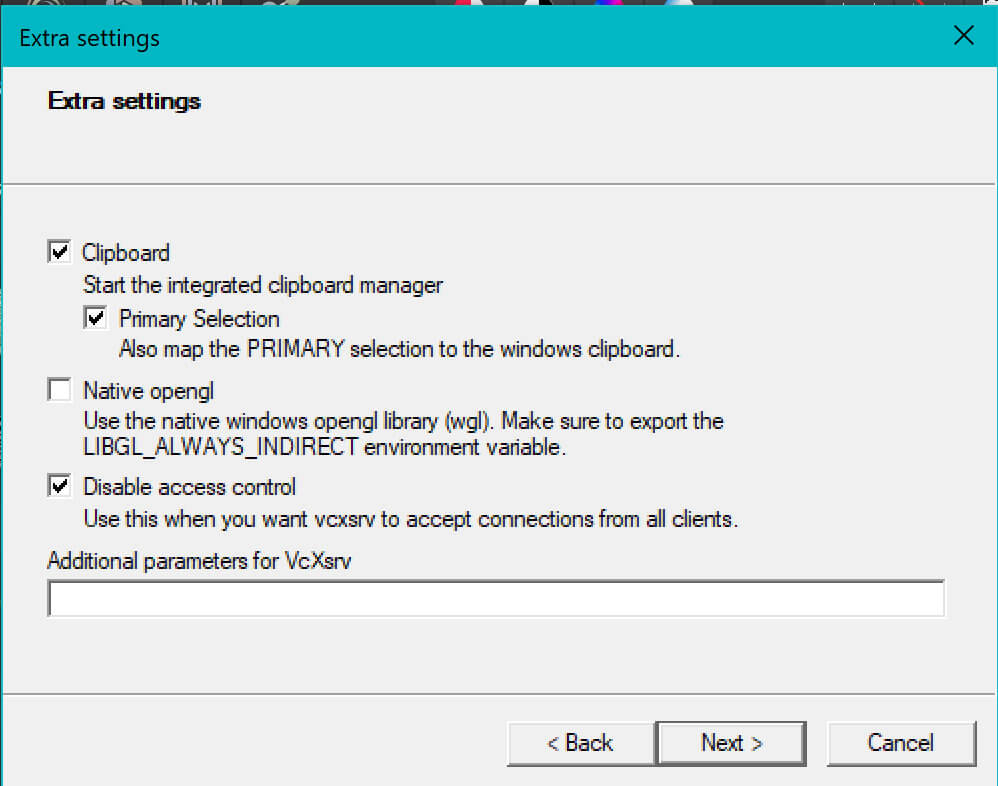
Finally, the screen above will come up. These are options for the connection. I’ve discovered that the Native OpenGL box being ticked seems to make the system run slightly slower, so I’ve left it unchecked. You’ll want to disable Access Control, so I’ve ticked that box.
This does leave your X-Windows server vulnerable to anyone else on your network being able to open X-Window applications on your screen – but in a home environment this isn’t likely to be an issue. You can lock it down more if you want, but I’ll not go into that here.
Click Next when you have the options chosen.
VITALLY IMPORTANT: When you first run VcXSrv (or XLaunch) you’ll get a Windows Firewall popup. You will need to allow it to accept connections on both the PRIVATE and PUBLIC networks. If you don’t allow PUBLIC networks you will not get a connection as the WSL Virtual Network is considered to be PUBLIC. There’s probably a better way to do this – let me know in the comments if you have any better suggestions.
You should then get a nice Window up showing you the Ubuntu login screen as shown below….
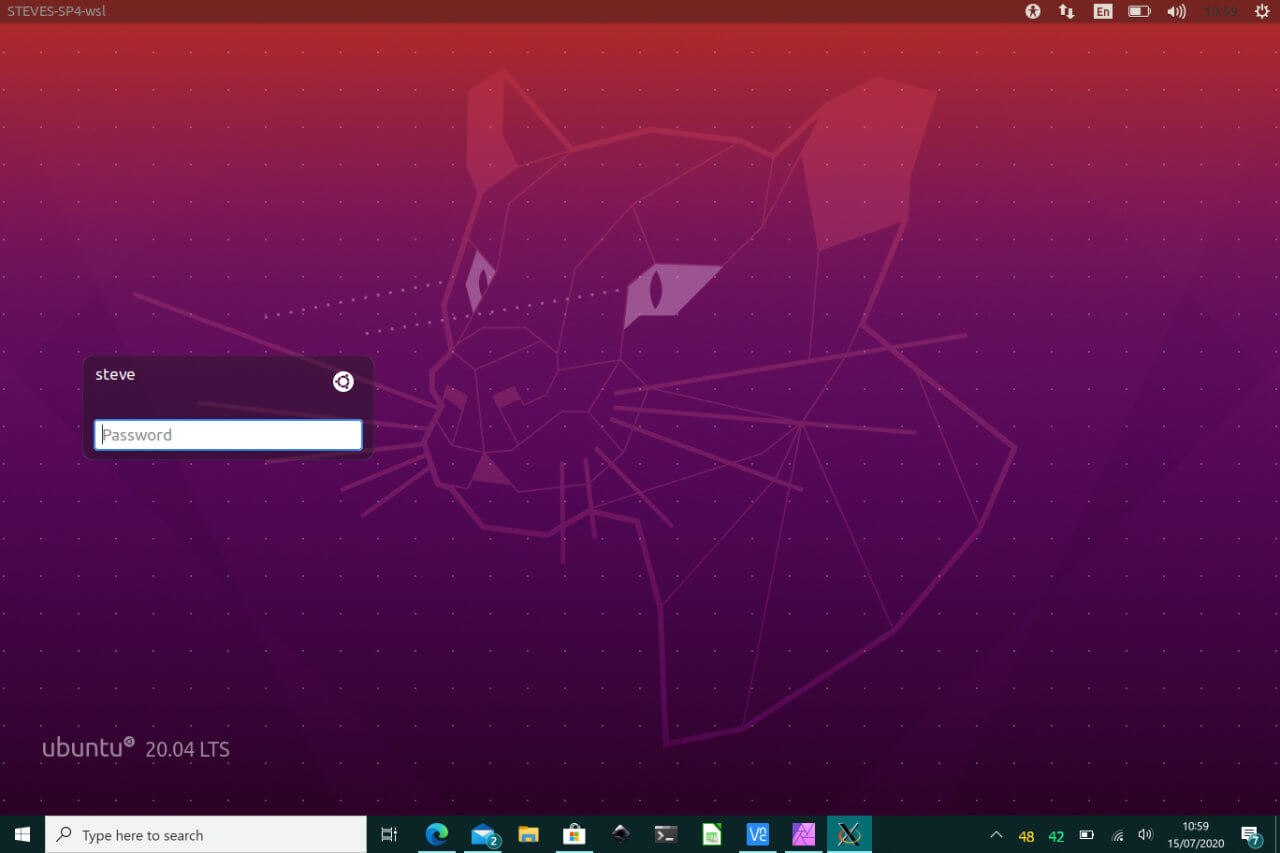
There you have it – you can login and use your WSL2 Linux Ubuntu Desktop just as if it was a normal Linux installation.
Tweaks After Installing
There’s a few things that need to be adjusted to make the whole experience somewhat smoother. We’ve not done those things yet because it’s better to make sure it’s all working before we tweak it. At least that way we can know which of the tweaks broke it all 🙂
These tweaks are in no particular order.
Restrict The Maximum Amount of RAM WSL2 Can Use
At the time of writing, WSL2 is really poor at handing RAM back to Windows once it’s been used by WSL2. You can restart the WSL system to free up all the RAM it was using – but that’s not overly practical sometimes. If that’s the way you want to do it though, use the following command;
wsl -t <distro name>

or

wsl --shutdown --all
However, there is a configuration setting that can set the maximum amount of RAM that WSL will use, in order to keep Windows running smoothly. By default WSL2 will use up to 80% of the available RAM (EDIT: newer WSL versions set the limit at 50%) – but that can be a bit too much sometimes. I set mine to about half of available RAM – which on my Surface Pro 4 is 4Gigabytes. To do this, open up Notepad and add the following text;
[wsl2]
memory=4GB
swap=2GB
localhostforwarding=true
Save the file as .wslconfig in your Windows home directory ( C:\Users\YourUsrname ). I find it also useful to provide the WSL2 kernel with the ability to use some swap space, hence the swap=2GB there too. You can adjust the settings to suit your requirements.
StartUp WSL2 SystemD-Genie when Windows Starts
The keen eyed amongst you will have noticed that we started SystemD-Genie manually from the WSL Terminal. That may be what you want, if you don’t want to use the Linux desktop all that often. The Desktop Environment is more memory hungry than the command line system, so if you’re short on RAM this may be the best option for you.
However, if you want to run the XDMCP desktop environment at startup (or more technically, when you login to Windows) then you can do that using this technique.
Open up Notepad and enter the following;
start /min wsl genie -iClick File -> Save As and in the address bar at the top, type C:\ProgramData\Microsoft\Windows\Start Menu\Programs\StartUp and press ENTER
In the filename box, type any name you like so long as it ends with .bat – I went with start-wsl-genie.bat – then click Save.
This should start the Genie System for you automatically after you log in to Windows. The Genie System will then take care of starting all the relevant Linux services within your WSL
Switching Back To VNC
If you decide that you don’t want to use XDMCP but prefer the VNC solution, you’ll need to disable the solution we’ve created above. Fortunately, it’s really easy – so you can pretty quickly switch between either solution. To re-enable VNC, simply open up the lightdm.conf file with nano;
sudo nano /etc/lightdm/lightdm.confComment out the top two lines by putting the # symbol in front of them;
#[LightDM]
#start-default-seat=false

[XDMCPServer]
enabled=true
port=177
Then
sudo service lightdm restartNow the XVnc session will be started by LightDM instead of XDMCPServer. Switching back is the reverse of the process.
Making Ubuntu Desktop Recognise The Internet Connection Under WSL2
If you try to connect any of your online accounts (such as Nextcloud) using the Ubuntu Settings app it’ll tell you that you’re not online – even though you clearly are because you can view web pages etc. The problem is that Network-Manager isn’t quite setup right with WSL. We need to reconfigure netplan to make this happen.
sudo rm -rf /etc/netplan/*.yaml
sudo nano /etc/netplan/01-network-manager-all.yaml
Then add the following code EXACTLY (copy and paste) into the file
# Let NetworkManager manage all devices on this system
network:
  version: 2
  renderer: NetworkManager
YAML files are extremely picky about indentation and syntax – so double check you’ve copied and pasted correctly and the indents are accurate. If they are, issue the following commands;
sudo netplan generate
sudo netplan apply
sudo service network-manager restart
Then Ubuntu should see that your network is indeed active.
Changing the HiDPI Settings For Better Font Clarity on SP4 / SP3
By default, VcXSrv seems to try to reduce the HiDPI settings on the Surface Pro by setting the X-Window dimensions to half the actual value. This has the effect of sending less data across the interface of course, but unfortunately it makes the fonts and some images rather blurry and anti-aliased. It’s not particularly noticeable to my aging eyes unless I looked closely – but once I spotted it, it annoyed me.
The fix is relatively simple, but bear in mind, although the desktop looks a LOT better, the performance is not quite as snappy.
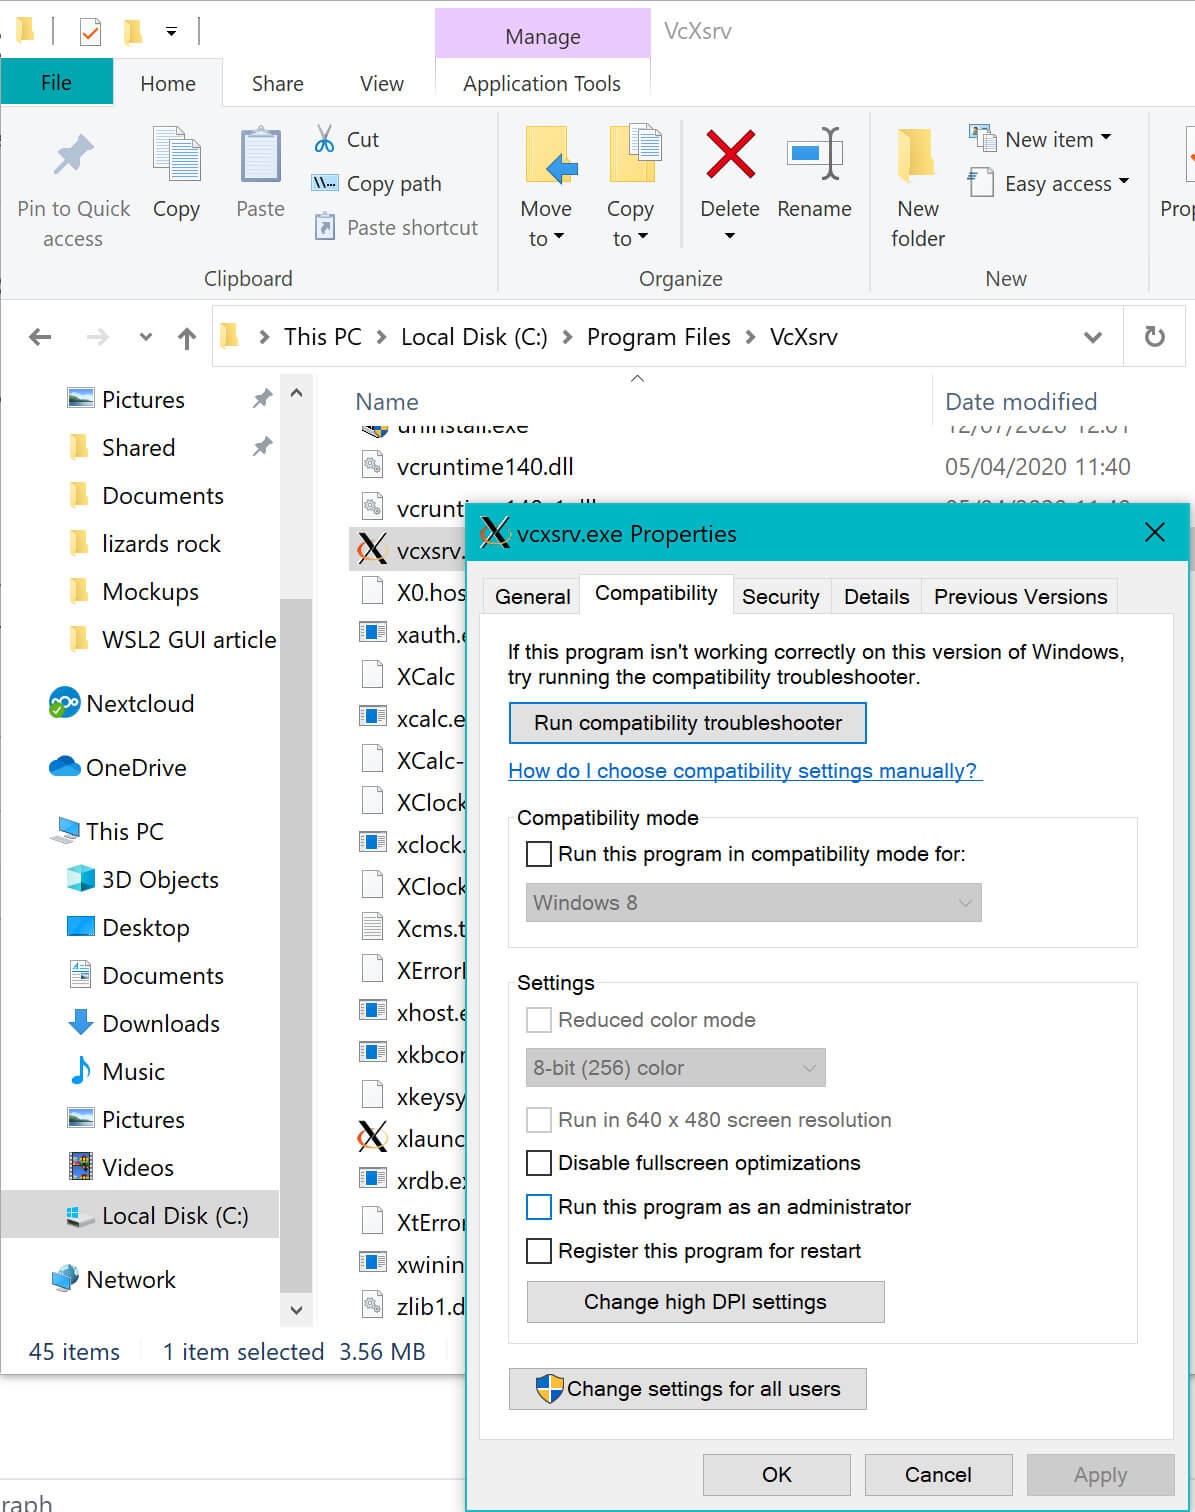
To make the change, open Windows File Explorer and navigate to C:\Program Files\VcXsrv folder. Right click over the VcXsrv.exe file and choose Properties. From there, choose the Compatibility tab and choose the Change HiDPI Settings button as indicated in the picture below.
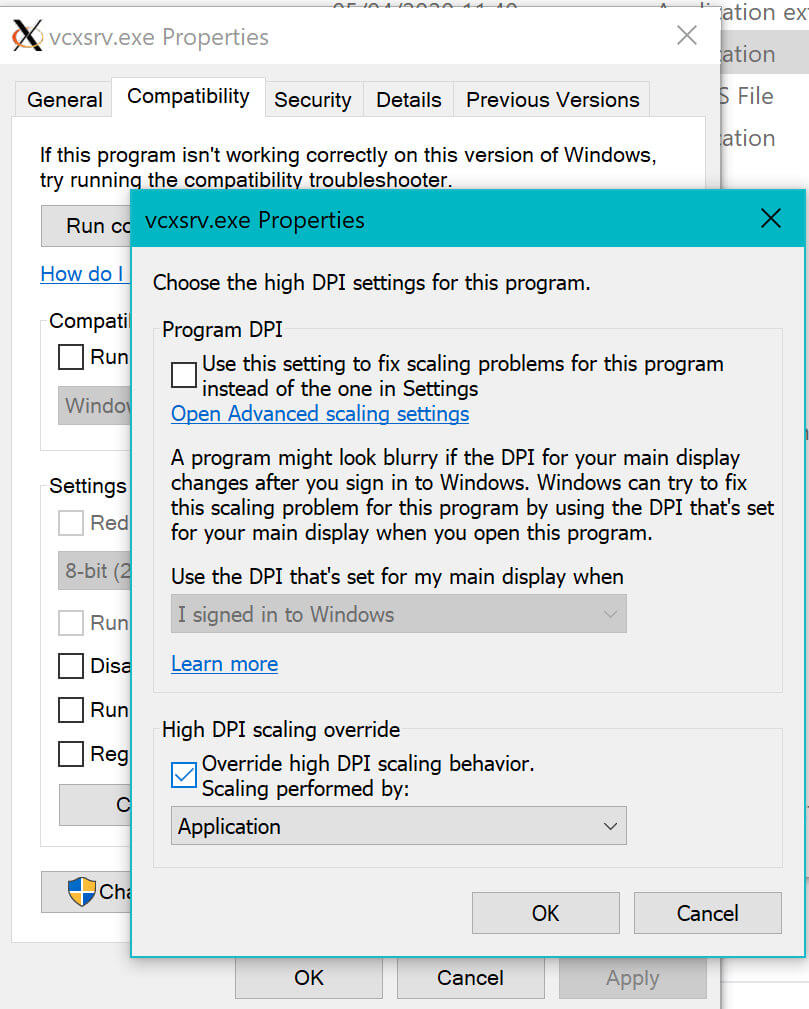
From there, set the tick in the box marked HiDPI Scaling Override as shown below and choose the Application option for the scaling performed by section. Restart your VcXSrv process and you’ll get the full Surface Pro 4 resolution.
Interestingly, the LightDM screen will be tiny (and a bit difficult to read if you’re old) but the Ubuntu Desktop will automatically apply 200% scaling to bring the resolution back to normal. It does a MUCH better job of this than VcXSrv does though, so although the size will be the same, the clarity is much better using this method.
Be aware though, that on my Surface Pro 4 at least, I couldn’t get this to work if the Native OpenGL tickbox was checked on VcXsrv. I’m not sure this matters much, but if you find it crashes after changing that setting, make sure you haven’t got the LIBGL_ALWAYS_INDIRECT=1 setting anywhere in your WSL configuration. It works on the lower resolution though so I’m not sure what’s going on.
It’s also worth noting that the default XLaunch application (xlaunch.exe) in the same directory is worth switching the scaling properties to the same settings. It looks a lot better if you do.
Create Unique Hostname For Connecting to XDMCP
Finally – unless I think of something else, remember earlier on I mentioned that difficulty in getting the IP address for your WSL installation and the annoyance that you cannot set it to a specific value AND Windows changes it each time you reboot. Well, there’s a fix from Shayne Sweeney who had issues with earlier versions of WSL2 before you could map localhost on TCP connections. But his fix is needed for us here because localhost isn’t mapped for UDP ports by the looks of it.
So, to be able to use a name instead of an IP address – and have that name automatically update whenever WSL2 changes the IP address internally, visit https://github.com/shayne/go-wsl2-host and install his little helper application. It makes life so much easier.
The helper application will require your Windows login credentials. If you use a Microsoft account to login to your computer you may find this doesn’t work. I had to revert my account to a local computer account and re-enter the details. It’s a pain but once it’s set up you’ll forget it exists 🙂 EDIT: 15/10/2020 – Thanks to poking around on Github I have found a proper solution that works. It’s a bit fiddly but I have produced a step by step guide here for you. Don’t be afraid, the guide is fully illustrated and means you don’t need to change to a local computer account after all.
Once you’ve done that, you can use XLaunch, create a profile and save it to your desktop. Then you can just double click the XLauncher configuration file in the future and be taken straight to your WSL2 Ubuntu Desktop!
Is It All Worth It?
If you’ve made it this far, to the end of this nearly 6000 word article – you need a break. A cup of tea and a biscuit at the very least.
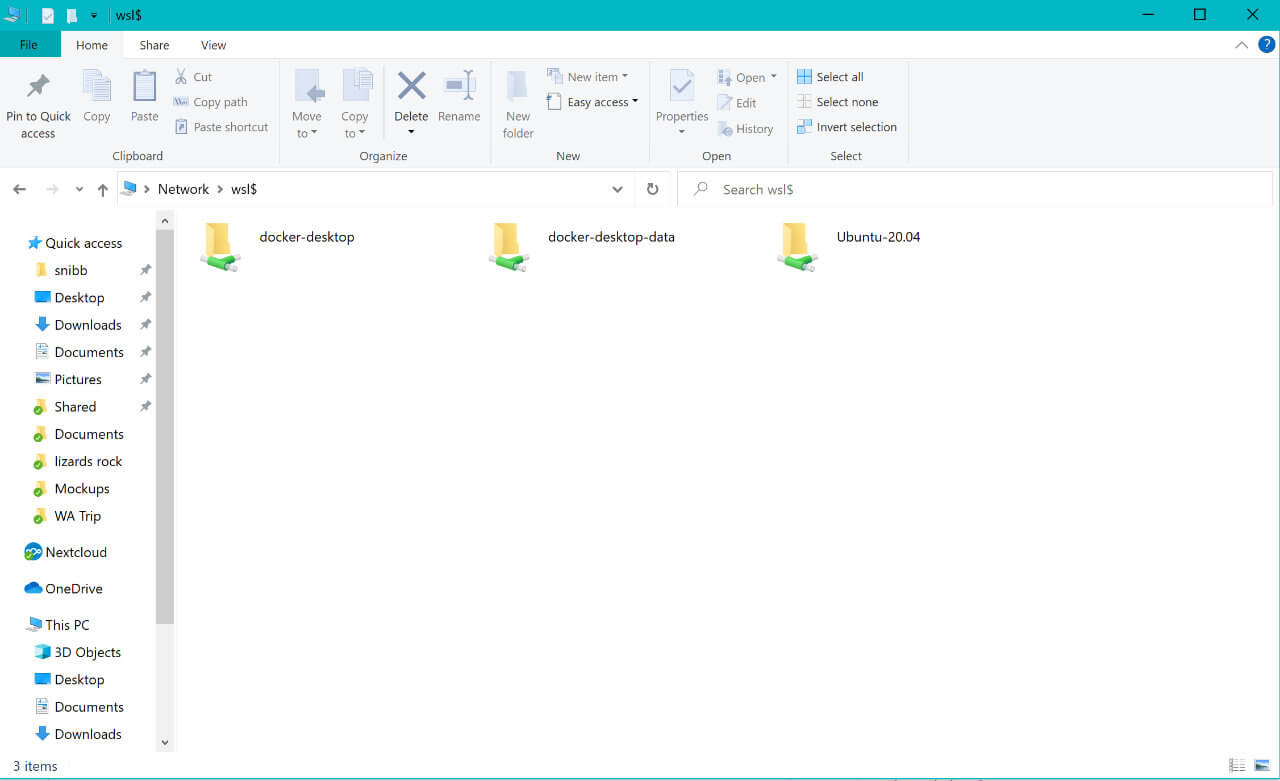
But yes, in my opinion it’s absolutely worth it. I love using the Ubuntu Desktop on my Surface Pro 4 under WSL. It means I can use Linux apps for things I want to, and Windows apps for other things without needing to reboot and I can do it with the integrations that Microsoft have built in to WSL such as file sharing between the two (see image below) by navigating to \\wsl$ in File explorer for example;
Or, going the other direction, you can easily view your Windows files from within the WSL system;
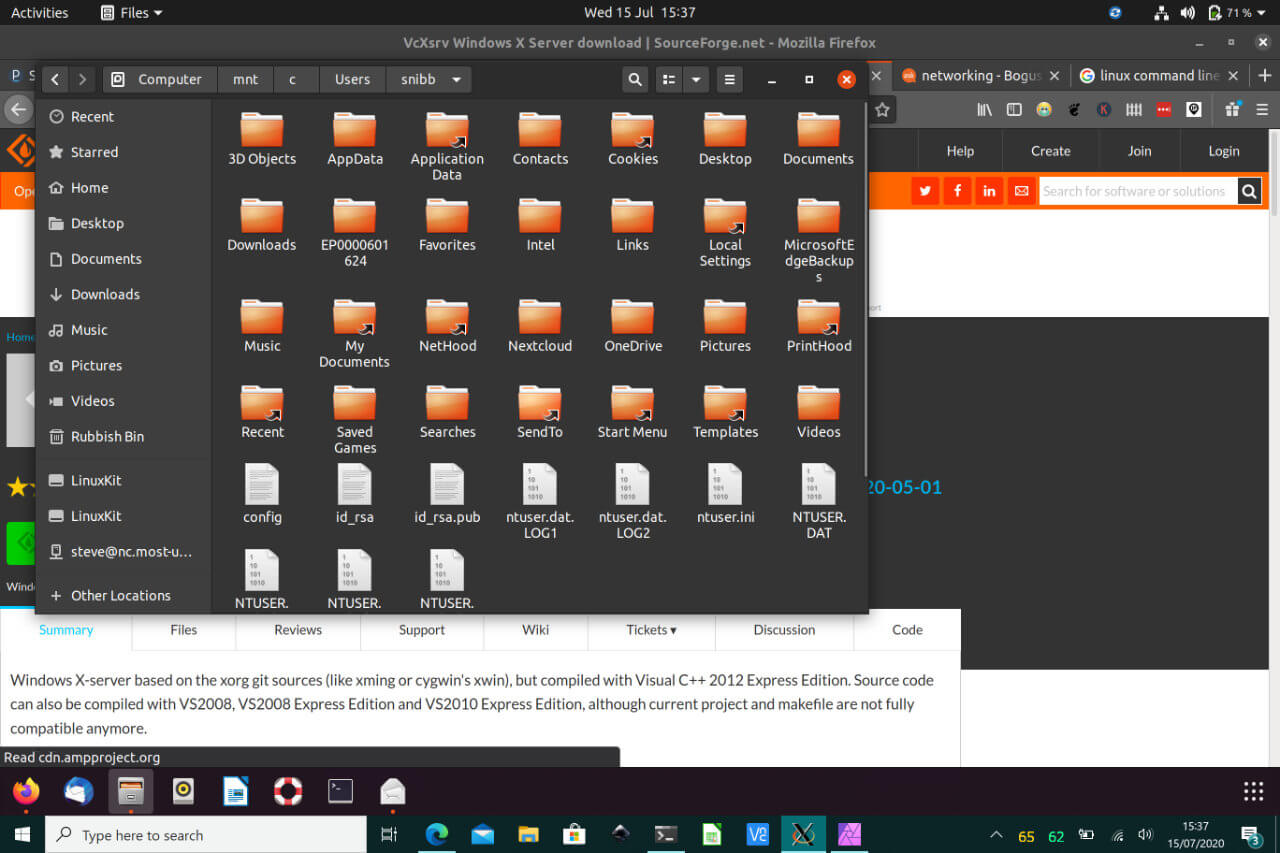
And, as you can see from the image above, the WSL window is almost full screen, minus the space for the Windows Tasbar. X-Windows just takes care of this – allowing arbitrary screen sizes, unlike most VM setups that would try to force a full screen application to be literally full screen.
Getting into things like Docker and Visual Studio Code is so much easier and better integrated under WSL2 rather than a separate VM -though of course you don’t need to have a full desktop to run these, if you want a desktop and Windows integration, the WSL2 Ubuntu Desktop is really the way to go.
Ultimately, this will likely become a LOT easier in future as Microsoft appears to be working on a native Wayland server for Windows which would enable, potentially, Linux GUI programs to talk directly to Windows with no need for an X11 Server application. Whether this would also work for the Ubuntu Desktop remains to be seen though.
Credits
Massive massive thanks to u/tdcosta100 on Reddit for his tutorial which inspired this. I couldn’t have done it without his/her doing the biggest legwork with the VNC side of things.
Also thanks to Arkane Systems for coming up with Genie to emulate a normal systemd setup for WSL2. Without this work, none of this would be possible.
Then there’s Shayne Sweeney who produced the Go-WSL2-Host package that makes it easy to use a hostname rather than IP address making the whole XDMCP connection so much simpler and more reliable.
Thanks to the various other people who’ve posted answers on forums about how to start WSL processes on logging in to Windows and how to get them to startup silently in a minimized command window for example. Other’s who’ve provided settings advice for VcXSrv to help speed it up here and there. As well as of course, the developer(s) of VcXSrv itself. Again, without whom this particular way of accessing a WSL2 desktop wouldn’t be possible.
Finally, and people will hate me for it potentially, but thanks to Microsoft for seeing the light, and providing the WSL to us Linux/Windows developers in the first place. It’s interesting, I’m not sure I’d be still using Windows if it were not for WSL and with WSL2 they’ve made the process even better. I’m looking forward to seeing what they do with the GUI side of things.
If you’ve any comments, thoughts or suggestions please do leave a comment below and I’ll do my best to respond! Thanks for reading, enjoy your new WSL Ubuntu Desktop!
The link above will take you back to the relevant place within the KDE Plasma article


