Install Ubuntu 20.04 LTS Server on Surface Pro
Install Ubuntu 20.04 LTS Server on Surface Pro – it’s not that hard, but if you need wireless drivers you probably want to read this

Last Updated: January 11th, 2022
By: Steve
Contents
I’ve been writing various articles here at Most Useful regarding installing various Linux flavours of Linux on Surface Pro 4 or 3 and various ways of repurposing said Surface Pros which require Linux. Many of the repurposing options require the ‘Server’ version of Linux rather than a graphical desktop since the graphical desktop will use up valuable memory space – particularly if your SP4 is the 4Gigabyte RAM version.
I’ve already gone through how to install Ubuntu 20.04 LTS Desktop version in a previous article – if you really want the desktop version then have a look at that one.
How To Install Ubuntu 20.04 LTS Server on Surface Pro
Download Ubuntu 20.04 LTS Server
The first step to installing any new operating system is of course, to download said operating system. With Ubuntu the best source is from Ubuntu themselves as they’ll make sure you’re getting a legitimate copy. Ubuntu Server is free software so make sure that you’re not paying someone for it.
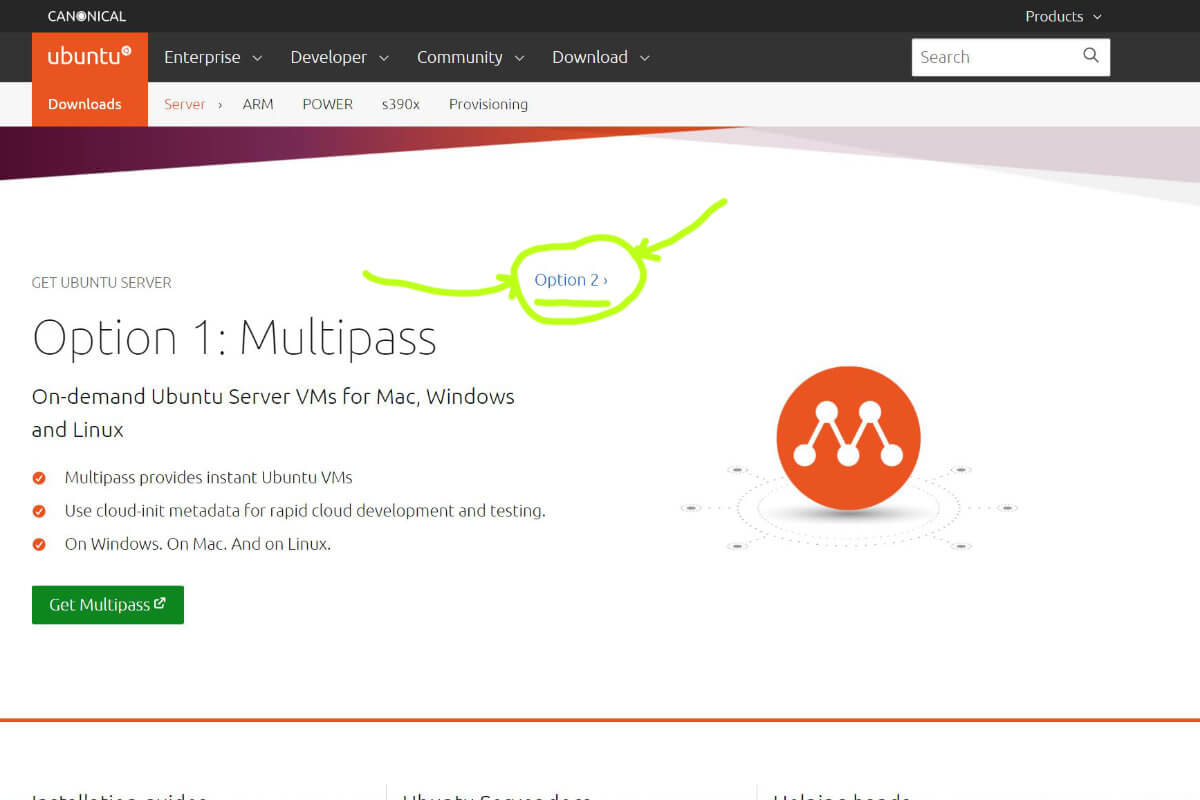
You can get Ubuntu 20.04 LTS Server at https://ubuntu.com/download/server – but bear in mind that at the time of writing the website is, in my opinion, horribly confusing and appears to be desperately trying to push you into buying Ubuntu as a service. This is clearly not what we want.
If you look at the picture below, this is a screenshot of the page you should see when you first visit the URL given above. I’ve highlighted in yellow the link you need to click – where it says Option 2.

When you click Option 2, you’ll see the screen change to say Option 2: MAAS.
Confusingly, in my opinion, you need to click the same link again – though this time it has subtly changed to say Option 3. Then you’ll see Option 3: Manual on the screen instead. Then you can click the button that says Download Ubuntu 20.04 LTS.
When you’ve downloaded the Ubuntu Server, remember where you saved it to – as you’ll need it shortly. In most cases it’ll be saved to your Downloads folder.
Download Rufus

Rufus is a clever piece of software which turns ISO images such as the one you’ve just downloaded, into something that can be used to boot your computer. Usually it’s done by copying special files and folders to a USB flash drive and marking that flash drive as bootable. So, now you need to visit https://rufus.ie in your web browser and follow the instructions there to download Rufus.
Plug in a spare USB flash drive with at least 4Gigabytes of space. You’ll need to make sure there’s nothing on this flash drive that you want because Rufus will erase it when it creates the bootable USB.
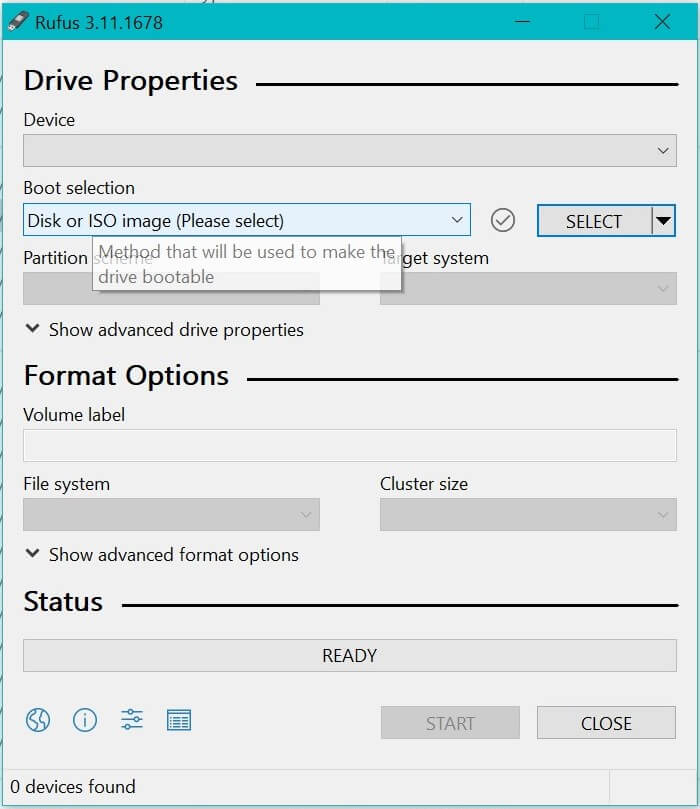
Once it’s finished downloading open up Rufus. You should see a screen that looks similar to the one on the right.
Click the SELECT button to choose the Ubuntu 20.04 LTS Server ISO file you downloaded from the Ubuntu web page. Choose the USB device you plugged in earlier in the top box. You can usually tell whether you’ve got the right one by looking at the amount of space available on the device.
All the other options can generally be left exactly as they are. So when you’re sure you have chosen the right ISO and USB device, just click START. Rufus will write the files to your USB flash drive and let you know when it’s finished.
Download the Wireless Packages
Unless you’re going to be using your Surface Pro in a docking station, you’ll be connecting to the Internet via a wireless device. Ubuntu Server does not expect people to use wireless devices to communicate with the Internet and so does not provide them on the install disks. Remember, we’re installing Ubuntu server purely because we want to maximise the amount of RAM available on our Surface Pro for running services. The Desktop (GUI) version of Ubuntu 20.04 LTS comes with the wireless devices pre-installed.
You’ll need to grab the following software packages;
https://packages.ubuntu.com/focal/wireless-tools
https://packages.ubuntu.com/focal/libiw30
https://packages.ubuntu.com/focal/wpasupplicant
https://packages.ubuntu.com/focal/libpcsclite1
https://packages.ubuntu.com/focal/libnl-route-3-200
https://packages.ubuntu.com/focal/libnl-3-200
Download the files from the above links (make sure you choose the AMD64 packages) and when they’re downloaded copy them to your USB flashdrive that Rufus has created. You can copy them to top directory or you can create a new sub-directory called Wireless for example. Remember where you put them as you’ll need them later.
Boot Surface Pro 4 From USB Flash Drive
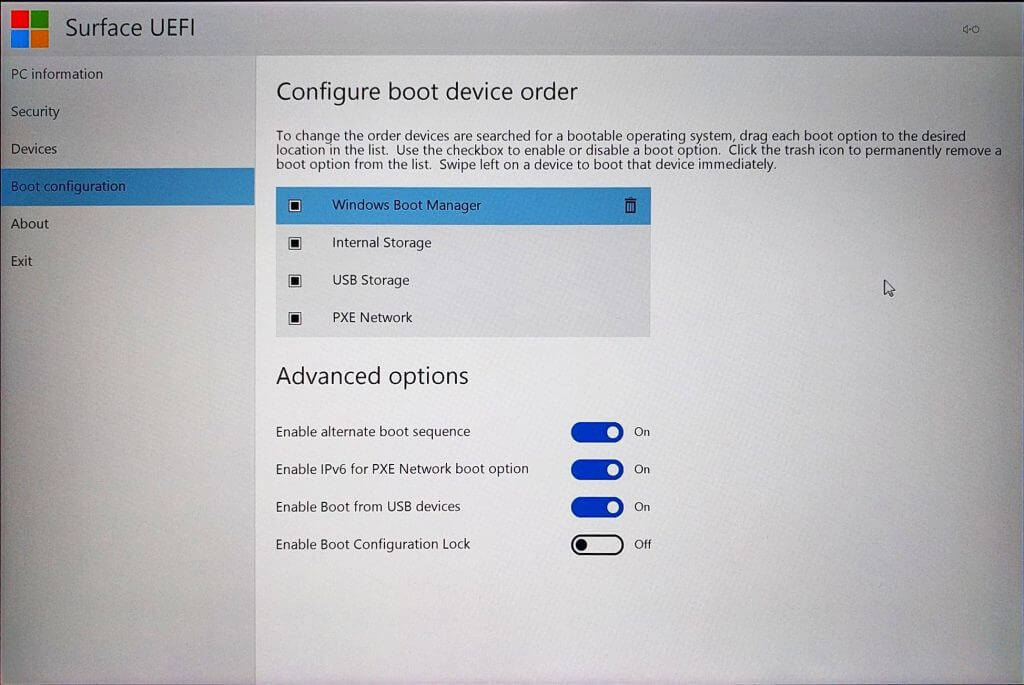
Provided that your Surface Pro 4 is setup to boot from USB before Windows 10 (or 8?) you should be able to simply power it on with the power button with the USB Flashdrive plugged in and Ubuntu should start to install. If it’s not setup that way, you’ll need to enter the UEFI settings screen and change it.

To enter the UEFI settings screen you can either reboot your Surface Pro 4 from Windows using the Settings -> Update And Security -> Recovery -> Advanced Startup option and then choose the UEFI Firmware settings option when your computer reboots.
Or;
Switch off your Surface Pro 4. You can hold the Power button until it powers off if you cannot switch it off any other way. Then, with the power off, press the VOLUME UP key ( marked + ) on the top of your SP4. Whilst continuing to hold the VOLUME UP key, press the Power button until your Surface Pro 4 boots. This should put you into the UEFI screen.
On the screen shown above, make sure there is no black square in the box next to Windows Boot Manager. Make sure there IS a black dot next to USB Storage. It’s safest to make sure none of the other boot options have black squares next to them either. Also make sure that Enable Boot From USB Devices is marked as On.
Once you have the settings as appropriate, choose the Exit option and save the changes and exit. Your Surface Pro 4 should now reboot into the Ubuntu Server setup.
Install Ubuntu Server on Surface Pro 4
Follow the on screen instructions for setting up Ubuntu Server. It’s pretty straight forward and will prompt you all the way. I do recommend erasing the entire disk and reformatting for Ubuntu Server rather than letting it dual boot with Windows – if it gives you that option. I’m not sure if it does because my hard drive was corrupt anyway, so I didn’t have a Windows install in any case.
On my Surface Pro 4 the installer crashed repeatedly for some reason, though on a different SP4 I ran it using a different USB flash drive and it worked first time. So I suspect there’s something up with my USB flash drive. Nevertheless, it did eventually install and once installed is absolutely rock solid.
When it’s finished, it’ll tell you to remove the boot media and reboot. You’ll need to do this. Make sure you remove the USB Boot disk, otherwise it’ll simply go back into the installation process all over again, even though it’s already installed.
Install the Wireless Helpers
Once you’ve rebooted and logged back in, you’ll need to install the Wireless helper applications. This is because Ubuntu Server is geared towards server systems that WiFi isn’t going to be a good match for. Server systems work better on Ethernet networks because they need the speed. But we might want WiFi. If you do, this section is for you.
You will see a lot of console error messages when you first login. Ubuntu Server, by nature of being a server, is fully expecting to have network access. It gets quite grumpy when it doesn’t. Be patient with it 🙂
Once you’re logged back in, re-insert the USB pen drive – the one where we copied those wireless drivers to. Now, because we’re on a console with no GUI and none of that fancy automounting software running, you’ll need to find out where the USB mounted. To do that issue the command below;
lsblkIt’s quite likely that your USB system will be the same as mine, unless you do have a USB hub and have multiple different disks attached. If you only have the one disk it’s probably going to be /dev/sda as in the picture to the right. You can tell which one is the USB pen drive by looking at the size column. Clearly, in the picture, nvme0n1 is not my USB flash drive because my USB flash drive is 32Gigabytes in size. Nvme0n1 is showing as 447G in size. You’ll notice that sda is showing as 28.7G in size, which is very close to 32G – so this is my flash drive.
To get access to those wireless drivers you’ll need to issue the following command;
sudo mount /dev/sda1 /mntThis is telling Linux that you want the sda1 partition to be attached to the file system at the mount point (also a folder) called /mnt.
Then issue the following command;
cd /mnt/WirelessThe above assumes you stored your wireless drivers in a directory called Wireless on your USB key. If you stored them in the top level directory, or somewhere else, just substitute Wireless as appropriate. You can use the ls command to look at the files and directories on your USB key to find the files. They will all end in the .deb extension so you can issue the command ls *.deb – if you get no files shown you’re in the wrong directory.
If you’re stuck, you can try the following;
cd /mnt
find . -name \*.deb -print
That should show you where you stored your wireless drivers. If the files start with ./ then they’re in the current working directory and you’re good to go. If they start with anything else, you will need to issue the cd command to change directory. For example;
./Wireless/wireless-tools_30~pre9-13ubuntu1_amd64.debThen issue the command;
cd ./Wireless(Technically the ./ isn’t needed, but for clarity I’ve included it and it won’t hurt)
Now that you’re in the right directory you can install them with the following command;
sudo dpkg -i *.debProvided you downloaded all the recommended files listed at the beginning of this article, and copied them correctly, they should install without any errors. If you get errors you can leave a comment and request some assistance (preferably with a screenshot using a camera-phone or similar) but the best bet is to go back to the top of the article and see which files you forgot to download 🙂
Configure the Wireless Drivers
So, they’re installed. That’s nice. They won’t do anything though until we configure them. Fortunately configuration of the wireless devices in Ubuntu 20.04 LTS Server isn’t that difficult. There’s a couple of hoops to go through but they’re easy enough. The first is that we need to find out what the Wireless Network Interface is called. To do this issue the command;
iwconfigYou should see something like the screenshot on the right.
On that screenshot you’ll see the top item, marked as wlp2s0 and then some text beside it. You can ignore the text beside it, except to realise that because, unlike the item named ‘lo’ it actually has options showing. This means that’s the name of the wireless interface card Linux has assigned to the physical wireless interface in your Surface Pro 4. Remember, or write down this name. Yours will (if you’re using this guide to setup a Surface Pro 4) likely also be called wlp2s0 (that’s a zero on the end).
Now you need to issue the following command ( this answer is taken directly from https://askubuntu.com/questions/1105069/how-to-enable-wireless-on-ubuntu-server-18-04-via-cli )
sudo nano /etc/netplan/01-netcfg.yamlThe file will not exist. That’s OK, we’re going to create it. I have modified the contents of the original AskUbuntu forum to match our Surface Pro 4’s wireless naming scheme.
network:
  version: 2
  renderer: networkd
  wifis:
    wlp2s0:
      dhcp4: true
      dhcp6: true
      access-points:
        "network_ssid_name":
          password: "**********"
Pay attention to the indentation in that file. If you get it wrong this will not work. The YAML markup language used in this file is extremely picky about indentation. You should use the SPACEBAR key to create the indentation of the various lines, TAB is not allowed. They must be typed as you see them above. Fortunately the netplan program will give you good feedback if you get it wrong.
Once you’ve edited the file, use CTRL-X to exit and follow the nano prompts at the bottom of the screen to save the file.
Then issue the following commands;
sudo netplan generate
sudo netplan apply
Reboot your Surface Pro 4 by typing reboot at the command prompt. You’ll need to relogin when it’s finished rebooting. If all went well, and it should, then this time your Surface Pro 4 reboots you shouldn’t see any error messages. You can confirm that your wireless is working with the following command;
ping www.google.comYou should see a few rows of output as in the picture to the right. If you get an error message then something went wrong.
Improve Wireless Stability
If you look at the output of the wlconfig command you can see that there is a setting there which suggests Power Management is switched on. On the Surface Pro 4 (and probably other devices) this causes the WiFi network to glitch out after a while. It might be minutes, hours or days. It’s a pain in the backside and on a server it’s definitely no good.
There’s lots and lots of tutorials around for switching off Wireless power management on linux systems that are using NetworkManager. But NetworkManager is a GUI system that makes controlling network interfaces nice and easy. We’re not using a GUI so this won’t work for us. We need a better way.
This way is a little bit fiddly but should see your wireless network remain stable. You’ll need to follow these commands exactly;
sudo mkdir -p /etc/pm/power.d
sudo nano /etc/pm/power.d/wireless_power_management_off
This will create a new file into which you need to type (or paste) the following;
#!/bin/bash

/sbin/iwconfig wlp2s0 power off
If your wireless interface is called something different, change the command above and replace wlp2s0 with whatever your wireless interface is called. You can find your wirless interface name through the iwconfig command.
Save that file. The issue the command;
sudo chown root:root wireless_power_management_off
sudo chmod 700 wireless_power_management_off
sudo crontab -e
If you’ve not used crontab command before it will ask you to choose which editor you wish to use. You can choose whichever you’re happy with. We’ve been using nano throughout this tutorial so you may want to choose that since you’re hopefully now a little bit familiar with it.
Into the nano editor you need to type (or paste) the following;
*/1 * * * * /etc/pm/power.d/wireless_power_management_offExit nano and save the file. This has the effect of telling the Linux system to switch off the power management feature of your wireless card every minute. It’s a kludge. It’s crap. I hate it. But it work. And after a minute passes, if you type iwconfig again, you should see Power Management: off underneath the Wireless card. Which should improve stability.
This advice has been taken from https://unix.stackexchange.com/questions/269661/how-to-turn-off-wireless-power-management-permanently and modified slightly for our Surface Pro 4 device names.
Install Linux-Surface Kernel (Optional)
The Linux Surface kernel has some additional stability fixes and firmware updates that can help improve the stability of the Surface Pro 4 under Linux. Much of it is related to touch screen drivers and Surface Pen for example. We’re not going to need any of those so that’s why this step is optional.
I haven’t used the Linux-Surface kernel on my ZoneMinder Surface Pro 4 setup and it’s been fine, but if you do want to install the latest and greatest Linux-Surface kernel, you can find all the details at https://github.com/linux-surface/linux-surface
Customize Your New Server
That’s it – you now have a functioning Ubuntu 20.04 LTS server to play with to your hearts content on your Surface Pro. From here you can customize it by adding whichever software you like from the Ubuntu repositories. You can set up Minecraft servers, ZoneMinder servers, NextCloud server, SSH server, whatever server you want to have running.
I’ve got mine set up with DNSMasq running as a proxy DNS server and DHCP Server because doing that gives me way more flexibility than my crappy internet service providers router does. The possibilities are endless.


