Host Your Own WordPress Site
In this article we show you 2 cheap ways to host your own wordpress site
Last Updated: November 23rd, 2021
By: Steve
Contents
I’ve been playing with WordPress for as long as I can remember. I can’t say exactly when I started playing with it to be fair. But it’s a while. So I’ve seen all sorts of ways of running WordPress websites. I’ve done all sorts of ways of hosting WordPress websites. In this article I’m going to look at 2 different ways to host your own WordPress site.
What Do You Mean ‘Host Your Own WordPress Site’?
So, the first thing to look at in this article is what it means to ‘host your own WordPress website’ and whether you need to host your own. There’s a fairly strong chance that you don’t need to host your own.
This article isn’t going to give you information on how to buy a dedicated server and set it up at a hosting provider or run it in your bedroom across your DSL. Though you could probably use a lot of the information here to do that. I’m going to show you how to use a Virtual Private Server (VPS) to create your own server.
A VPS is, to all intents and purposes, your own server. You will have full access to a Linux computer that looks like it is your own computer. The reality is that the actual machine will be a massive rack based system with 8 or 80 different ‘virtual’ computers running on the same hardware.
This is useful though, because with a virtual server, your system looks and behaves just like it was the only operating system running on the server. This means that unlike ‘shared hosting’, if your server gets hacked it won’t infect any of the rest of the websites. More importantly, if someone else’s server gets hacked it won’t affect your server. With shared hosting there’s always the risk (albeit quite small these days) that an infected WordPress installation can spread.
Advantages To Hosting Your Own WordPress Site
Perhaps most importantly, there’s no restrictions over which plugins you can use. You can adjust all sorts of parameters on the server. For example, you may need to allow your customers to upload large files to your WordPress installation. Shared hosting providers will often impose strict limits on how big an upload can be. Hosting your own WordPress site overcomes these restrictions.
I recently experienced a significant limitation of SiteGround’s shared hosting. I have a WordPress multisite installation which has quite a large database. Being WPMS it has an awful lot of database tables too. SiteGround didn’t like it because every time they ran a backup (which they do for free by the way) of the website it ground all the other sites sharing the same machine (most of which were not mine!) to a halt.
Clearly that’s unacceptable to SiteGround. My site was too big for shared hosting. So I had to move it.
Hosting your own also means you can scale the server as you see fit. You can install any plugin or theme you want. You can have as big a database as you need. You can add more memory if you want to.
Disadvantage to Hosting Your Own WordPress site
The biggest disadvantage is that you will need to set it all up yourself. You’ll also need to secure it yourself. And you’ll need to know what to if things go wrong.
Most VPS providers do provide some level of technical support but it’s usually around the server operating system itself rather than anything you might want to run on top of it. You’re going to need to be a bit familiar with Linux (or Windows, but this post concentrates on Linux). You’re going to need to be somewhat familiar with Apache, MariaDB, NGINX and PHP too in order to install it all and get it running.
That is, unless you use one of Vultr’s application servers. Which is exactly what I do.
Enter VULTR’s Application Server
There’s a few different application servers that Vultr offer – depending on what you want to do. They even offer a pre-setup Minecraft server – though I’ve not used that one yet. I might though cos I do enjoy a good game of Minecraft. But I digress. Incidentally, they do a very easy to setup and operate VPN server (Virtual Private Network). This will be the topic of another post someday, but it’s very handy if you’re out and about using public WiFi and don’t want to be snooped on.
I’ve used two different Application Servers on Vultr to host your own WordPress site. The first is where I run my deardiary.net service which is the huge WordPress multisite server which was too big and bulky for SiteGround. The second is currently just a temporary staging system but I shall be moving sites across to it shortly because quite frankly it’s extremely awesome.
It’s also very good value for money. The DearDiary.Net server runs very fast, despite it’s database size. It’s running on the $10/month server at the moment and is perfectly adequate. If and when the time comes that I need more horsepower I can simply upgrade the server to have more RAM and/or disk space.
The DearDiary.Net server however came with no control panel and had to be tweaked manually after installation to get things working the way I wanted them. At the time of writing I notice that Vultr now have a control panel called Cockpit which gets installed on the WordPress Application and it’s highly possible that I will go back and have a look at this, and possibly update this post. (Update, I checked Cockpit, it doesn’t do what I want).
Plesk Control Panel on Vultr VPS
Plesk used to be an expensive way to control your Linux computer. To be fair it was absolutely years ago when I switched from Plesk to cPanel. Until today I hadn’t looked back because cPanel just did everything I needed. cPanel is an advantage of shared hosting that I forgot to mention above. Most shared hosting plans will include cPanel to enable you to set up e-mail addresses and generally manage your space. But on your own server – without the special licencing arrangements that the providers have, cPanel will cost you upwards of $15 per month on top of your server fees. If your server requirements are small enough that you get away with the $5/mth Vultr VPS then adding $15/mth for a control panel seems unwise.
Plesk now has a free licence available called Plesk WebAdmin SE. It is more limited than the commercial versions available, but for the purposes of simply hosting your own WordPress site it’s perfect.
The WebAdmin SE version will let you add up to 3 website domains on the one licence. That is probably enough for most people and in fairness, if you’re going to be using more than that you’re probably trying to make money online through affiliate marketing or something similar so you should probably expect to pay for your control panel…
Setting up WordPress is a one click affair – unless you want to customize the installation.
You can add e-mail accounts (very handy if you want to have a way to communicate with your website users without giving away your personal e-mail address).
You can easily add SSL capability to your website using LetsEncrypt or LetsEncrypt wildcards.
The DNS zone is automatically created for you, including nameserver records if you want to use your new server as the name server entry for the domain.
You can manage MariaDB databases independently of WordPress, through the Plesk WebAdmin SE interface too. Plus the system automatically has PHPMyAdmin installed. I had to install that manually on my WordPress server.
The system comes pre-installed with Apache webserver and NGINX as a caching proxy front end. Having got used to NGINX running PHP by itself on the DearDiary.Net server I prefer not to use Apache any more as the NGINX server has a significantly smaller memory footprint and can handle load much better than Apache. But as I mentioned earlier I had to set all that up manually on that server. You can do the same with Plesk to host your own wordpress site, but it does take some configuration with Plesk to do it. I’ll not go into that in this article but I may put something up in the future if people want it.
There’s all manner of other goodies I’ve not even scratched the surface of yet.
Setting Up A Vultr Plesk WordPress Site
If you’ve not heard of Vultr before you’re missing out. They provide rapid installation VPS servers which vary in size and speed. Vultr’s ‘out of the box’ applications will spin up a new server with all the software you need in a matter of minutes. Gone are the days when you had to order a server and wait a week for it to be delivered.
Vultr bills for their servers by the hour – with a monthly cap. This means that, for example, the base VPS will cost you 0.7c (US) per hour. This gives you enormous flexibility. You can spin up a server and have a play for 2 hours and it’ll cost you just under 1.5 US Cents. If you decide that you need more RAM and/or disk space after having a play you can usually upgrade the system there and then without having to reinstall. This depends on the capacity available in the datacenter that you chose though.
Speaking of datacentres, Vultr has datacentres all across the world. You can choose to put your server closest to the largest section of your intended audience. For example, beardeddragonsrock.com has a good chunk of US visitors, so it might make sense to house the server there. In this case though, I chose the UK because that’s where I am and the latency for web page downloads will be minimal. But for SSH access which is real time typing commands on the keyboard, latency becomes noticeable.
So anyway, this is exactly what I have done today to get a website running WordPress up and running, literally in minutes, on Vultr using the Plesk Application.
Sign In Or Sign Up For Vultr
If you don’t yet have a Vultr account you’ll need to create that first. At the moment you can sign up for Vultr and get $100 of free credit to play with the different services. Just use our banner link below to sign up to receive your free $100.
Vultr is a ‘pre-pay’ type of system. You will need to load your account with at least $10 to start playing, although they do often have promotions where you can get free credit to try before you buy. If one is currently running there’ll be a banner above this paragraph which you can click on to get your free trial credit. Nevertheless, once you become a member you’ll load your account with a designated balance (you decide how much). This gives you the freedom to spin up as many or as few servers, for as long or as short as you like. The hourly charge just gets taken off your balance.
Click The Big Plus Sign
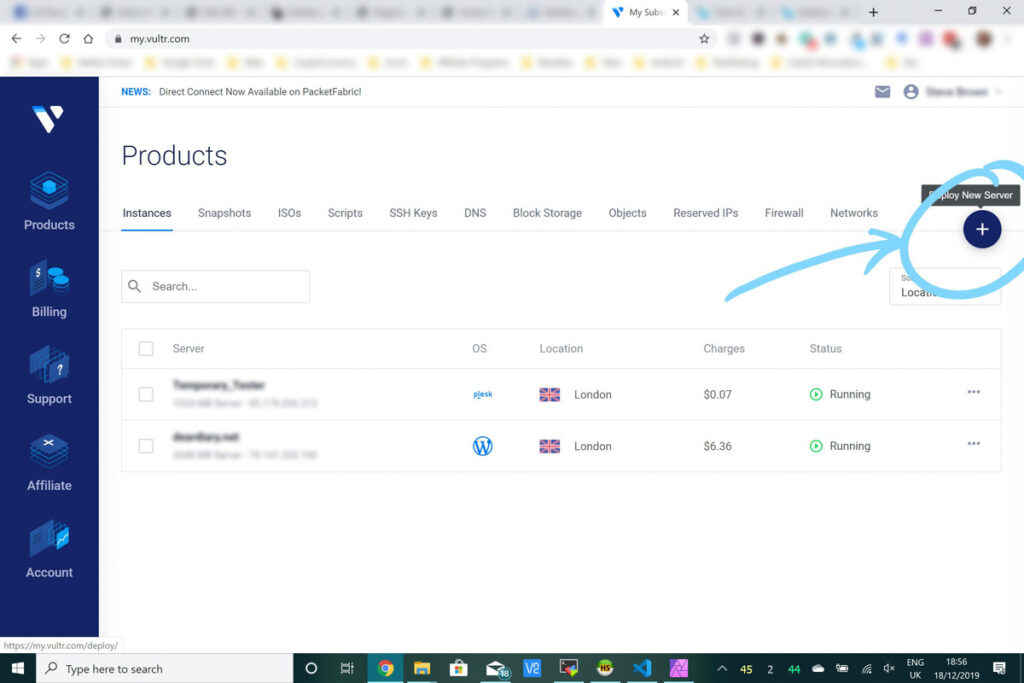
Once signed up you’ll be presented with a dashboard that looks like the picture above
Click the big + symbol found toward the top right of your screen. This will take you to a provisioning screen which we’ll show below.
Choose Cloud Compute
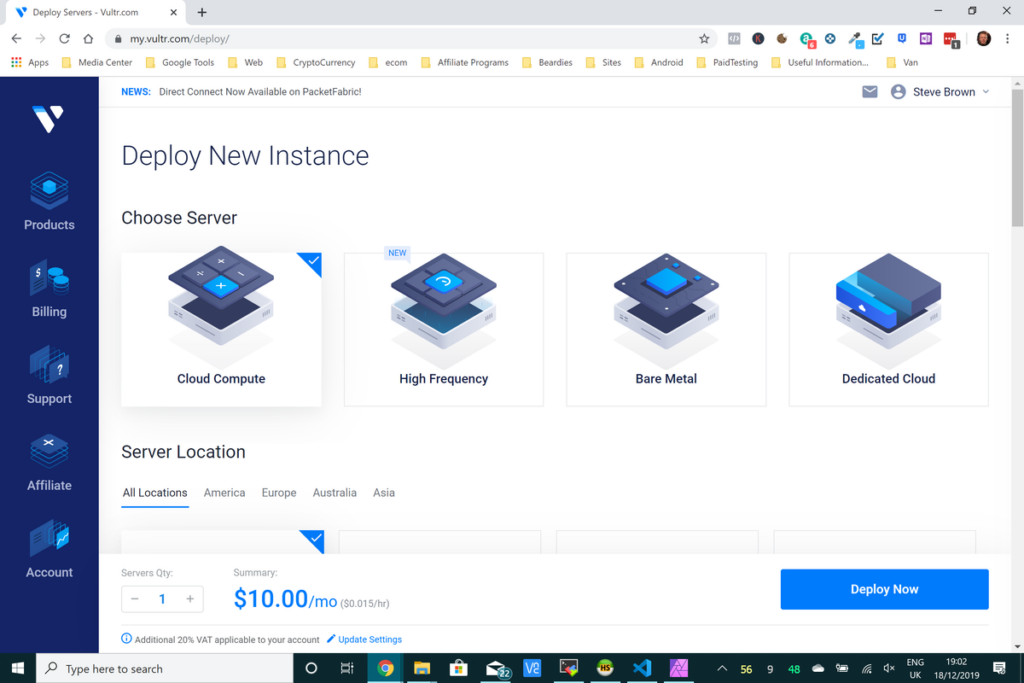
Click the ‘Cloud Compute’ icon. If you prefer a little more horsepower for a little more cash, the ‘High Frequency’ server looks a good option but I haven’t tried them yet. I probably will soon. EDIT: I have now switched to use the High Frequency server – they definitely feel more snappy and do provide a slightly bigger disk size for just a couple of dollars extra. But it’s up to you. If you use the banner link above to get $100 of free server time you can play around with either solution for free.
Decide Where You Want The Server To Be Located
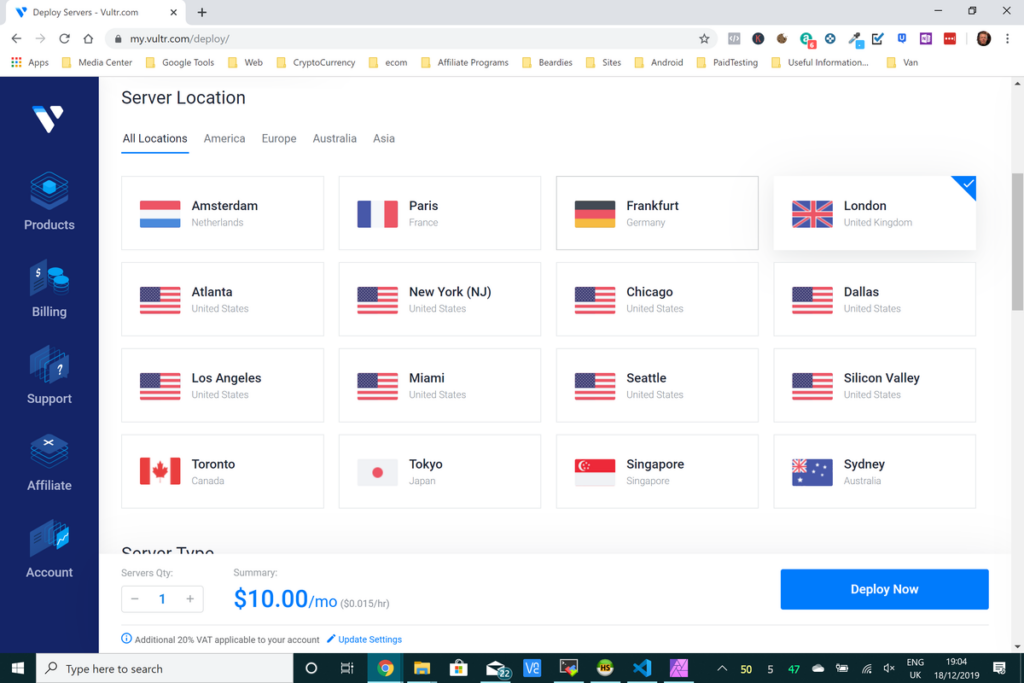
Choose the location you want your computer to be housed. I chose London.
You should choose where-ever is closest to you – or your main customer targets, whichever you prefer.
Choose Server Type
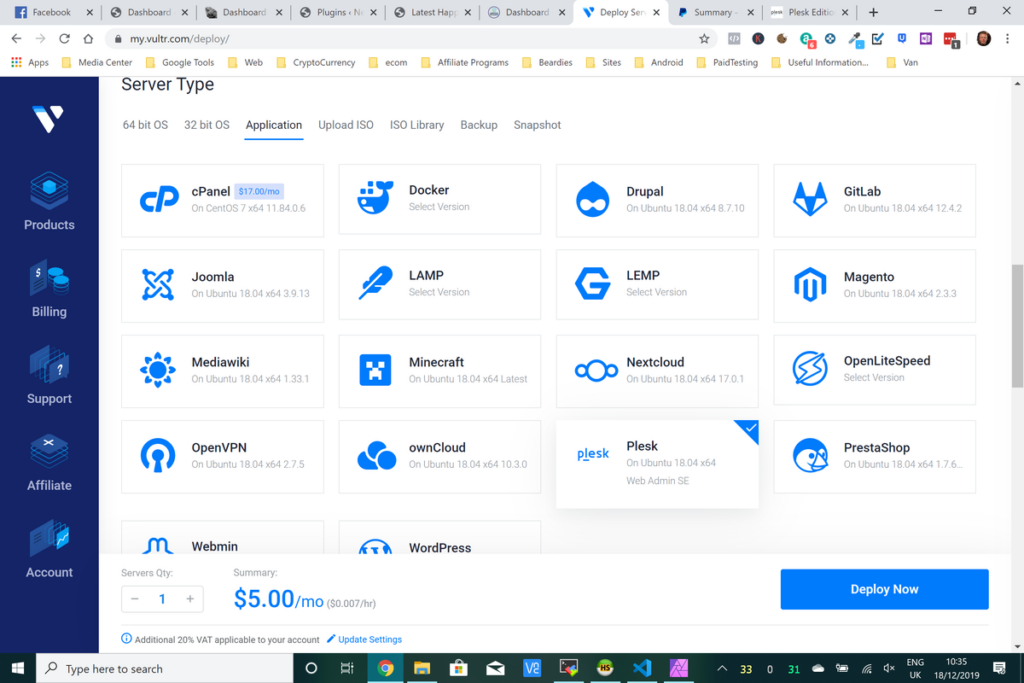
The choices here are many. You can have a play with various different server types here.
If you want you can even deploy a Windows server.
Do be aware though that Windows servers are more expensive than Linux servers since they require a licence fee to be paid to Microsoft.
In this case, we’re going to press the Application tab / link. This will show us various different pre-installed application servers we can use. For DearDiary.Net I opted for the WordPress installation as this provided the best speed and I’m comfortable using the Linux command line to configure things. For you, if you’re not familiar with Linux command line, choose the Plesk option and selected Web Admin SE option as this is the free one we’ve mentioned in this article.
Then click the Deploy Now button. Vultr will go ahead and install the server for you. Generally it takes less than a couple of minutes. You’ll receive an email when it’s finished being deployed with instructions on how to access it.
Log In To Plesk
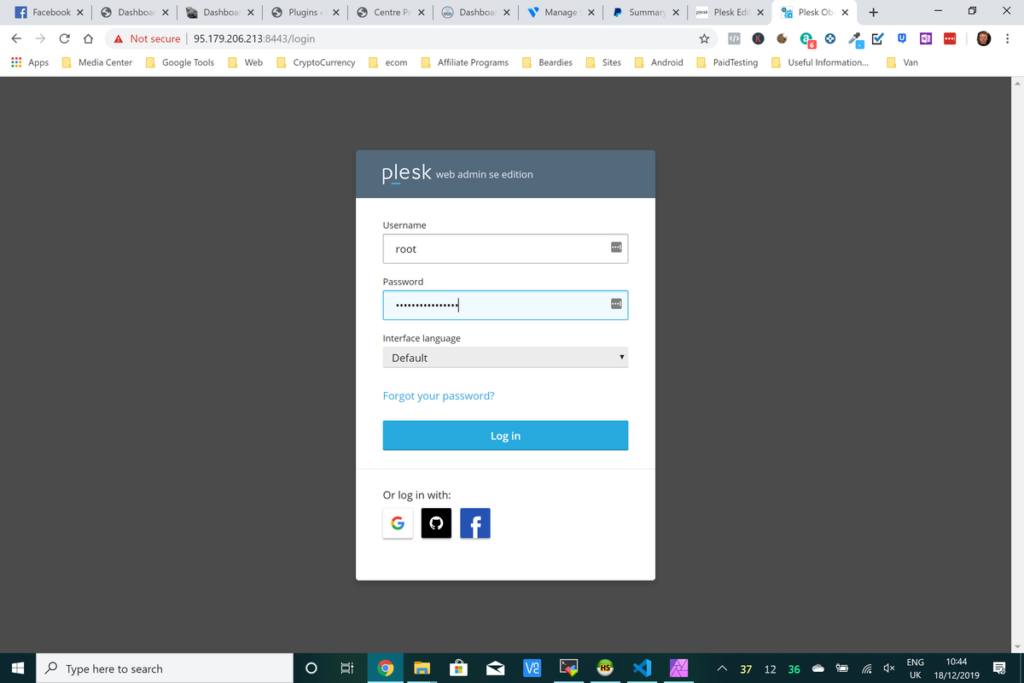
Once the deployment is complete – it normally takes less than 5 minutes – the server will appear in your Products tab. Clicking on the listed server will take you to a screen which will give you instructions on how to log in to Plesk.
As you can see from the screenshot, Plesk will let you login with Google or Facebook too. I’ve not tried this – I used the root password as shown in the instructions on the server screen from Vultr – although once set up I have now actually switched to using a Github login since I find that nice and convenient.
Add A Domain
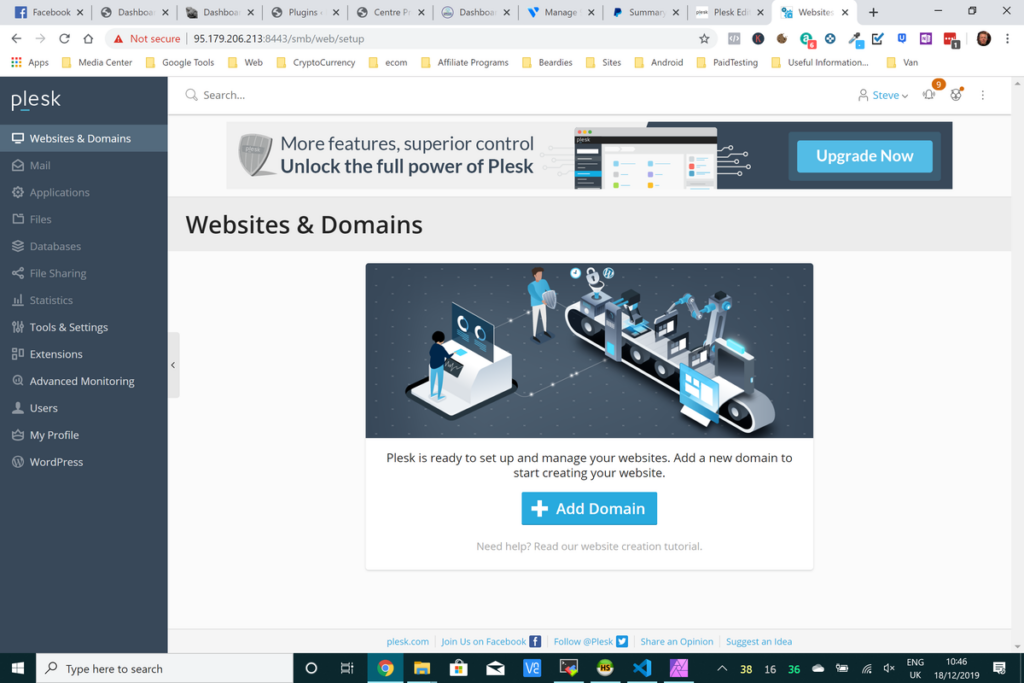
When you first login, Plesk will initialise itself. This can take a few minutes depending on which sized server you chose.
Once it’s initialised, choose the Websites And Domains tab as shown in the screenshot. In my example I have chosen to add a domain that is already registered but you can register domains through Plesk itself. I’ve not investigated the prices of this at this time though.
Enter Details
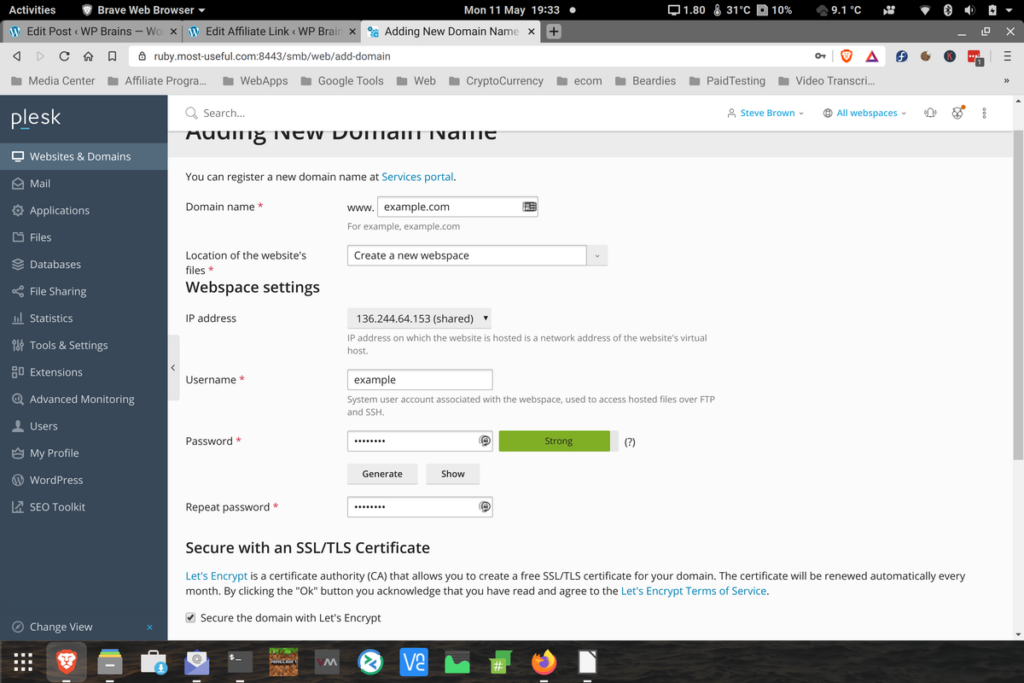
Enter the details into the screen. They’re fairly self explanatory.
You’ll notice that Plesk supports LetsEncrypt certificates and automatically installs and keeps these up to date for the domain.
It’s very nice and highly recommended to have an SSL certificate set up for your website as Google is pushing SSL secured websites over and above non SSL encrypted.
Choose a secure password for the domain as this will (if you leave SSH password access) be the way you can login to the shell and upload files through FTP if you need to. Clicking the generate button will generate a secure password. You can copy and paste the password somewhere for now or add it to something like LastPass.
Use The WordPress Toolkit
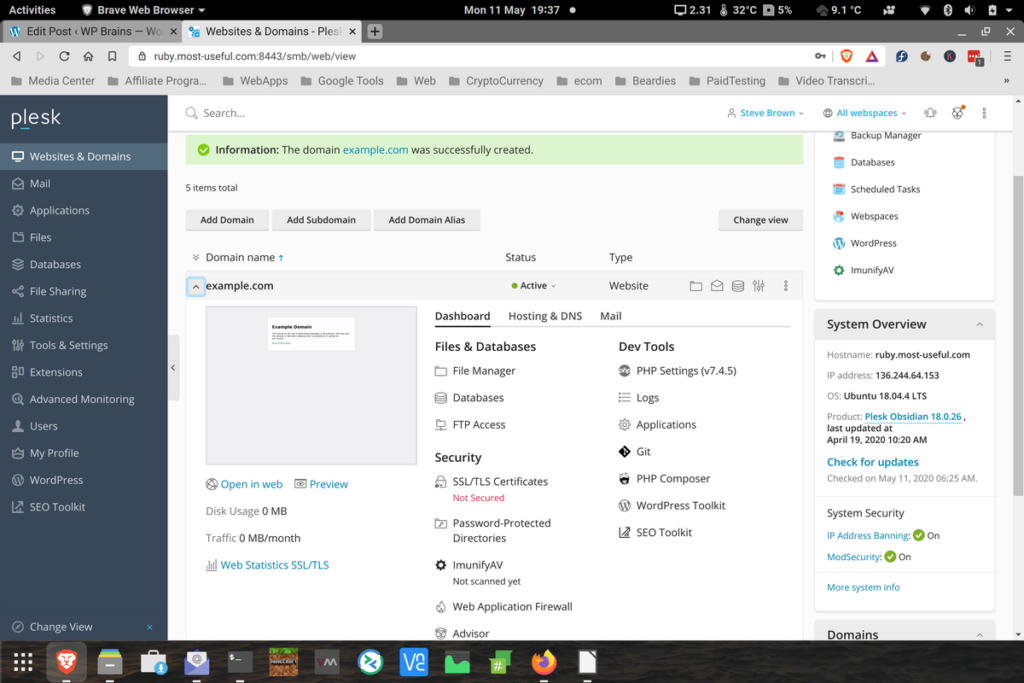
Once Plesk has created the domain and hosting package on your server you should see a screen like the one above. You’ll see a little screenshot of the website, which will initially be the default Plesk page. Looking at the right hand side there under Dev Tools you’ll see WordPress Toolkit. Clicking that link is the next step to getting your WordPress installation set up on Vultr.
Install WordPress
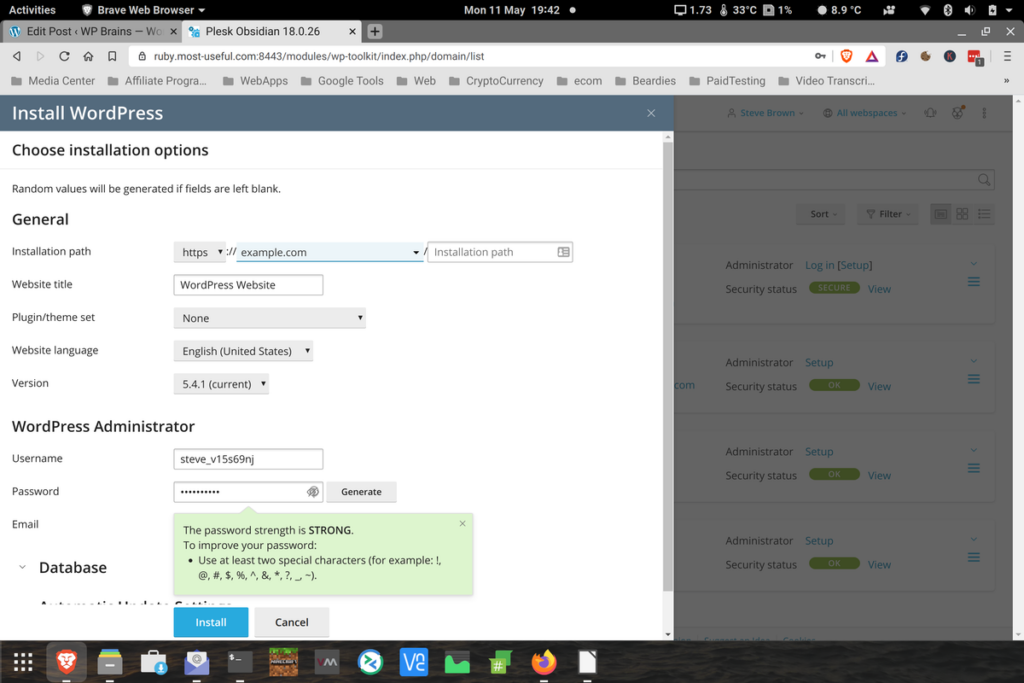
You’ll need to click the Install button at the top left hand side of the main window to see the screen shown above.
I don’t find this method of installation particularly intuitive or pretty. It’s OK, and it works, but I think the design of it and the workflow is a bit poor. Nevertheless, let’s crack on…
On the installation path line, choose the relevant domain name from the drop down. If you have multiple domains on your server then they’ll all be listed. If you already have a WordPress installation on that domain, the part after the slash ( / ) will probably say wordpress. You’re probably on the wrong domain if that’s what it says 🙂
I generally leave the rest of it as it is. Click the Install button
Admire Your New WordPress Installation
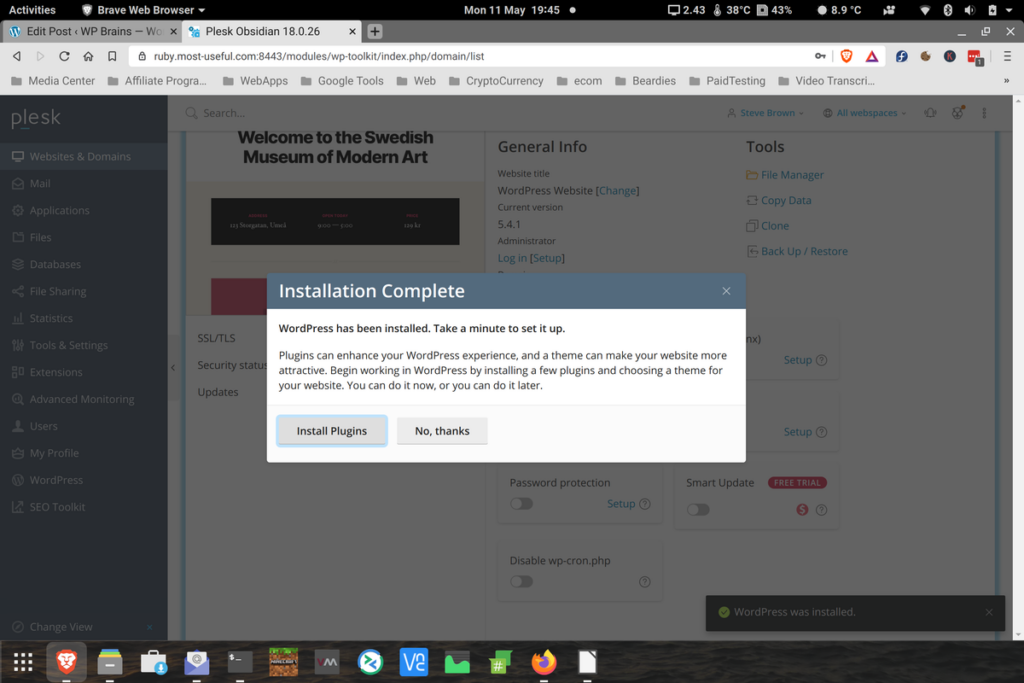
You can install plugins and themes straight into your WordPress install from Plesk, as well as upgrade them and remove them if you want. I generally do it all through the actual WordPress administrations screens but its up to you.
To get back to the WordPress management screens on Plesk (which let you access and modify the database among other things) you can click the WordPress menu item on the left hand menu at any time.
Final Words
Setting up WordPress on Vultr is really very easy. In this tutorial we have covered setting up the WordPress installation itself. We’ve not gone over actually setting up WordPress to look and feel how you want it to as that is the subject for another day. Also, it’s worth noting that Vultr offer a WordPress application which automatically installs WordPress on a VPS for you. I have used that WordPress application from Vultr and it is very good – however it does have some limitations. These limitations are;
- No control panel, just WordPress. So any administration has to be done via command line (or install a control panel)
- No easy ability to create e-mail addresses to go with the domain you set up
- Only one website can be hosted at a time, unless you switch to WordPress MultiSite and that’s a whole different kettle of fish.
- No PHPMyAdmin setup for you.
But it does have one significant potential benefit – and that is one of memory and processor footprint. Since the Vultr WordPress application is designed purely for running WordPress only, you can easily get away with using the smallest VPS Vultr offer which at the time of writing costs a mere $5 per month. The amount of RAM and processor will be suitable for even a medium traffic website.
Vultr servers are very very fast in my experience.
If you have any questions or comments please don’t hesitate to ask. Also, don’t forget, if you want $100 credit to play with the server before you decide to use it or not, you can use our link ( <- there ). The $100 is valid for 30 days, after which it will expire. $100 is a massive amount to be able to play around with.
Most-Useful.com Is Hosted On A VULTR VPS – Using Exactly That Method Above To Set It Up!
So when I originally wrote this article I was using WordPress on a VULTR VPS to run the most-useful.com website. I do still use WordPress but now I have everything setup using Gatsby as the front end and WordPress as a backend server. The Gatsby driven code still resides on a VULTR VPS though, even though the WordPress installation itself is a different system.


