Hackintosh on Surface Pro 3
Learn how to install hackintosh on surface pro 3. Step by step guide, including what works and what doesn’t.
Last Updated: January 11th, 2022
By: Steve
Contents
I’ve been playing around with various Surface Pro devices for a while now, mostly replacing screens and refurbishing them to sell on. Recently I picked one up a 256G storage, 8G RAM Surface Pro 3 on eBay for around £50. It was cheap because although the screen was intact, the touch didn’t work properly.
Why Hackintosh On Surface Pro 3?
I had intended on replacing the screen and flogging it on. And then I decided, for a bit of a techie laugh, I’d have a go at putting Hackintosh on it. If it didn’t go well I’d revert to my original plan and replace the screen and get it sold. I figured since Apple still haven’t embraced the 21st century and MacOS doesn’t support touch screen I wouldn’t miss it anyway.
So I set about investigating Hackintosh. I’d had a look at Hackintosh in the past – many years ago. It’s changed a bit. It’s a lot better these days. Clover EFI is fabulous for one. I can’t even remember how I used to boot them in the past.
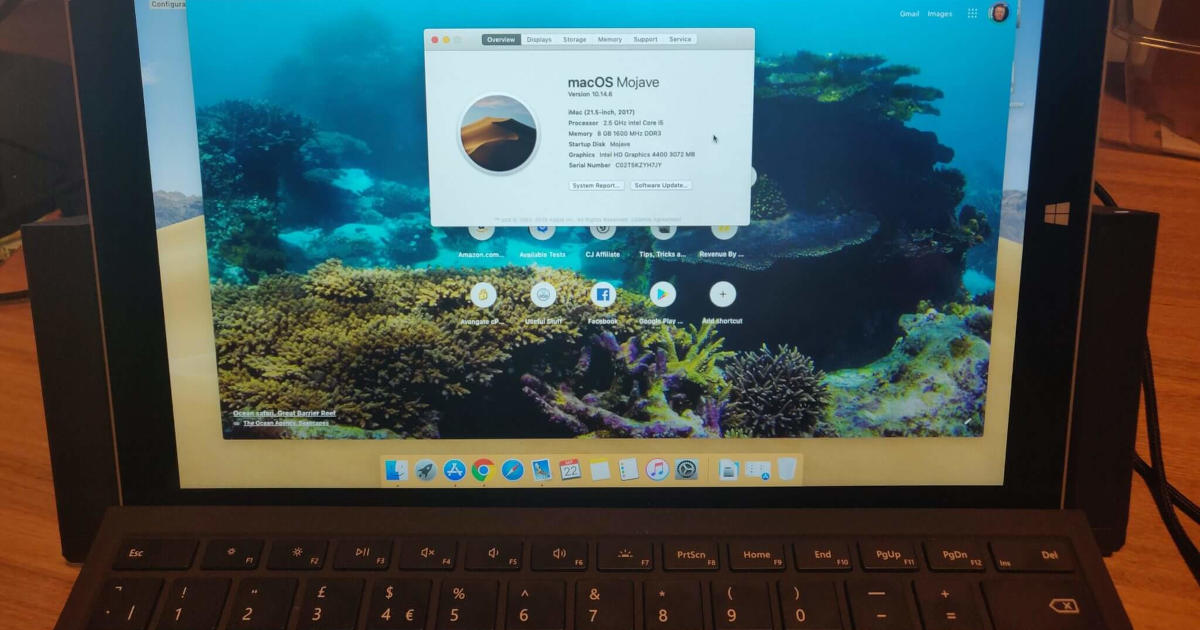
Anyway, this is how I did it. And by the way, for a total spend of around £100 I now have a very lightweight, ultra-portable laptop running MacOS.
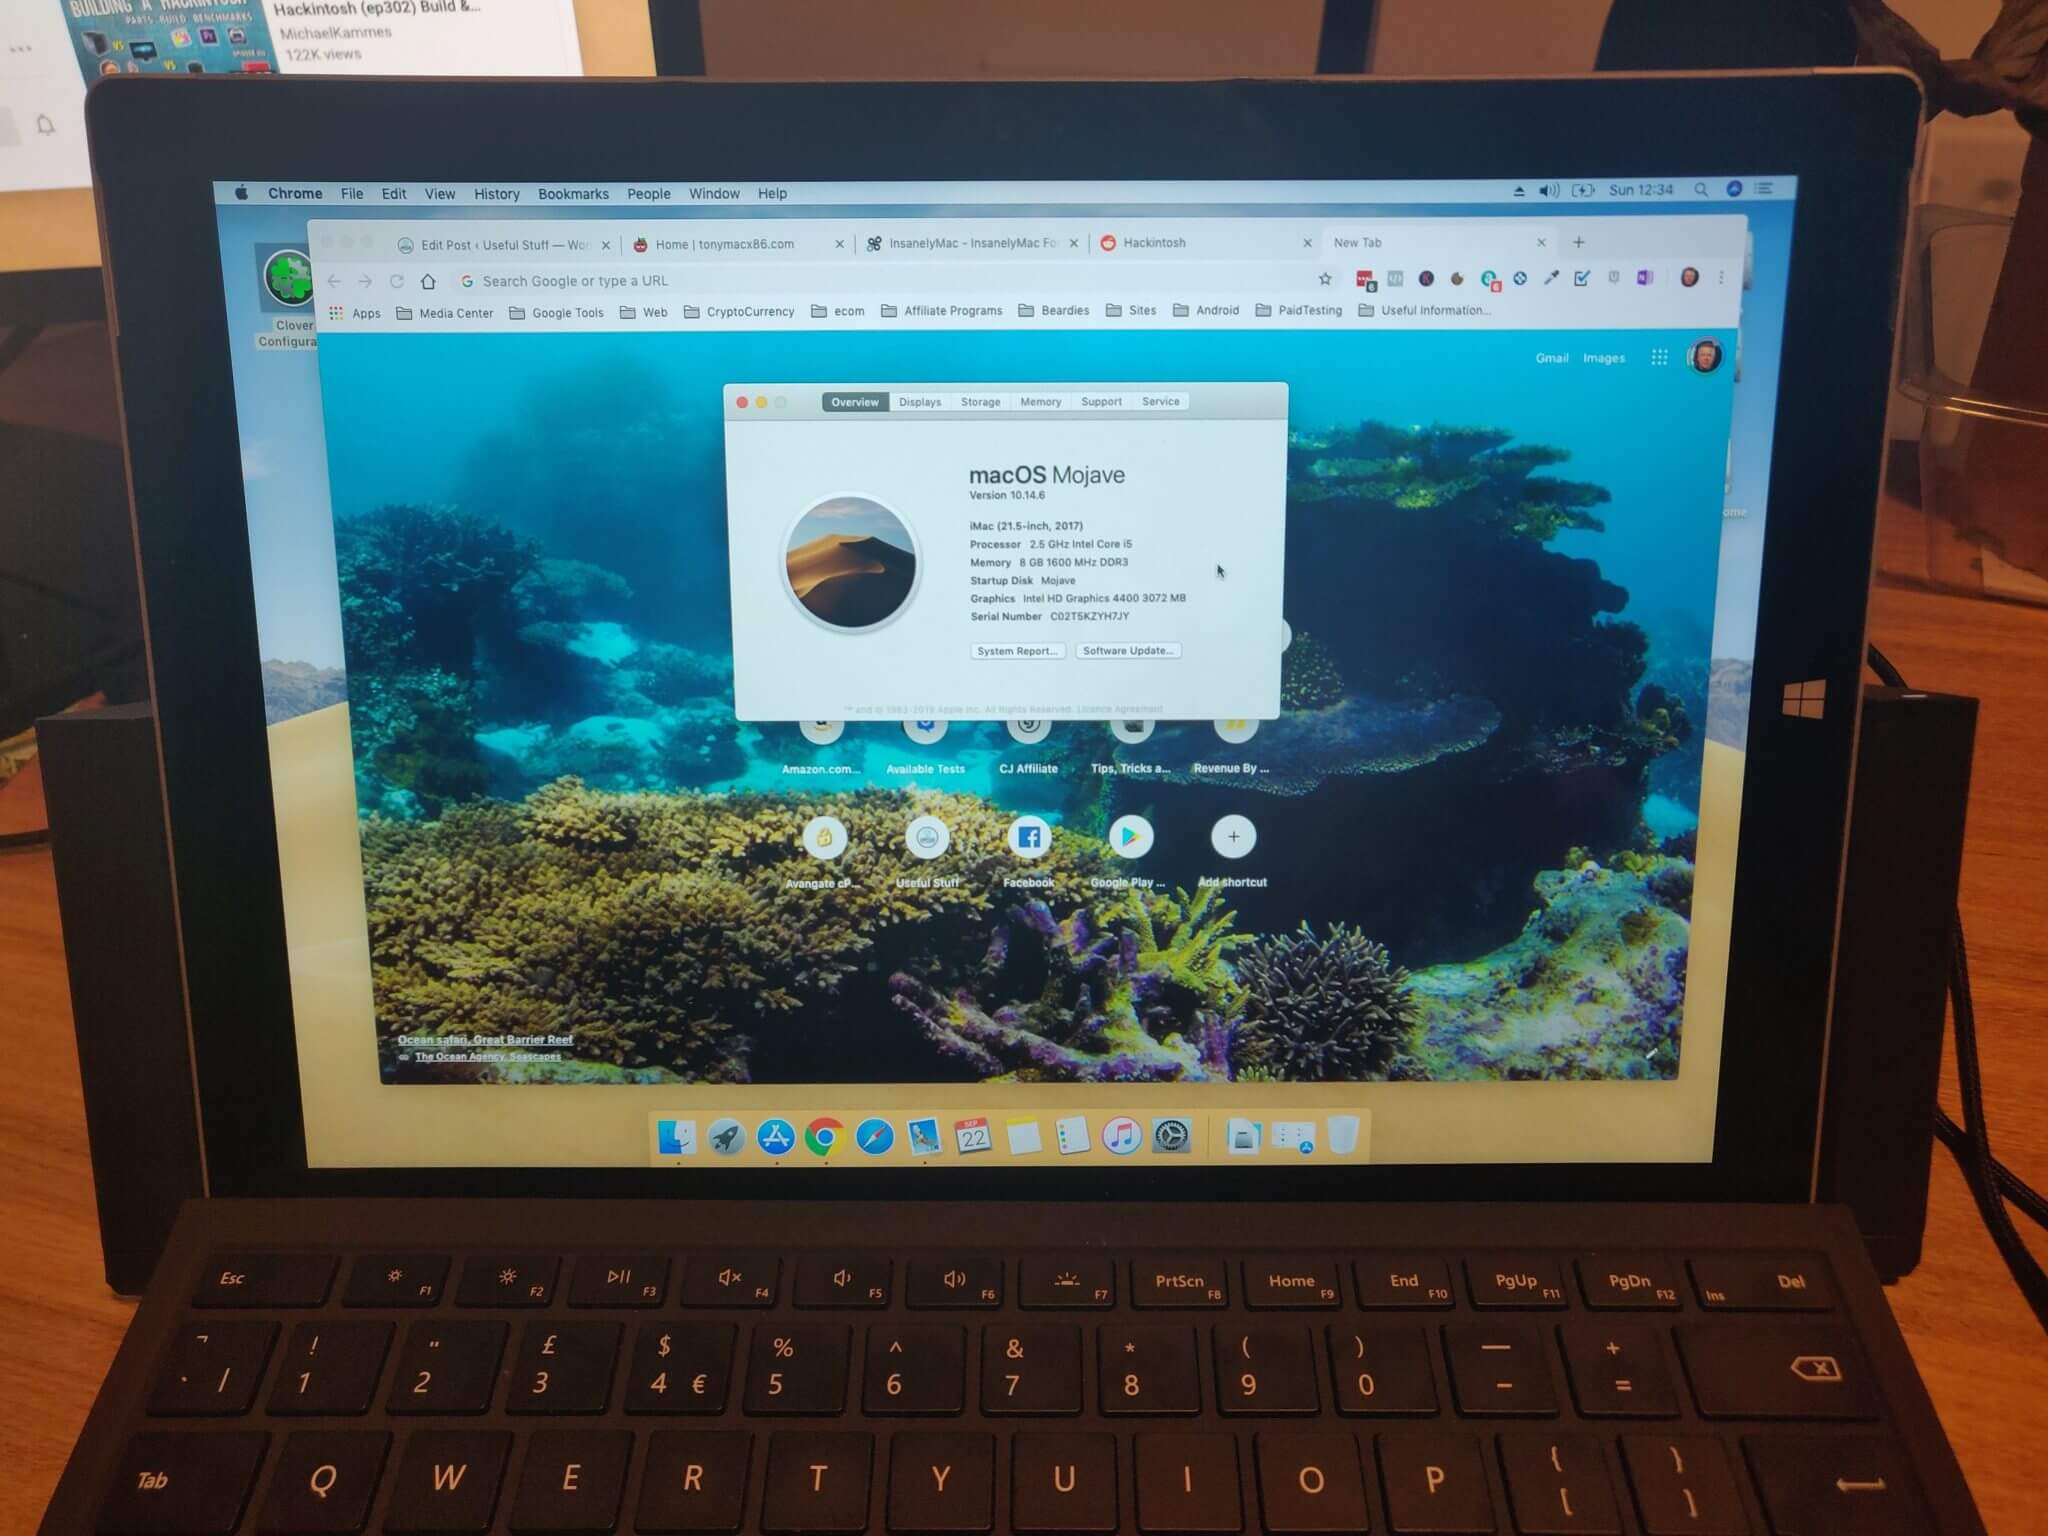
What Doesn’t Work?
Pretty much everything works as a normal Mac, with the exception of the following;
- WiFi
- Bluetooth
- Touch Screen (but Macs don’t have that either)
- Trackpad gestures (but does function as mouse)
- Secure boot (if you care)
- Hardware volume button
What You’ll Need
- A USB thumb drive with at least 8G of storage. Preferably USB3 for speed.
- A 4 port USB hub. Or a Surface Dock.
- A USB keyboard.
- A USB mouse.
- Patience. A lot of it.
A Surface Dock is highly recommended if you want Internet access on your Surface Pro 3 after the installation. The ethernet device in it works straight out of the box in OSX. Other USB devices such as WiFi dongles might not. I’ll update this article as I get more information.
I may update the drivers package to allow the Surface Pro Type Cover to work during installation at some point. At this stage I have only managed to get the Surface Type Cover 4 working (the one with the spaces between the keys).
WARNING – MAY BRICK YOUR DEVICE
It shouldn’t. But it might. If you’re not comfortable with messing around with advanced settings and making your life very difficult if something doesn’t work – DO NOT PROCEED.
This guide does not cover dual booting your device. I switched to OSX completely on my device and I’m sharing what I did. If you need dual boot, most of the techniques in here should work for you but I can’t guarantee it. Sorry.
If your’re still happy to proceed – shall we begin?
Where To Start?
Where did I start? I went to Google of course. And what I found was that the general opinion is that Surface Pro 3 is a horrible platform to turn into a Hackintosh. I didn’t care because I was just experimenting. I found many many sites describing problems and issues with getting the Surface Pro 3 to be a hackintosh. So it was a bit daunting. And it’s why I’ve written this guide – because it doesn’t have to be that hard.
After watching many different YouTube videos I came across Morgonaut’s YouTube channel. Morgonaut doesn’t go into detail about Surface Pro itself, but she gave me enough information to be able to begin. I’ve embedded the video below – but I highly recommend checking her channel out. She will guide you through the steps to installing Hackintosh on any platform.
This tutorial could not exist without her – please consider visiting her YouTube channel
You’ll need a USB flash drive with at least 8 gigabytes of space. I used the SanDisk 64 gigabyte Ultrafit USB3
How To Install Hackintosh on Surface Pro 3
Time needed: Approx. 2 hours
- Get a copy of OSX from the Apple Store
For this you’ll need access to a real Mac with the App Store installed. There are other ways but I didn’t need them. Morgonaut talks about the other ways in her video above, so I’m not going to here.
Open the App Store and search for Mojave. Download the installer from the App Store.
When it’s downloaded it will automatically open. We don’t want to install it on the Mac we’re downloading on, so just close it. - Prepare your flash drive
Open Disk Utility. You can hit CMD-Space and type in Disk Utility to find it. Or it’s in Applications / Utilities folder in Finder.
At the top left click Show All Devices. Select your flash drive and choose Erase. Make sure you’re selecting the right disk – you do not want to erase the wrong one!
- Erase the flash drive
When you hit erase you will be presented with another dialog box as per the image below. I recommend you call the new volume INSTALLER to make it easier to follow the remaining steps. Make certain that GUID Partition Map is selected as MBR may be selected by default. Leave the format as Mac OS Extended (Journaled). Then click Erase. It should only take a few seconds.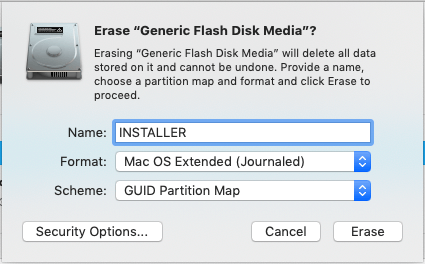
- Create The Install Media On USB
For this step you’re going to need to get dirty with the terminal. Open Finder and press CMD-Shift-A to go to the Applications folder. Find Utilities folder and navigate into it. Then find Terminal and open it.
Copy and paste the following command into Terminal
sudo /Applications/Install\ macOS\ Mojave.app/Contents/Resources/createinstallmedia –volume /Volumes/INSTALLER
If you didn’t set the name of the USB flash drive to INSTALLER in the previous step you’ll need to replace INSTALLER with whatever you did call it.
Follow the instructions the creation process gives you. It will take quite some time depending on your Mac. - Get Clover EFI Bootloader
Once the above step has completed you will have an installation disk that can be used on a real Mac. But you won’t be able to use it on a non-Apple device. For this we need Clover EFI Bootloader. This is an open source bootloader.
To get it, open your browser and go to https://sourceforge.net/projects/cloverefiboot/ (or click the link)
Click the Download button and wait 5 seconds. - Install Clover EFI Bootloader
Find the download (it’s probably in Downloads folder?) and unzip it. You can just double click on it to unzip it. Navigate into the directory and Right Click on the Clover package and click Open.
You’ll be asked for your password. Supply your password and click Open.
If you just double click the package in Finder MacOS will block the application from opening because it isn’t signed by the App Store. Using Right Click open gets around this. You’ll then see the screen below. Click Continue.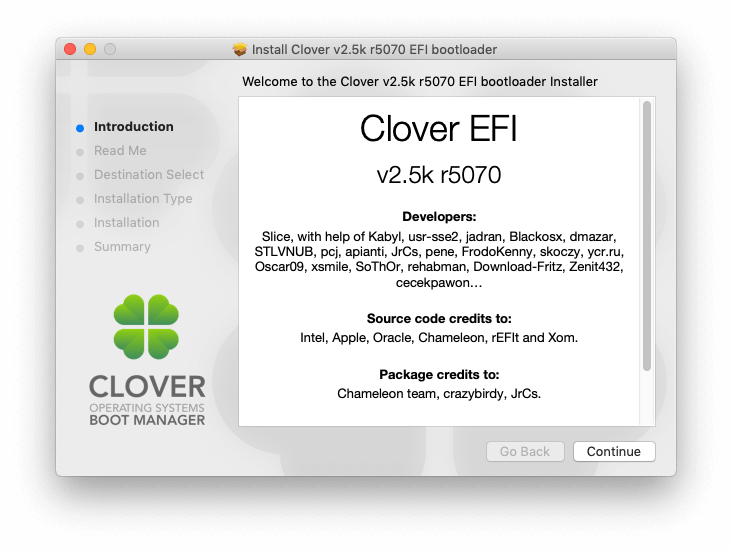
- Change Clover Install Location
By default Clover will try to install itself to the system disk. We don’t want this because we’re currently on a real Mac and it doesn’t need Clover. See the screenshot below, click the Change Install Location button. Do NOT click Install until you have changed the Install Location.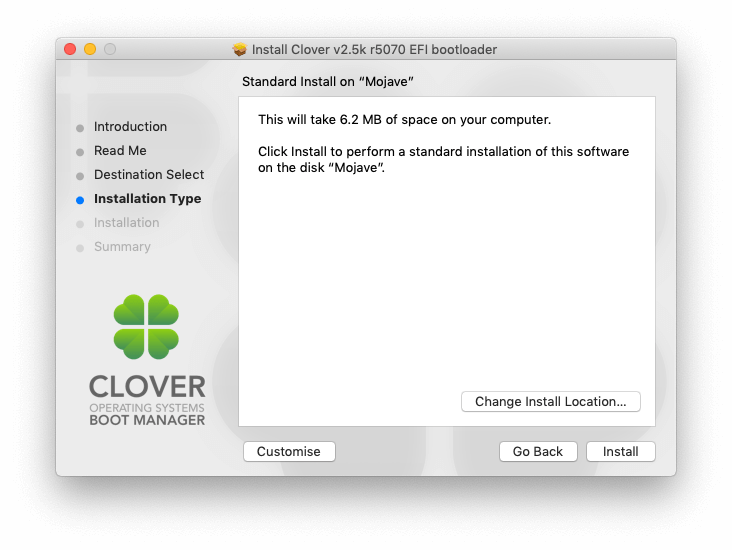
- Verify Change Of Install Location
Check that the installer is going to write to the correct disk. It’s probably a white looking disk icon as in the picture below. You may have more disks showing than I do – check the disk size if you’re not sure which one it is. The green arrow should be pointing to the disk that is the same size as your USB flash drive. It definitely should not be the size of your Mac’s internal disk…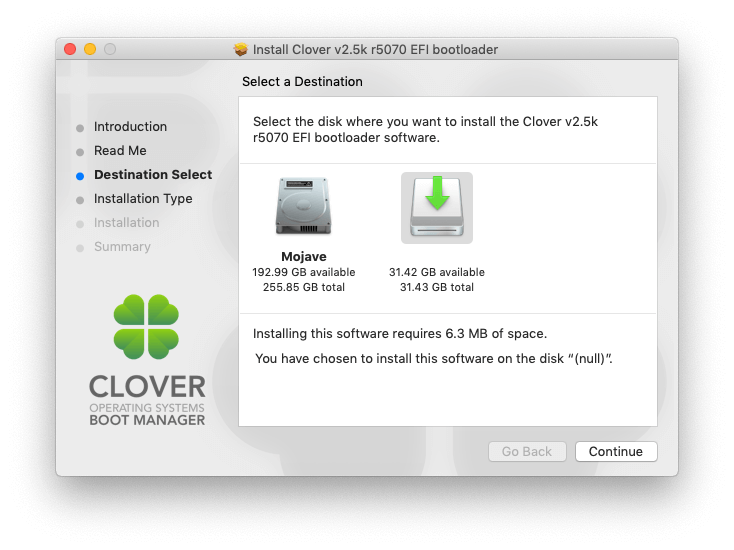
- Customize the install
After you’ve clicked the Continue button in step 8 you’ll go back to the screen in step 7. Now click the Customize button on the bottom left hand side of the dialog box.
Put a tick in the box marked Clover for UEFI booting only.
Under UEFI drivers, make sure VBoxHFS and ApfsDriverLoader are selected. You’ll probably boot straight into Windows if you don’t have these two selected.
Make sure OsxAptioFixDrv is also selected – the boot process will hang without this.
You can now click install. You’ll need to enter your password again. Then just wait until it’s finished. This step won’t take too long to finish.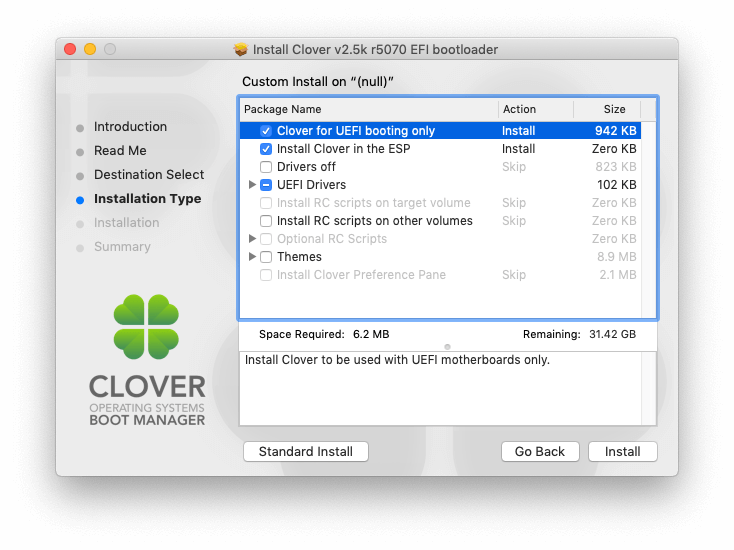
- Get Clover Configurator
Download the Clover Configurator application from https://mackie100projects.altervista.org/download-clover-configurator/
This will help you to install drivers and kexts (kernel extensions) that are need for successfully running Hackintosh on a Surface Pro 3.
Once it’s downloaded, unzip it and Right Click->Open to open the configurator application. - Configure the EFI Drive On The USB Flash Drive
After you have installed Clover to your USB Pen Drive you should notice an EFI disk drive icon on your desktop. If it isn’t, you should be able to find it using Finder.
Open the EFI disk and navigate to EFI / CLOVER folder. Right click over config.plist and Open With Clover Configurator as per the screenshot below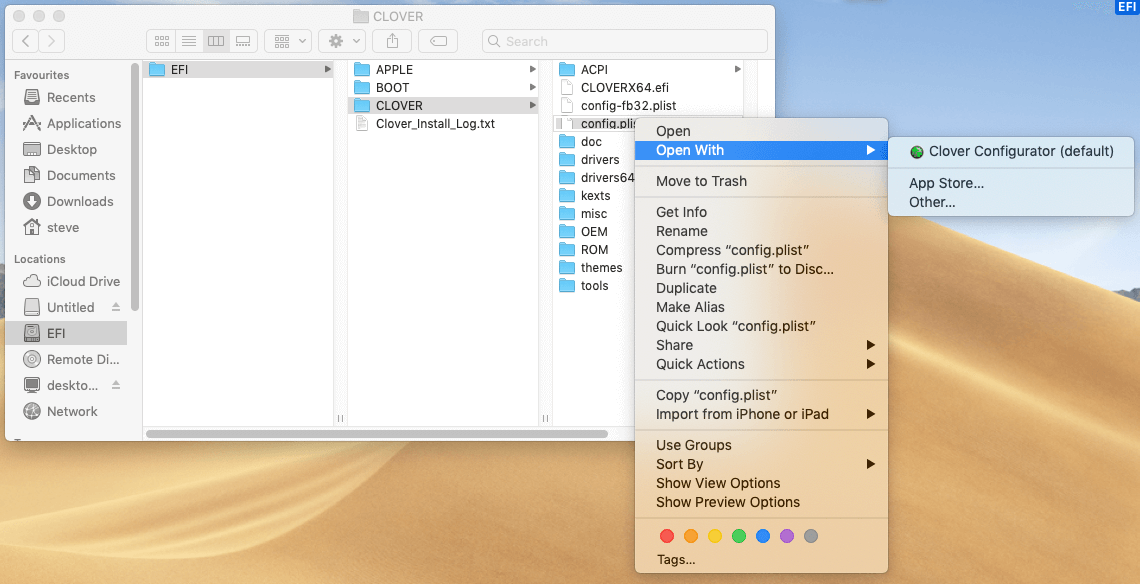
- Install the necessary KEXTs (Kernel Extensions)
Kexts are MacOS kernel extensions. You need some of these to make MacOS work on non-Apple hardware. You’ll need to be connected to the internet.
Choose Kexts Installer option on the lefthand sidebar of Clover Configurator
In the top right corner of the Clover Configurator you will see an OS Version drop down box. You should choose Other. Put ticks in the following checkboxes under the name column.
Lilu
WhateverGreen
FakeSMC (you need to scroll down to see this one)
Then click Download. The KEXTs will be installed into the Other folder on your EFI partition. You will be asked which sensors you wish to install. You can choose them all. When it’s all downloaded you can Quit Clover Configurator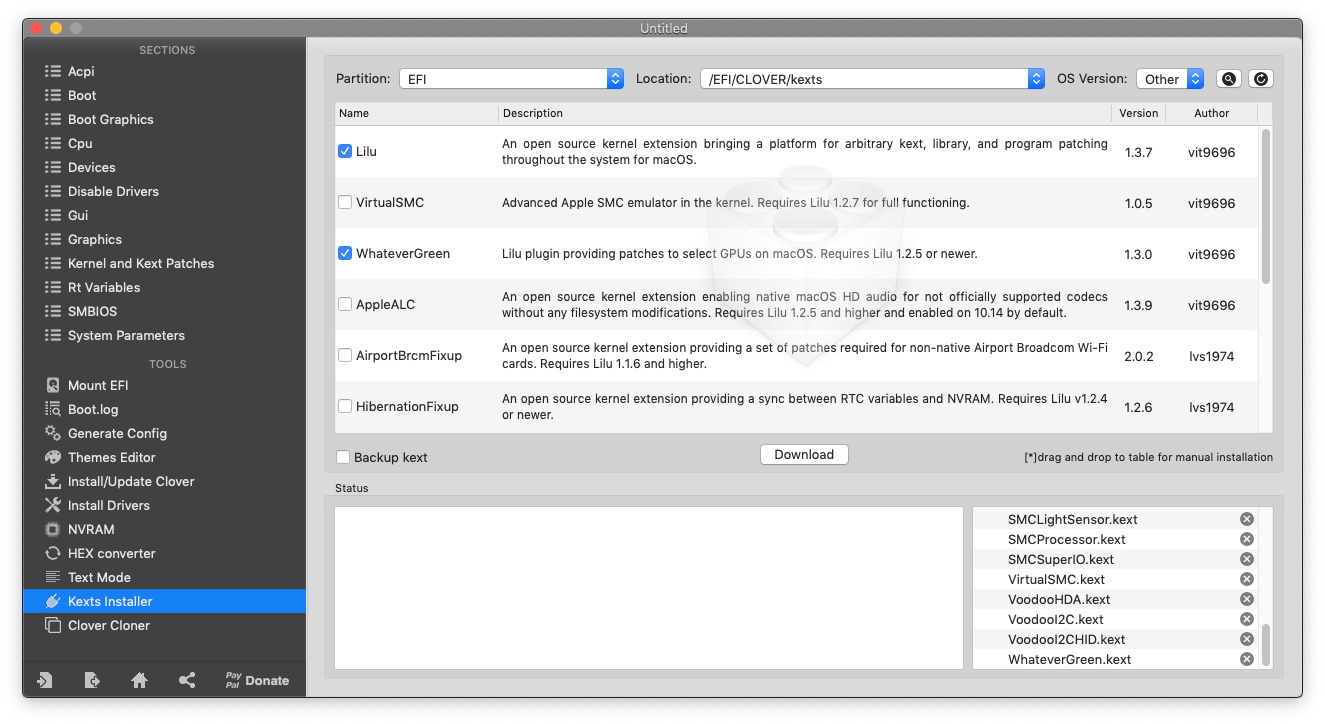
- Create your own config.plist
In the EFI / CLOVER folder on the EFI partition you were working with Clover Configurator earlier, select the config.plist that we used to open Clover Configurator in step 11. Right click and Move To Trash. Then empty the trash. We’re going to get a fresh config.plist designed for our processor and hardware.
The fresh config.plist for the Surface Pro 3 can be downloaded from https://hackintosh.gitbook.io/-r-hackintosh-vanilla-desktop-guide/config.plist-per-hardware/haswell
Don’t worry too much about all the explanation in there unless you’re interested in what goes on under the Hackintosh hood. Downloading from that page is a pain, so I have created a sample config.plist which you can downloaded from https://www.most-useful.com/wp-content/uploads/2019/09/SP3-sample-config-1.txt
You’ll need to right click -> Save As… to save the file, otherwise it will just display within your browser as text.
The file available from this site is identical to the sample listed above except that I have changed the system type to appear to be a MacBookAir. You can change it in Clover Configurator if you’d prefer something else.
Move that downloaded file to EFI / CLOVER and rename it to config.plist - Copy Utilities to USB Drive for later
To be able to boot from the Surface Pro 3 hard drive later, you’ll need to install Clover and the Clover Configurator on it. Copy the downloaded Clover file from Step 5 and the clover Configurator install files from Step 10 to your USB thumb drive at the top level. Having them there won’t interfere with the installation and they’re ready to go later.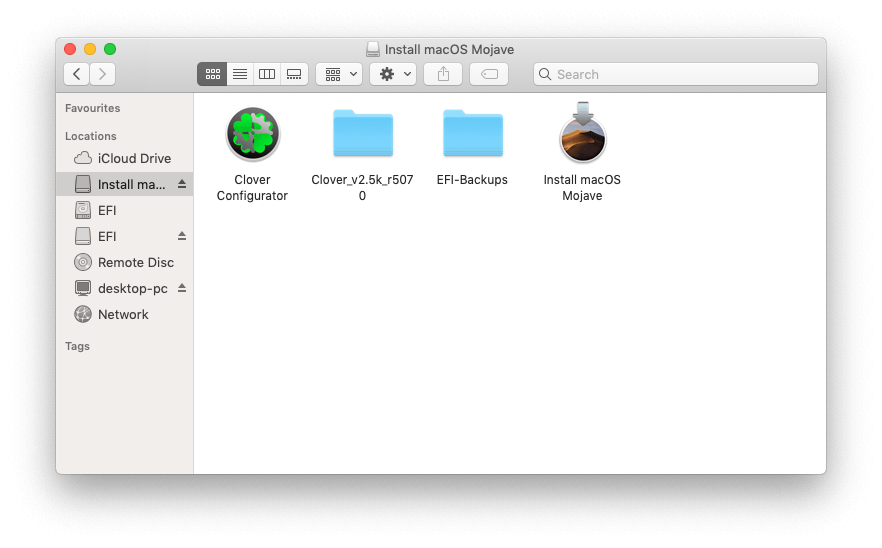
- Preparation Finalised!
Now is the moment of truth… The boot disk is ready for use in your Surface Pro 3. Eject the disk and choose Eject All when asked.
Be SURE YOU WANT TO DO THIS
THERE MAY BE NO TURNING BACK FROM THIS POINT. SEE DISCLAIMER AT THE TOP OF THIS ARTICLE BEFORE PROCEEDING FURTHER… - Reboot your Surface Pro into UEFI Settings Screen
- Make sure your Surface Pro 3 is turned off.
- Hold down the ‘Volume Up’ button on your device.
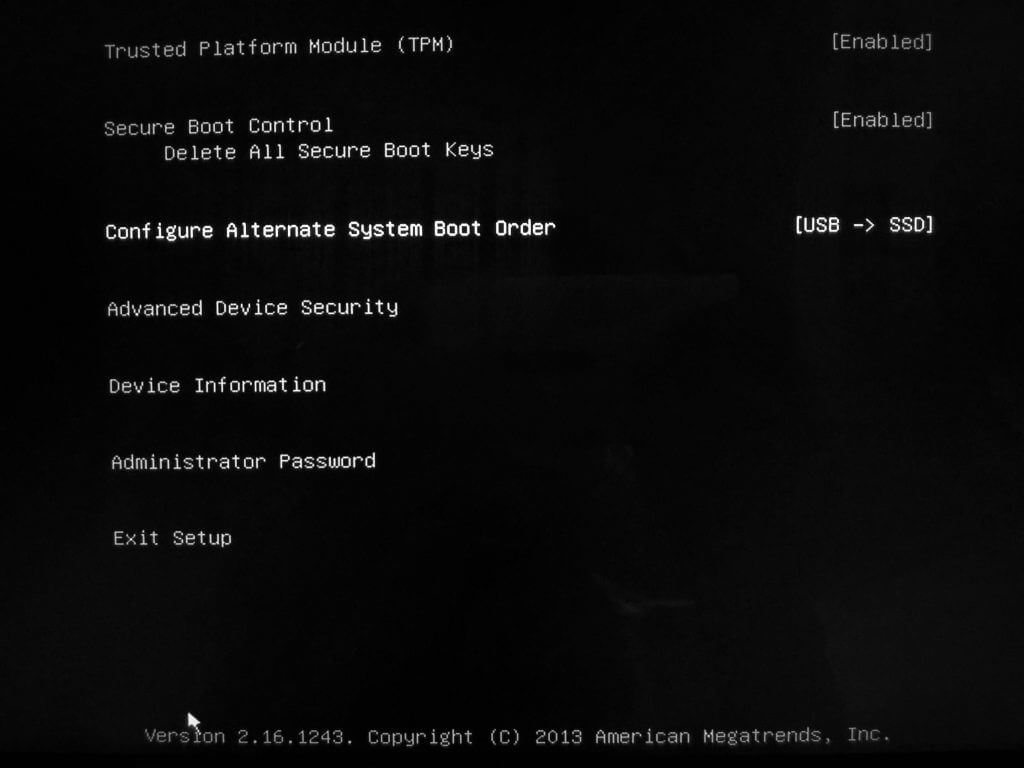
- Whilst still holding the Volume Up button, press the power button. Your Surface Pro should start up and enter a screen that looks like the image below.
- More information about the Surface Pro 3 UEFI boot screen is available from https://surfacetip.com/configure-surface-pro-3-uefi-bios-setup/ which is where I have ‘repurposed’ this image from 🙂
- Change settings to boot from Unsigned USB
The USB thumb drive we have prepared is considered an insecure way to boot a device. By default your Surface Pro will only allow operating systems signed by Microsoft to be installed. We need to change that.- Disable the TPM setting
- Disable the Secure Boot setting
- Make sure the Boot Order is set to USB->SSD
- Exit setup, saving any changes you had to make
- Begin MacOS Installation
Power up your Surface Pro 3. You should, if everything is setup correctly, see a Clover Boot screen after a few seconds. Prior to. that you’ll see the standard Surface logo, but it’ll be on a red screen. This is because we’re not in Secure Boot mode any more.
Once the Clover screen is visible use the keyboard arrow keys to navigate to the install macOS Mojave partition.
Press enter and you’ll see a lot of debug messages. Hopefully eventually (it’ll take a while) you’ll get to the standard Mac install screen.
The screen will be very hi resolution and the text very small. If you’re old like me you may need some reading glasses!
During one of my tests my TypeCover got completely confused and wouldn’t talk to the Surface any more. I’ve yet to work out what happened and can’t reproduce the problem even after multiple installs. My best advice here is not to detach your TypeCover during the install just in case that’s what I did… - Erase Internal SSD
As I said at the beginning, this tutorial does not cover dual booting. I erased my Surface Pro drive completely. It is possible to dual boot, but I have not done it.
When the MacOS install screen shows, choose Disk Utility. Select the internal SSD (check the size to make sure it’s the right one). Choose the disk itself, not the partition. Choose Erase.
Name the drive MOJAVE. Choose GUID Partition map. Choose MacOS Extended (Journaled) for format. Then hit Erase. This will destroy all your data on the Surface Pro internal drive. Be sure you’re comfortable with that.
When it’s finished, click Close - Install MacOS
Choose Install macOS. Follow the standard macOS installation procedure.
Morgonaut’s video has step by step instructions for this, I won’t repeat them here. The video walkthrough is at the top of the page.
The installation will reboot twice during installation. When it does, be sure to boot from MOJAVE instead of install macOS Mojave option when you get to the Clover screen. If you choose the ‘install macOS Mojave’ by mistake you’ll end up going through the same process over and over.
Tip: During installation you may be asked to sign in to your Apple Account. I found this didn’t work – at the top of the dialog in very small text is an option to do this setup later. I chose that and continued with the install. - Setup Boot from hard drive
The MacOS installer expects it’s installed to a genuine Apple Mac. This means it won’t load any of the things we need to get it working on the Surface Pro 3. We need to do that ourselves.
Open the INSTALLER USB disk. Find the Clover package you copied to it in Step 14. Right click over the PKG file and select Open. Click Accept and Continue until you reach the screen shown below. It may look familiar – we used this process earlier too.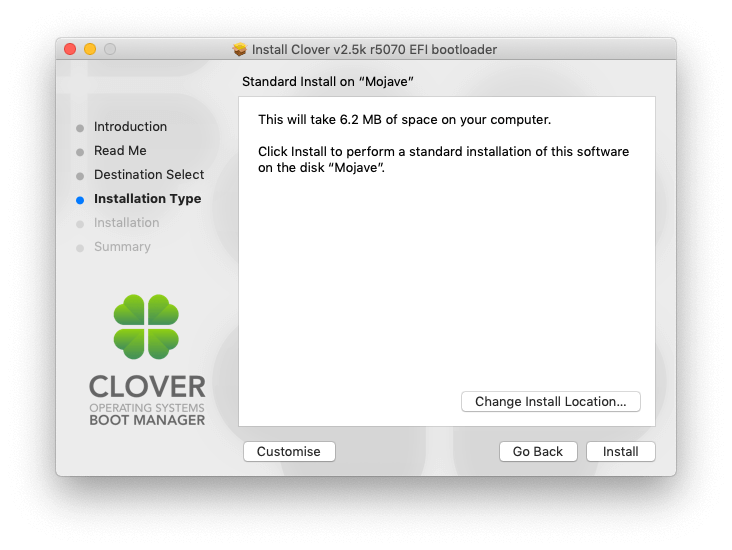
- Check install location
This time, we do want to install it to the system disk, and by default Clover chooses that location. But it’s wise to check. In my case it is – the grey box outline shows which drive is selected. The white disk indicates a USB drive – not the one we want.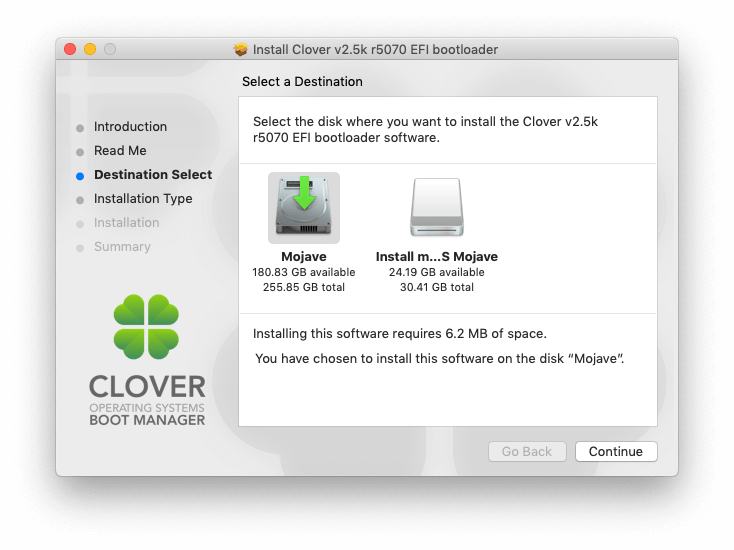
Check the grey boxed location and the green arrow. As you can see in this example, it’s set to the internal SSD of the Surface Pro 3. - Customize Clover again
Select the Clover for UEFI booting only option, and install Clover to the ESR.
Leave the recommended drivers checked. Make sure the ApfsDriver is checked. Click Install to install Clover to your Surface Pro SSD.
I also installed the Clover Preference Pane on this occasion so I can keep things up to date from within Mojave.
Copy the Clover Configurator from the USB to the desktop after Clover is installed. You’ll need it later.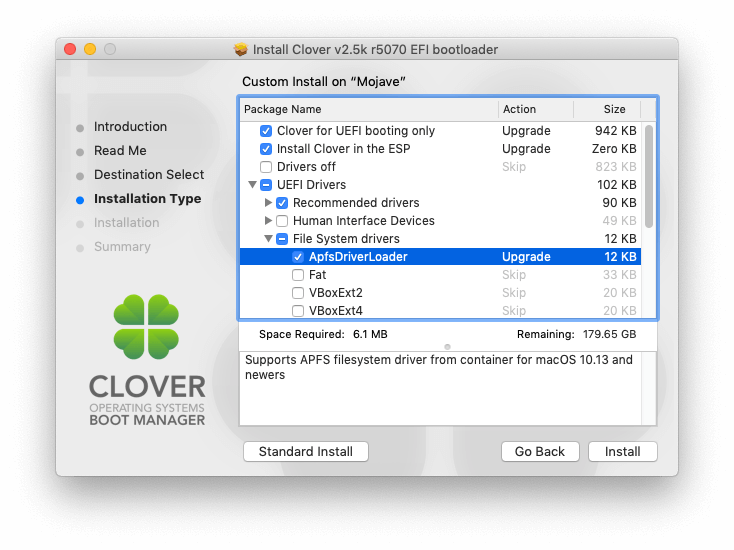
- Make sure all disks are showing on the desktop
You should see MOJAVE and EFI disks on your desktop. If you don’t then open Finder, choose Preferences -> General and click on Show Hard Disks.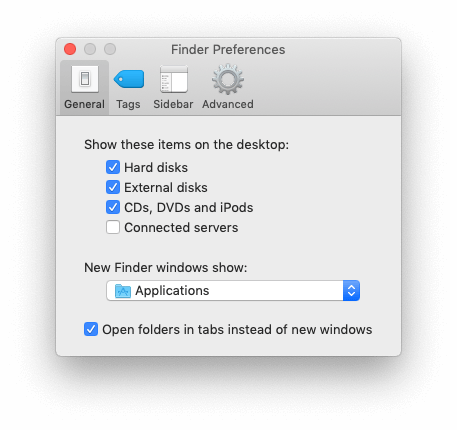
- Open Clover Configurator again
On the USB disk you should find the Clover Configurator if you copied them in step 14. Right click on. it and choose Open. On the left, click on ‘Mount EFI’ and choose EFI on install macOS Mojave to mount.
You will now have two disks listed as EFI on your desktop.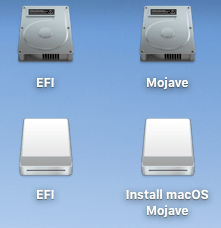
- Open EFI Partition in Finder
Double click on the Silver EFI drive from the step above. This is the EFI partition on your Surface Pro 3 internal hard drive. - Delete EFI folder
Make certain you’ve opened the SILVER drive. This is the drive in your Surface Pro 3 – we want to get rid of it as we’re going to replace the contents with the USB drives contents, since we already downloaded and booted from them so we know they work.
Right click over the folder icon and select Move To Trash. Leave the window open.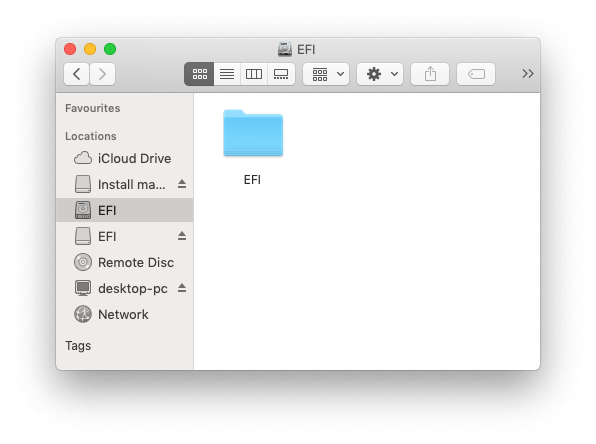
See how the silver disk is shaded in the left hand sidebar and the title shows the silver looking disk icon. - Copy and paste EFI folder from USB Disk
Double click on the white EFI drive to open it. Right Click the EFI folder there and choose Copy.
Select the silver drive window (the one we just deleted the EFI folder from, which should now be an empty window)
Right click anywhere in that window and choose Paste. The EFI folder from your USB should now be copied to the SSD disk. - Reboot from SSD
Reboot your Mac, removing the USB drive after it shuts down but before it starts up again. You can remove the USB drive when you’re looking at the red Surface logo if you like.
At the Clover screen you should see the MOJAVE disk and no USB drives. You might see some other options. Choose MOJAVE and your new Hackintosh should boot from the SSD. You can now either repurpose your USB or keep it in case you need to boot from USB in the future. - You now have a bootable Hackintosh on Surface Pro 3
Many of your devices won’t work yet though – to fix that we need to download the EFI drivers from GitHub. I wish I was clever enough to have been able to contribute to these, but I’m not.
Download the zip by going tohttps://github.com/hacker1024/Hackintosh-Clover-SurfacePro3and choosing Clone or Download. Choose Download ZIP and save it to your Downloads folder. The original link I used has now disappeared. I have found another at https://github.com/ivanbowman/Surface-Pro-3-Hackintosh but I have not tested this – please let me know in the comments if it works.
Unzip the contents and open the folder. You should a list of files and folders as shown in the screenshot below.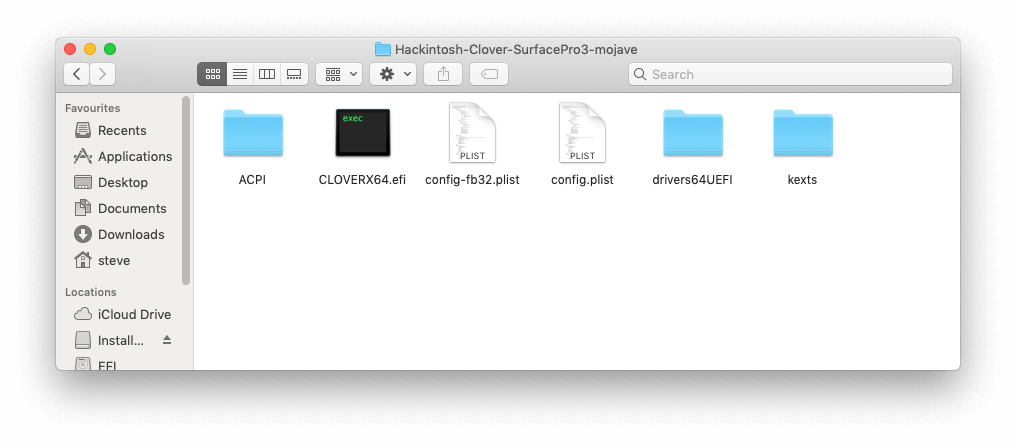
- Copy these files to your EFI drive
If you cannot see the EFI drive you can mount it with the Clover Configurator as we have done previously. With the drive mounted, double click on the EFI drive icon to open it. Navigate to EFI / CLOVER folder as shown below.
Copy the files and folders from the downloaded Hackintosh-Clover-SurfacePro3-mojave folder into the EFI / CLOVER folder and reboot. - You’re done!
Enjoy your new Hackintosh on Surface Pro 3!
Customize
Now that you’ve got OSX setup and running, with sound and graphics drivers etc you’ll probably want to customize it. With the drivers provided you can adjust the screen resolution to something more comfortable.
Sound should be working. Test it out using the control panel applet.
The world ( or Steve ) is your Oyster…
Things That Should Be Working At This Stage
- Booting from the internal SSD in your Surface Pro 3
- Surface TypeCover – provided you have the version that has space between the keys. I couldn’t get the version without spaces (the older type cover) to work at all, even with fixes mentioned online.
- Rudimentary touch is implemented with the drivers. You can’t do multitouch with it, but you can point at things and click on them using the touch screen. This in itself is amazing.
- Sound, works fully through the speakers. I couldn’t get the headphone socket to work but will continue to investigate this.
- Ethernet through the Surface Dock works – I’m accessing the website through it to type this article.
- Multiple screens through the Surface Dock.
- Sleep and Resume.
If you find that your sound is too quiet on the Surface Pro 3, I have uploaded a version of the drivers with a tweaked VoodooHDA KEXT that boosts the sound. You can fetch it by clicking here.
Things That Don’t Work
- WiFi – probably never will
- Bluetooth – also probably never will
- Multitouch – either on screen or touchpad. May never work. I’ll keep looking though
- Headphone socket – I think there’s fixes around for this but since I don’t use it, I haven’t tried.
Things I Haven’t Tried
- iMessage
- FaceTime
These may work. People say they do. I haven’t bothered to look because I’m on Android anyway 🙂
Acknowledgements
This article would not have been possible without the exceptional information scattered around the internet. I make no claims to having figured ANY of this out for myself. All this article attempts to do is bring all the information together in one place to make it easier for Surface Pro 3 owners who want to try Hackintosh.
In no particular order then. Well, except for Morgonaut without whose video I wouldn’t have even started;
Legal Information
I am not a lawyer. Is this legal?
It’s a grey area.
If you do not have any Mac at all then you will need to download a copy of OSX from a less than reputable source. This is definitely piracy.
If you do have a genuine Apple Mac then you can fetch the OSX software from Apple themselves. However, the licence agreement is clear – it is only for use on Apple Branded hardware. The problem is, since about 2015 Apple branded hardware is substandard and overpriced. They’ve concentrated only on the iPhone/iPad/Watch line and they’re ignoring Mac users. This is a shame. A decent touchscreen 2 in 1 running MacOS (not iPad Pro running iOS) would suit me nicely. So long as it’s nice and thin like the Surface Pro.
Anyway, technically, no, you shouldn’t do this. I don’t think Apple care that much. If you’re using this method to install OSX to then go on and develop apps using XCode then you’re supporting the ecosystem and generating profit and interest in the iOS market. So they probably don’t care. But who knows. If they tell me to take this down I will.


