Can I Upgrade the Storage in the Geo Flex 2 in 1 laptop?
Learn how you can upgrade the storage in the GEO Flex 2 in 1 laptop in some instances. Note though that not all models are capable.
Last Updated: October 17th, 2023
By: Steve
Contents
Can I upgrade the storage in the Geo Flex 2 in 1 laptop? The short answer to this, is a resounding yes, you can. At least, the version of the Geo Flex 2 in 1 that I have, you can. Your mileage may vary.
Is Upgrading the Storage Easy?
This depends on your level of computer experience. If you’re familiar with tinkering around with hardware then it’s super easy to upgrade the storage in the Geo Flex 2 in 1. But it helps to know what you’re dealing with. Fortunately, this is something I’ve just done and I can guide you through what you’ll need and how to do it.
If you’re not familiar with playing with computer hardware, or don’t want to take the risk, you should be able to find someone locally who doesn’t mind reading this article to find what they need and performing the task for you.
Do bear in mind though, the following information MAY void your warranty. I have NOT contacted Geo Computers as yet to determine if it will.
Why Would I Need To Upgrade the Storage in the Geo Flex 2 in 1 laptop?
In a previous article about this laptop, I raved fairly hard about it. I think, despite Curry’s PC World’s sales staff, that this laptop is a great find for the price. Touch screen, tablet mode, tent mode, great little touchpad with multitouch gestures, the list of things to like goes on and on.
But in one area, the laptop lacks. Severely. And that is the area of storage space. Storage space, or hard drive space, determines how many applications, data or hours of music/movies you can put on a device. Bearing in mind that Windows itself uses approaching 11 Gigabytes these days, that leaves not much at all out of the 32Gigabytes that GeoFlex 11″ 2 in 1 laptop comes with.
It’s very easy to add a USB Pen-Drive to this laptop and the fact that both USB ports are USB3.0 is a bonus because they’re relatively quick. However, USB3 pen-drives are still slower than the built in drive that the machine comes with. So adding a USB3.0 drive will give you extra storage but there’s two problems;
- You can’t easily boot from the USB drive and although you can tell Windows 10 to install new software and stuff to this drive it all feels a bit disjointed.
- A large USB drive sticking out the side of the machine is prone to breakage. Not good for your computer and not good for your data.
So given those reasons, you may want to upgrade the storage in the Geo Flex 2 in 1 laptop as a result.
OK, You Said I Can Upgrade – How?
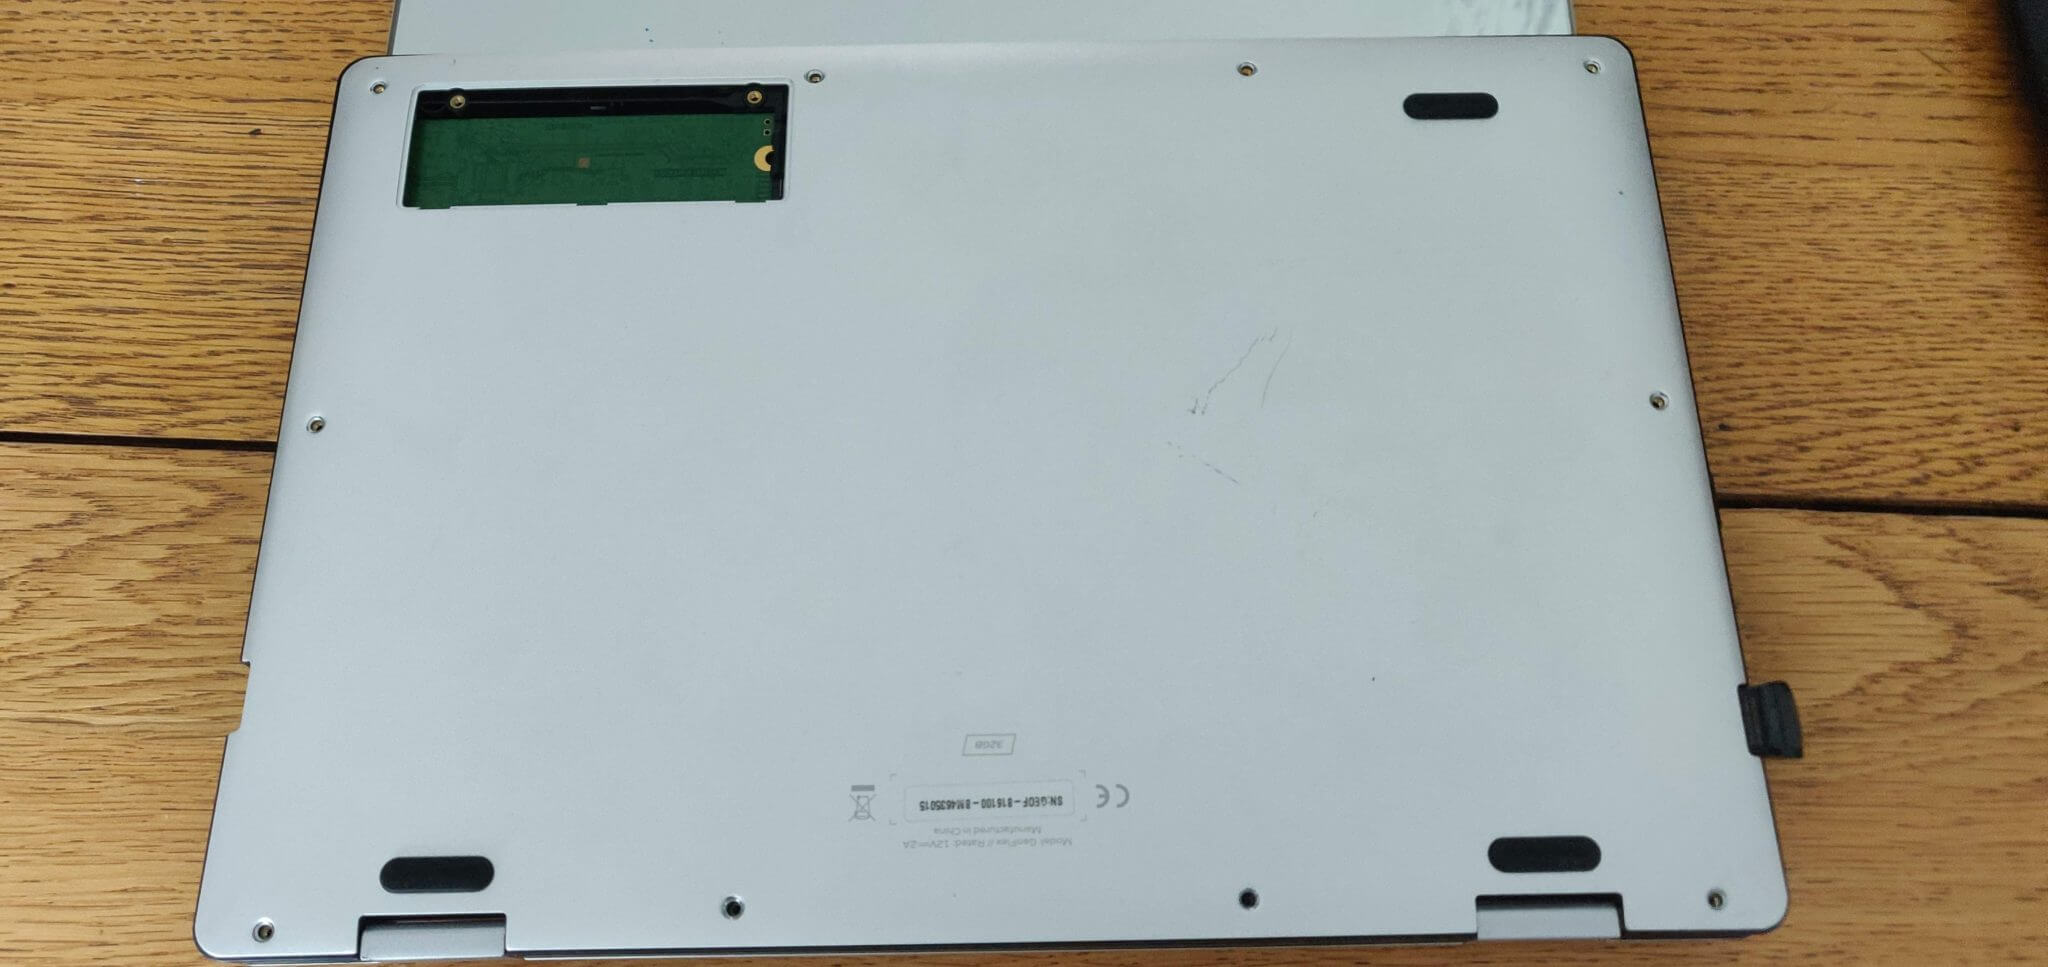
The Geo Flex 2 In 1 laptop comes with a small expansion ‘hatch’ at the bottom, underneath. It’s secured by two small Phillips head screws. Finding the right size screwdriver to remove this cover reveals an M.2 port, with a B-Key form factor.
If you don’t understand what any of that means, you can do a bit of research for yourself, or take the simple explanation that this is an expansion port into which a very small (in terms of physical size) Solid State Hard Drive will plug.
A Brief Note About M.2 ports and cards
I’ve had to do a LOT of reading around this new way of adding expansion devices to computers because I haven’t really played with hardware for quite some time. Briefly though, M.2 is a new way of connecting expansion cards to computers. It’s a small expansion slot, which takes cards that are generally 22mm wide and either 30, 42, 60 or 80mm in length. Some are 110mm in length.
M.2 form factor was previously called NGFF or, Next Generation Form Factor.
I’m not going to go into great detail about all this, the keywords above should help you to do a Google Search though if you’re interested in figuring it all out for yourself.
There are various interfaces of hard drives which match the M.2 form factor and it’s vitally important that you plug the right type into the right socket.
B-Keys and M-Keys
Firstly there are 2 types of notches – a B-notch (or B-key) and an M-notch or M-Key. The GeoFlex 2 in 1 laptop port contains a B-Keyed port. The key refers to an area of the substrate of the expansion card which has been cut away to provide a ‘key’ area. If your card does not have the right notch cut out it will not fit.
So, you need a B-Keyed M.2 card. An M-Keyed card will not fit. Some cards have both notches cut out, and indeed the drive most likely to work for you is actually one of these dual notched cards or a B-M-Keyed M.2 card. Cards with both keys cut out will work in either.
Next there are two types of interface for these expansion cards. There is a SATA interface and a PCIE NVME interface. The PCIE NVME interface itself comes in 2 variants, a 2x variant and a 4x variant. The 2x variants have a B-Key notch cut out, and the 4x variants come with an M-Key cutout. At least, that’s what I’ve tended to find in my searches.
The SATA interfaced M.2 cards have a B-M Key. This means they’ll fit in either a B-keyed M.2 socket or an M-Keyed M.2 socket.
So Which Key Type Do I Need?
Remember that we said the GeoFlex 2 in 1 has a B-Key socket inside that little expansion hatch on the bottom? This means that potentially either a NVME Gen3 x2 interfaced card would work (it has the B-Key) or a SATA interfaced card would work (these have both keys).
It turns out – because I’ve tried both the NVME and the SATA card, the only one I could get working was the SATA interfaced card. An image is included below to help you identify what you’re looking for.
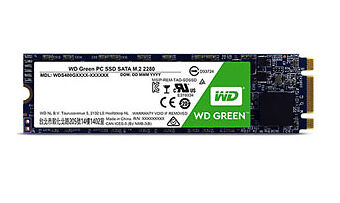
I chose the 120 Gigabyte version because it’s plenty big enough for my needs on this laptop. It was also the cheapest option since I didn’t know at this point if it would actually work. You could go for a much bigger capacity drive if you wish. But if you choose a different drive make certain it’s a SATA interface not an NVME interface. My research suggests any with the dual notch are SATA, but do check before buying. The picture above links to the exact drive I used from Amazon. The other interface types will NOT work to upgrade the storage on the Geo Flex 2 in 1 laptop. They simply won’t be recognised by the UEFI system.
If you click on the picture above, Amazon will show you various other drives that are also compatible if you do want bigger storage capacity.
Western Digital Green or Blue?
I chose the WD Green because there is absolutely no cooling inside this laptop. The WD Green is a low power device and doesn’t, allegedly, generate as much heat as other devices might. It’s not as fast as other devices, but in this case heat is going to be the issue. For this reason I’d recommend sticking with the WD Greens, but feel free to experiment 🙂
Remember though, you MAY be invalidating your warranty. You do so at your own risk and I am not responsible if you do.
I’ve Bought The M.2 SATA Drive, now what?
Next we need to install it. On undoing the two small phillips head screws that hold the expansion hatch in place, you’ll see a very small port toward the edge of the laptop. Your new drive needs to be put into that port.
There’s quite likely to be another small screw attached to a small piece of plastic inside the hatch area. This is an attachment which will allow a 2240 sized drive device to be inserted and affixed. I couldn’t find any of this size, almost everything is 2280 anyway. So I removed the piece of plastic and stored it safely in case I ever need it again. If you’re using 2280 size you won’t need it and it’ll be in the way if you don’t remove it.
Caution – It’s Upside Down!
When attempting to insert the card into the port, bear in mind, this port is upside down. The main board on which it is attached faces upwards, into the inside of the laptop. So when you’re inserting the new drive device you need to be looking at the back of it.
Inserting the device is extremely fiddly. Take care not to touch any of the components on the board. Line the card up with the port and gently push the device into the port. If you have everything lined up correctly the device shouldn’t take too much to push it in.
You’ll need to go at a very flat angle. Otherwise there’s a strong chance that you’ll end up doing what I did and insert the card underneath the port. Clearly, it won’t work if it’s not inserted correctly. You’ll know if you’ve got it right. The card should snap into position and clip under the small plastic clip at it’s far end. If it’s inserted underneath the port it won’t lie flat and will be difficult to clip in. And it won’t work.
Is It Worth Upgrading The Storage On The Geo Flex 2 in 1 Laptop?
In a word. Yes.
The extra capacity on its own makes this upgrade worth it – but it is a bit of a faff. You’ll likely need to reinstall Windows once you’ve done it. To do this you’ll need to make sure you have all the GeoFlex drivers. I’ll give you details later in the post on how to do that.
But, another spin off benefit ( haha, spin off – hard drives, see what I did there? ) of this upgrade is that the eMMC storage that comes with the laptop is pretty slow. You can google eMMC versus SATA for the reasons why and how different they are performance wise.
I’ve found the laptop to be much quicker to boot up, and much quicker to switch between applications that are already running. Copying files around is a LOT quicker and opening new applications up is much snappier.
For the £30.00 I paid for the WD Green SATA M.2 this has to be the best upgrade to this laptop you can make.
How Do I Use It Once It’s Installed?
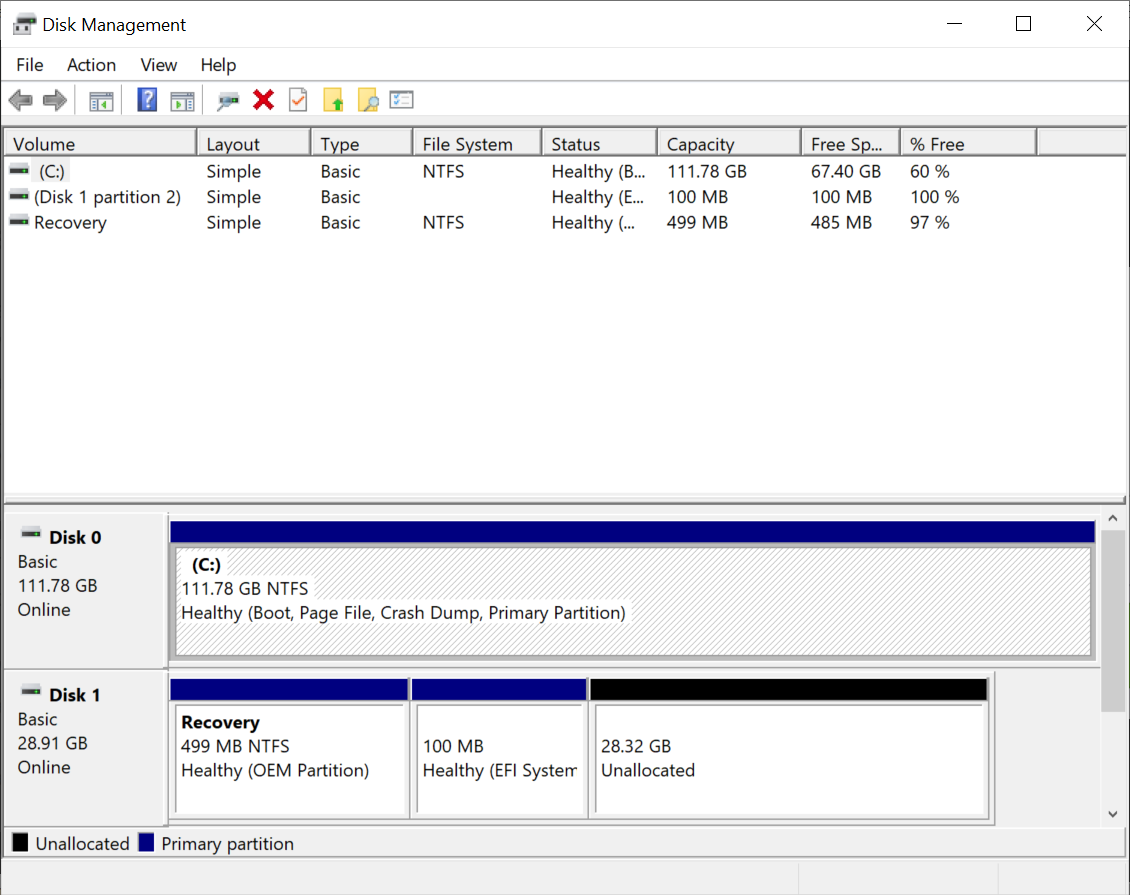
For me, I didn’t have to do anything in the BIOS/UEFI settings. It just showed up as a SATA Port when I restarted Windows. But you do need to open up the Disk Management application and partition and reformat the drive into something usable.
You can choose whether to use the drive as an additional drive, or whether you want to reinstall Windows.
Reinstalling Windows
The benefit of re-installing Windows is that you’ll get a nice clean install, which should run nice and fast. You’ll also want to install Windows on to the new SATA drive. This drive is much quicker than the eMMC that the GeoFlex came with. This will give your little laptop a great boost.
I also just find it tidier to have everything on the one drive rather than some stuff on a USB drive and the system on a separate drive.
But, you’ll need to make sure that you have all the necessary GeoFlex drivers. And you’ll need to install Windows from a USB key. You’ll need at least an 8 Gigabyte USB storage key for this. A good USB key for this purpose is the SanDisk 64Gigabyte UltraFit USB 3 key, also available at Amazon. It’s the one I used. Once the reinstall is done you can use it for other things.
Create Windows 10 Installation Media
Doing this needs to be done on your laptop before you attempt to re-install, although you can do it from another machine it’s just easier to do it before you destroy the existing data and operating system. Navigate to
https://www.microsoft.com/en-gb/software-download/windows10 in your browser and follow the instructions for that. If the link above doesn’t work for you, just Google ‘Download Windows 10 ISO’ and you’ll get taken to the right place anyway.
I told the Windows 10 Installation Media creation tool to download as an ISO and then I use a tool called Rufus to create the USB drive, although the Windows creation tool will create a bootable USB key I like having the ISO around in case I want to play with something later, or re-use the USB key in the meantime. Rufus will make a good job of creating the disk for you. You’ll need to use GPT Partition tables and UEFI bootable drive to make it work on the GeoFlex.
Getting The GeoFlex Drivers
I had cause some time ago to write to GeoFlex and tell them that I’d had to re-install Windows from scratch (in this case I had destroyed my Windows partitions completely and installed Neverware’s Cloud Ready Chromium OS).
When I reinstalled Windows a good proportion of the drivers were actually automatically found. However, some weren’t. And some were but didn’t work properly. Notably the keyboard and screen accelerometer’s which come with Windows were quite problematic and didn’t detect when the laptop was being used as a tablet. GeoFlex drivers fix that.
Geo’s support team provided me with a link to download the drivers, along with helpful instructions on how to install them easily. You can get the instructions and details from GEO download and install drivers.pdf
Please be aware that it’s possible the link above will break at some point and I’m not sure how happy Geo will be with me sharing it. If they ask me to remove it I will, although the drivers are only useful on their hardware and hopefully this article will help people realise how good their hardware actually is. If the link does break, visit https://geo-computers.com/ and request their support.
I’d save the drivers to another USB drive somewhere, or put them in your Google Drive account or something – you never know when you’ll want them again in the future.
Booting From The USB
In order to reinstall Windows on to your new hard drive you’re going to need to boot from the USB media that Windows Media Creation Tool made for you. To do this, you need to change the boot order of the Geo Flex 2 in 1 laptop because by default it will only ever boot straight into Windows.
I haven’t managed to find a nice key combination like some laptops have in order to boot from a USB as a one off. Instead, I’ve had to go into the UEFI/BIOS settings and adjust the boot order in there. If you know of a key combination to do it once off please leave a comment for me!
To reboot into the UEFI boot manager you’ll need to reboot Windows using the Troubleshooter tool. In the Cortana box to the left, type ‘troubleshoot settings’ then click the suggestion. Then click the ‘Recovery’ option and then the ‘Restart now’ button. This will restart your PC and from there you’ll need to choose the options to enter the UEFI/BIOS setup screens, which require another restart.
Once in the UEFI management screens, choose Boot and choose the USB key you created as the first boot option. Then choose the Save and Exit option and it should boot from the USB key. Bear in mind that if it doesn’t, but instead boots straight back in to Windows, you’ve got something wrong somewhere. Leave me a comment and I’ll try to help. I may even do a video walkthrough of how to do this as it’ll probably be better explained that way.
Installing Windows
Installing Windows is a case of following all the prompts, but pay special attention to which drive you are installing to. The new drive will be the one that is bigger!
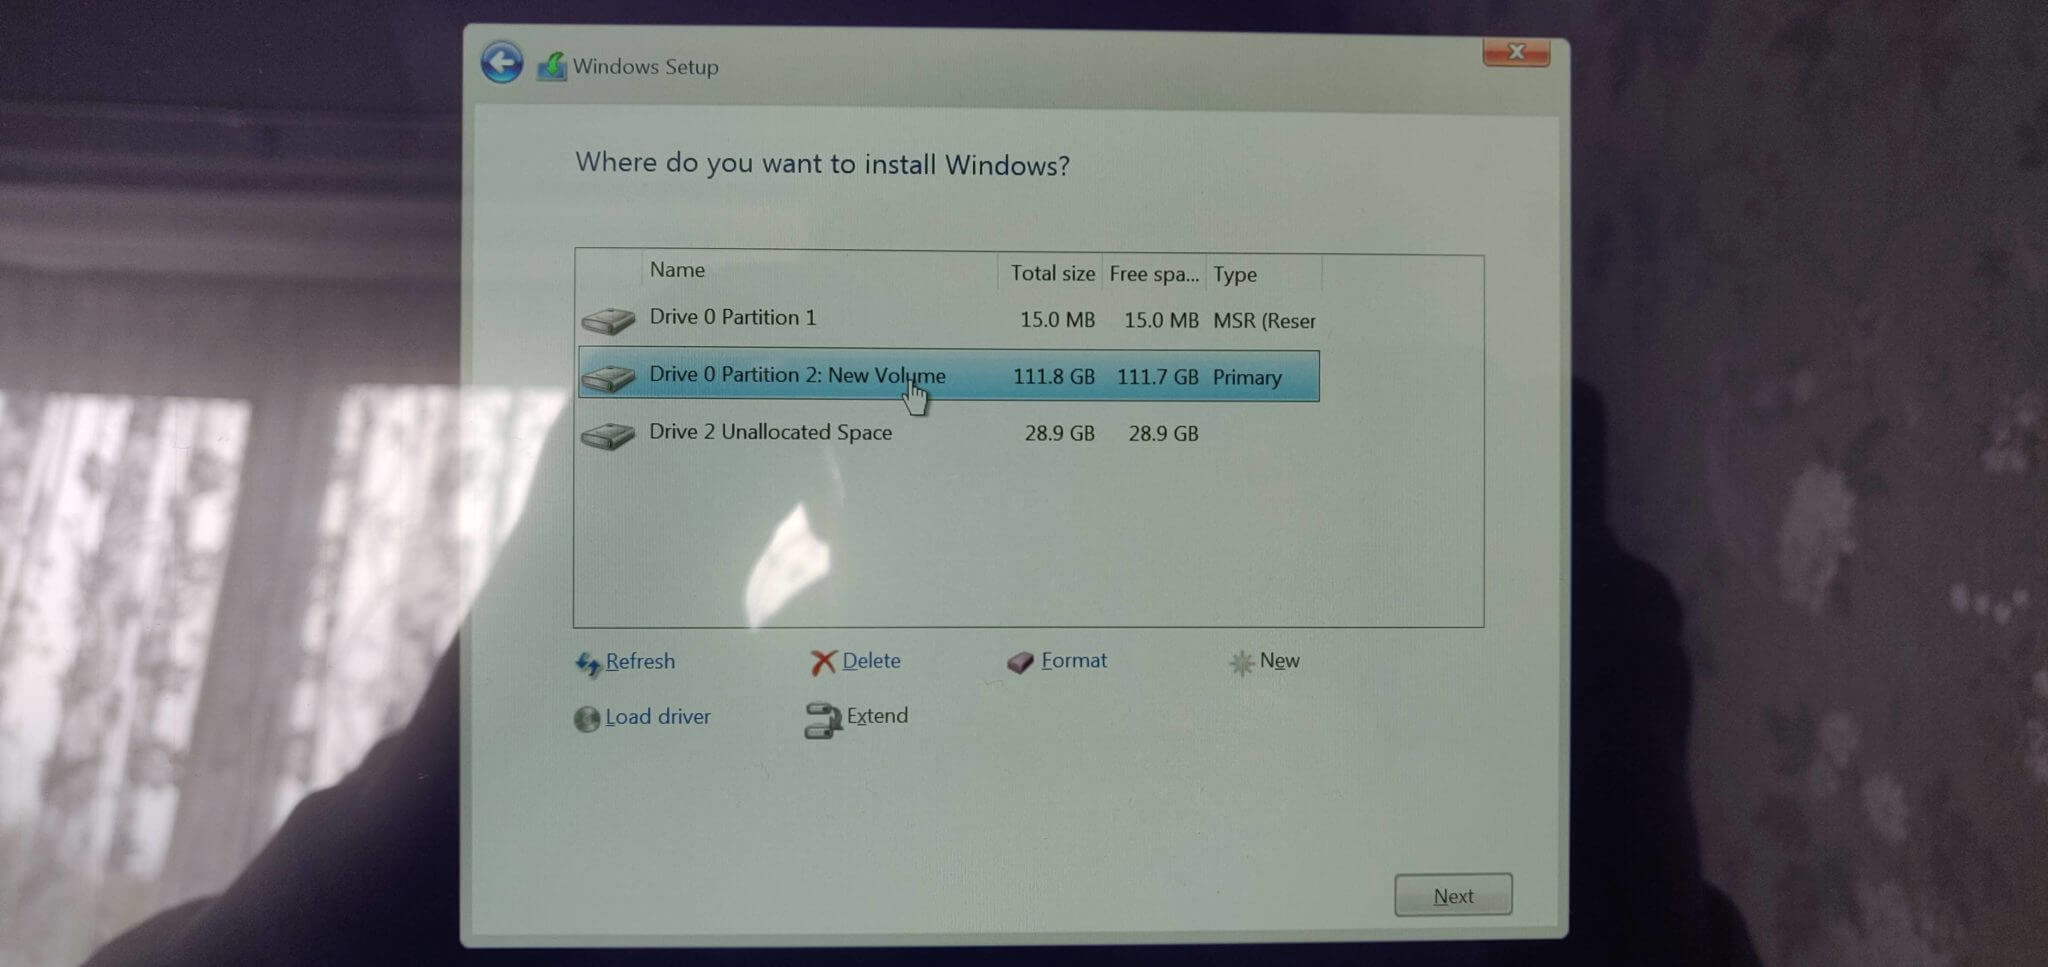
For me, I decided to delete the partitions from the original drive because I wanted to make sure that my system was booting from the faster and larger SATA drive. But only do this if you’re sure you have everything backed up somewhere else and can restore all your data files. I use Google Drive for this purpose so it never matters if I delete a whole computer. At the moment I’ve not even reformatted it because I don’t think I’ll actually need to use it.
Some Basic Performance Benchmarks
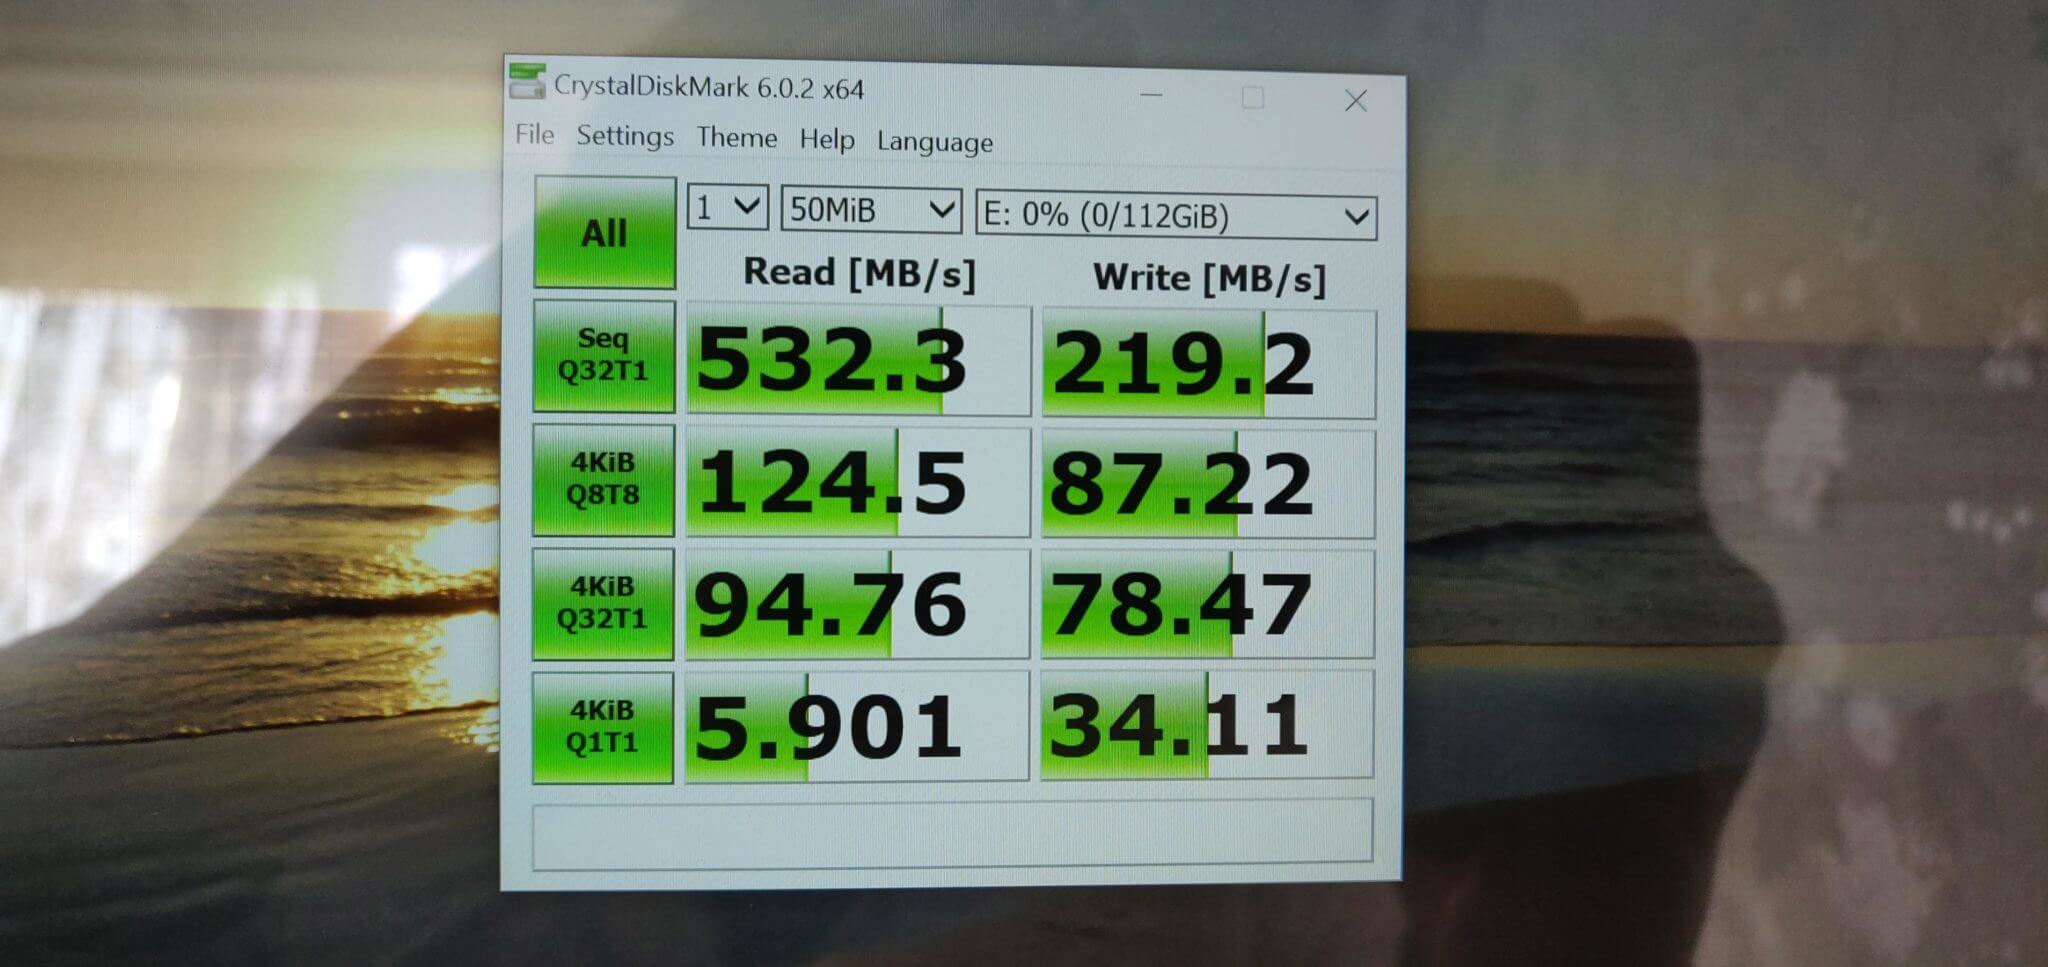
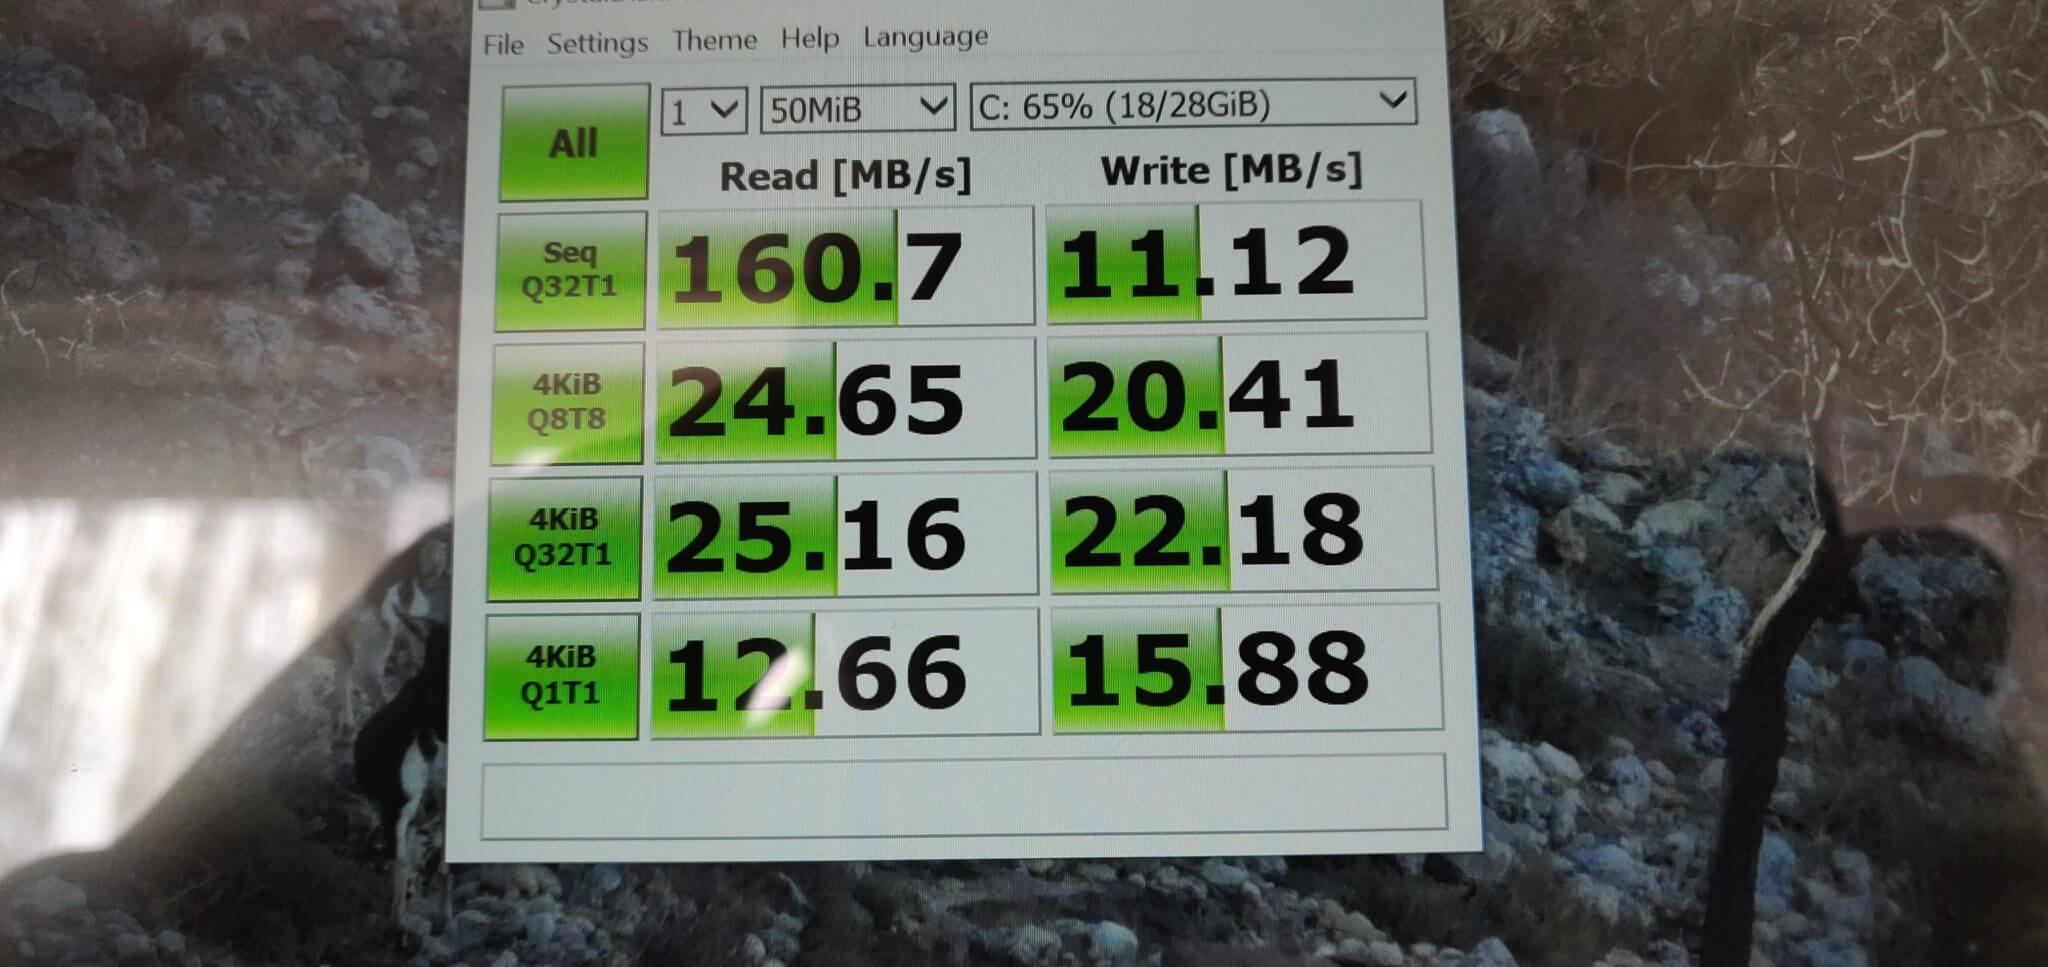
I’m not all that familiar with what all that means to be fair. Someone who is better at it than I can leave a comment hopefully and explain it all. But suffice to say, it is an indication of how much data is transferred from the hard drives to the application per second. So a higher number is better. You would expect the SATA interface to outperform the eMMC on more complex operations and this seems to bear it out.
The laptop definitely feels snappier and has a LOT more storage space available. For £30 quid or so I’ve quadrupled the amount of storage space and given the laptop a speed boost at the same time.
Massive kudos and respect to Geo Computers for including an M.2 SATA port in their laptop. This makes this laptop one of (if not the) best budget laptop I’ve seen for a very long time. For some of my other reasons for liking this laptop, read my review of the GeoFlex 2 in 1 Laptop here.
Where To Buy?
Both boxes may generate a commission for me if you purchase at either Curry’s PC World or Amazon as a result of clicking through. If you’ve found this article useful and don’t mind me getting a commission please use the boxes above. Otherwise, if you prefer, you can search for the terms mentioned above on Google and avoid any commissions. The price you pay will be the same though, regardless of any commissions that may or may not be paid to me.


